How to Flush DNS: A Step-by-Step Guide for Windows, macOS, Linux, and Web Browsers
If you’ve ever experienced website loading issues, slow browsing speeds, or seen the dreaded “DNS_PROBE_FINISHED_BAD_CONFIG” error, you’re not alone. These issues often stem from problems with the Domain Name System (DNS).
Thankfully, there’s a simple solution—flushing your DNS cache. This guide will walk you through everything you need to know about flushing DNS, why it’s important, and how to do it on various platforms, including Windows, macOS, Linux, and web browsers.
Table of Contents
Understanding DNS cache and how to flush it can be a valuable tool for troubleshooting internet connection problems like inaccessible websites and 404 errors. This risk-free procedure can also offer additional security benefits.
This article will first explain what DNS cache is, then provide instructions for flushing it across various operating systems and web browsers.
What Is DNS, and Why Does Flushing It Matter?
DNS is like the phonebook of the internet. It translates human-friendly domain names (like www.aveshost.com) into IP addresses that computers use to communicate. Your device stores these translations in a DNS cache to speed up browsing.
However, over time, this cache can become outdated or corrupted, leading to browsing issues. Flushing the DNS cache removes old data and forces your device to fetch fresh DNS records, solving many connectivity problems.
Common Reasons to Flush Your DNS Cache
Flushing your DNS cache can resolve several issues:
- Website problems: Clearing the cache forces your system to retrieve fresh website information from the DNS server, resolving potential errors or corrupted data.
- DNS spoofing: Resetting your DNS ensures your system uses valid records, preventing redirection to malicious websites due to DNS manipulation.
- DNS server changes: Flushing the cache removes outdated information from your previous DNS server, preventing conflicts when switching providers.
- Faster DNS propagation: if you host a website, flushing the DNS on your local machine can speed up access to your site after updates by forcing a refresh of DNS information.
How to Flush DNS Cache on Different Operating System (OS)
Flushing the DNS cache requires different steps depending on your operating system. Below, we outline the process for the three most common OSs: Windows, macOS, and Linux.
How to Flush DNS Cache in Windows
For Windows, the steps to flush the DNS cache are generally consistent across most versions, particularly the newer ones. Here’s how you can do it:
For Windows 10 and 11:
- Press
Win + Sto open the search bar. - Type Command Prompt, right-click it, and select Run as Administrator.
- In the Command Prompt, type:
ipconfig /flushdns - Press
Enter. You’ll see a confirmation message: “Successfully flushed the DNS Resolver Cache.”

For Older Windows Versions:
The process is similar, but ensure your Command Prompt is running with administrative privileges.
How to Flush DNS Cache in macOS
- Open Terminal from Applications > Utilities.
- Based on your MacOS version, type the following command to flush the DNS cache:
- macOS Big Sur (11), Monterey (12), Ventura (13), Sonoma (14), and Sequoia (15):
sudo dscacheutil -flushcache; sudo killall -HUP mDNSResponder - macOS El Capitan (10.11), Sierra (10.12), High Sierra (10.13), Mojave (10.14), or Catalina (10.15):
sudo killall -HUP mDNSResponder - macOS Yosemite (10.10):
sudo discoveryutil udnsflushcaches - macOS Lion (10.7), Mountain Lion (10.8), or Mavericks (10.9):
sudo killall -HUP mDNSResponder - macOS Snow Leopard (10.6):
sudo dscacheutil -flushcache - macOS Leopard (10.5):
sudo lookupd -flushcache
- macOS Big Sur (11), Monterey (12), Ventura (13), Sonoma (14), and Sequoia (15):
- Enter your admin password when prompted.
For Older macOS Versions:
Use this command in Terminal:
sudo killall -HUP mDNSResponderNo confirmation message appears, but the DNS cache is flushed.
How to Flush DNS Cache in Linux
Depending on your Linux distribution and its DNS service, you’ll need to use different commands to flush the DNS cache.
For Ubuntu and Debian-Based Systems:
- Open your terminal.
- Use the following command to restart the DNS service:
sudo systemd-resolve --flush-caches - Optionally, verify it’s flushed with:
sudo systemd-resolve --statistics
For Other Linux Distros:
Restarting the nscd service clears the cache:
sudo service nscd restartIf nscd is not installed, install it using:
sudo apt-get install nscdHow to Flush DNS Cache on Web Browsers
Sometimes, browsers maintain their own DNS cache. Here’s how to clear it:
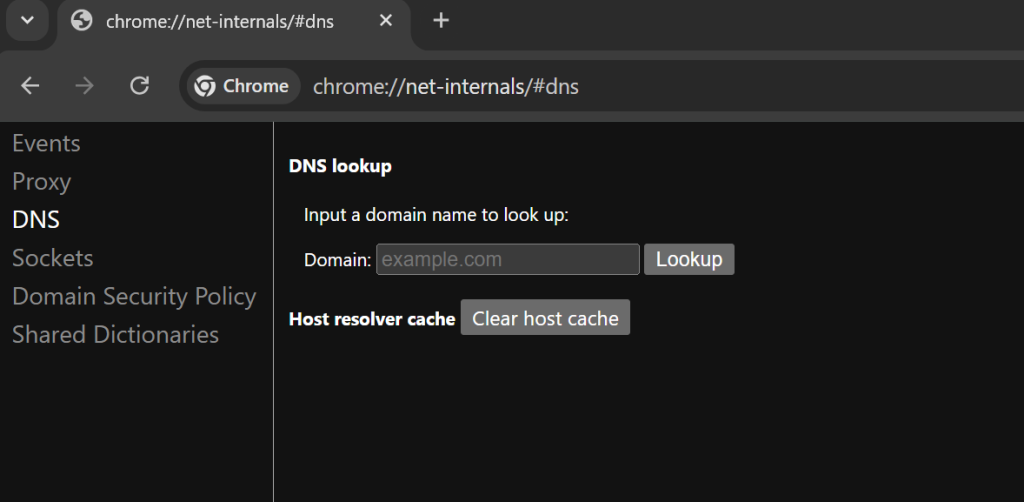
Google Chrome:
- Open a new tab and go to:
chrome://net-internals/#dns - Click Clear host cache.
Mozilla Firefox:
- Type
about:networkingin the address bar and hitEnter. - Navigate to the DNS section.
- Click Clear DNS Cache.

Microsoft Edge:
- Type
edge://net-internalsin the address bar and hitEnter. - Navigate to the DNS section.
- Click Clear DNS Cache.

Opera
- Type
opera://net-internalsin the address bar and hitEnter. - Navigate to the DNS section.
- Click Clear DNS Cache.
Tips for a Smooth DNS Flushing Process
- Restart Your Device: After flushing DNS, restarting ensures all changes take effect.
- Clear Browser Cache: Along with DNS, clear your browser’s cache for a clean start.
- Update DNS Settings: If you’re still experiencing issues, consider switching to a public DNS like Google (8.8.8.8) or Cloudflare (1.1.1.1).
When to Seek Additional Help
If flushing the DNS cache doesn’t resolve your issue, the problem may lie elsewhere:
- Router Cache: Restart your router to clear its DNS cache.
- ISP Issues: Contact your Internet Service Provider if problems persist.
- Hosting & Domain Issues: Contact Aveshost Support if issues persist.
- Advanced Configuration: Network settings or firewalls may need adjustment.
Conclusion
The DNS cache, while designed to optimize website loading times, can become a source of connectivity issues due to data corruption or obsolescence.
This article has outlined the procedures for flushing the DNS cache across various operating systems and web browsers. These procedures typically involve utilizing command-line interfaces with administrative privileges or accessing dedicated browser settings.
Regular maintenance of the DNS cache through flushing is recommended to mitigate connectivity problems and enhance security against DNS spoofing.
How to Flush DNS Cache FAQ
What is DNS and why would I need to flush the DNS cache?
DNS (Domain Name System) translates domain names into IP addresses that computers use to communicate. Your device stores these translations in a DNS cache to speed up browsing. Flushing the DNS cache removes outdated or corrupted data, forcing your device to fetch fresh DNS records, which can resolve website loading issues, slow browsing speeds, and errors like ‘DNS_PROBE_FINISHED_BAD_CONFIG’.
How do I flush the DNS cache on Windows 10 or 11?
1. Press Win + S to open the search bar. 2. Type ‘Command Prompt’, right-click it, and select ‘Run as Administrator’. 3. In the Command Prompt, type: ipconfig /flushdns and press Enter. You’ll see a confirmation message: ‘Successfully flushed the DNS Resolver Cache.’
How do I flush the DNS cache on macOS (Big Sur, Monterey, Ventura, Sonoma, Sequoia)?
1. Open Terminal from Applications > Utilities. 2. Type the command: sudo dscacheutil -flushcache; sudo killall -HUP mDNSResponder 3. Press Enter and enter your admin password when prompted. No confirmation message appears, but the DNS cache is flushed.
How do I flush the DNS cache on Ubuntu or Debian-based Linux systems?
1. Open your terminal. 2. Use the command: sudo systemd-resolve –flush-caches 3. Optionally, verify it’s flushed with: sudo systemd-resolve –statistics
How do I clear the DNS cache in Google Chrome?
1. Open a new tab and go to: chrome://net-internals/#dns 2. Click the ‘Clear host cache’ button.
What are some common reasons to flush my DNS cache?
Common reasons include: resolving website loading problems or errors, preventing DNS spoofing/redirection to malicious sites, clearing outdated information after changing DNS servers, and speeding up DNS propagation after website updates.
What should I do if flushing the DNS cache doesn’t solve my problem?
If issues persist, try these steps: 1. Restart your device and router to clear router cache. 2. Clear your browser’s regular cache. 3. Update your DNS settings to a public DNS like Google (8.8.8.8) or Cloudflare (1.1.1.1). 4. Contact your Internet Service Provider (ISP) or hosting provider (like Aveshost Support) for further assistance, as the issue may be related to network settings, firewalls, or domain/hosting problems.