
To self-host Supabase on a VPS with Docker and HTTPS, provision an Ubuntu server with at least 4 GB of RAM and 2 vCPU cores, install Docker Engine and the Docker Compose plugin, clone the official supabase/docker directory, replace every default secret inside the .env file (POSTGRES_PASSWORD, JWT_SECRET, ANON_KEY, SERVICE_ROLE_KEY, and DASHBOARD_PASSWORD), bind Kong’s HTTP gateway port to 127.0.0.1:8000, and place a reverse proxy such as Caddy or Nginx with Let’s Encrypt TLS in front of port 8000.
Self-hosting Supabase gives you full ownership of your PostgreSQL 15 database, predictable monthly server costs, unrestricted database size up to your VPS disk capacity, and complete control over data residency—without losing the developer experience of Supabase Studio, GoTrue authentication, PostgREST auto-generated APIs, Realtime WebSockets, or S3-compatible Storage.
Key Takeaways
- Size your VPS for a 12-container stack: A production self-hosted Supabase instance runs PostgreSQL, Kong, GoTrue, PostgREST, Realtime, Storage, Supavisor, and Supabase Studio simultaneously—start with at least 4 GB RAM and 2 vCPU cores (8 GB RAM recommended for active production workloads).
- Never deploy with default
.env.examplekeys: Every default JWT secret and database password in the public repository is publicly known. Always generate fresh cryptographic keys before starting the containers. - Keep port 8000 bound to localhost: Docker’s port publishing bypasses standard UFW rules if bound to
0.0.0.0. Bind Kong to127.0.0.1:8000:8000and route all external traffic through an HTTPS reverse proxy on port443. - Enable WebSocket upgrades on your reverse proxy: Supabase Realtime requires HTTP/1.1
UpgradeandConnectionheaders so live database subscriptions work overwss://.
Table of Contents
How to Self-Host Supabase on a VPS: Docker Architecture Overview
Unlike a standalone database container, Supabase’s official Docker setup is a complete backend-as-a-service platform built around PostgreSQL. When you self-host Supabase on a VPS, you do not expose seven different microservice ports to the internet. Instead, every external client SDK request and Studio dashboard session enters through a single reverse proxy on port 443, which forwards traffic to the internal Kong API Gateway (:8000).
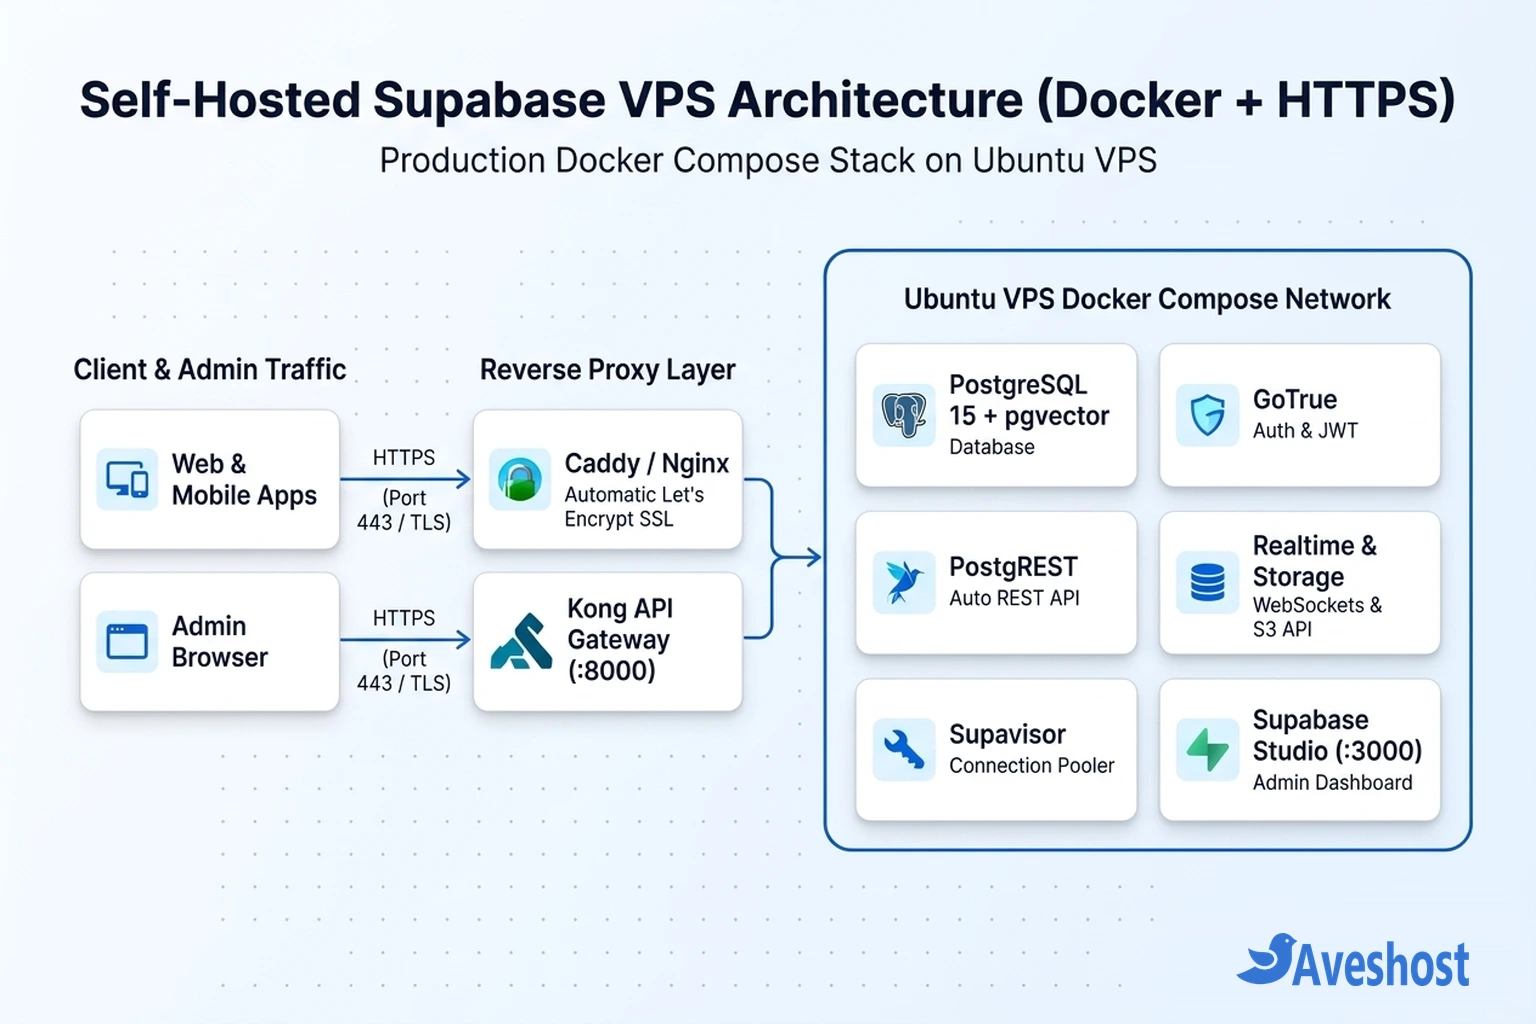
Inside the private Docker bridge network, Kong routes each path to its dedicated container:
/rest/v1/→ PostgREST: Introspects your PostgreSQL schema and exposes instant, Row-Level-Security (RLS) enforced REST endpoints./auth/v1/→ GoTrue: Manages user sign-ups, JWT issuance, magic links, and OAuth logins./realtime/v1/→ Supabase Realtime: Broadcasts PostgreSQL logical replication changes, presence, and broadcast messages over WebSockets./storage/v1/→ Storage API & imgproxy: Handles file uploads, access control policies, and on-the-fly image resizing./(Root) → Supabase Studio (:3000): Serves the web-based visual table editor, SQL workbench, and policy manager, protected by Kong Basic Auth.
VPS Hardware Requirements and Sizing Matrix
Because the Docker Compose bundle launches PostgreSQL, an Elixir virtual machine for Realtime, Kong, Vector log aggregation, Logflare analytics, Supavisor connection pooling, and the Node.js Studio interface, running on a 1 GB or 2 GB server will trigger Linux out-of-memory (OOM) kills. Use the sizing table below to select the right server tier on Aveshost Self-Managed VPS Hosting or Aveshost Ghana VDS:
| Deployment Profile | Minimum vCPU | Minimum RAM | Recommended Storage | Best Fit Use Case |
|---|---|---|---|---|
| Staging / Internal Tools | 2 vCPU Cores | 4 GB RAM (+ 4 GB Swap) | 40 GB SSD / NVMe | MVPs, internal dashboards, dev/staging backends |
| Standard Production SaaS | 4 vCPU Cores | 8 GB RAM | 80–120 GB SSD / NVMe | Production web & mobile apps, Realtime subscriptions, Auth |
| AI / Vector & High-Throughput | 6–8+ vCPU Cores | 16 GB+ RAM | 200 GB+ NVMe | pgvector embeddings (e.g., AI help desks), heavy concurrent writes |
Step 1: Provision Your Ubuntu VPS, DNS, and Firewall
Deploy a clean Ubuntu 22.04 LTS or 24.04 LTS server and point a dedicated subdomain—such as supabase.yourdomain.com or api.yourdomain.com—to your VPS public IPv4 address using an A record in your DNS manager (if you need a domain, register one via Aveshost Domains). If you proxy the subdomain through Cloudflare, set SSL/TLS encryption mode to Full (Strict) after completing Step 6, and make sure security rules do not inadvertently block verification challenges on your API endpoints.
Connect to your VPS over SSH, update system packages, create a 4 GB swap file (for resilience during container startup spikes), and configure UFW so only SSH (22), HTTP (80), and HTTPS (443) are open publicly:
sudo apt update && sudo apt upgrade -y
sudo apt install -y curl git ufw openssl ca-certificates

# Create a 4 GB swap file if none exists
sudo fallocate -l 4G /swapfile
sudo chmod 600 /swapfile
sudo mkswap /swapfile
sudo swapon /swapfile
echo '/swapfile none swap sw 0 0' | sudo tee -a /etc/fstab

# Configure UFW firewall
sudo ufw default deny incoming
sudo ufw default allow outgoing
sudo ufw allow OpenSSH
sudo ufw allow 80/tcp
sudo ufw allow 443/tcp
sudo ufw --force enable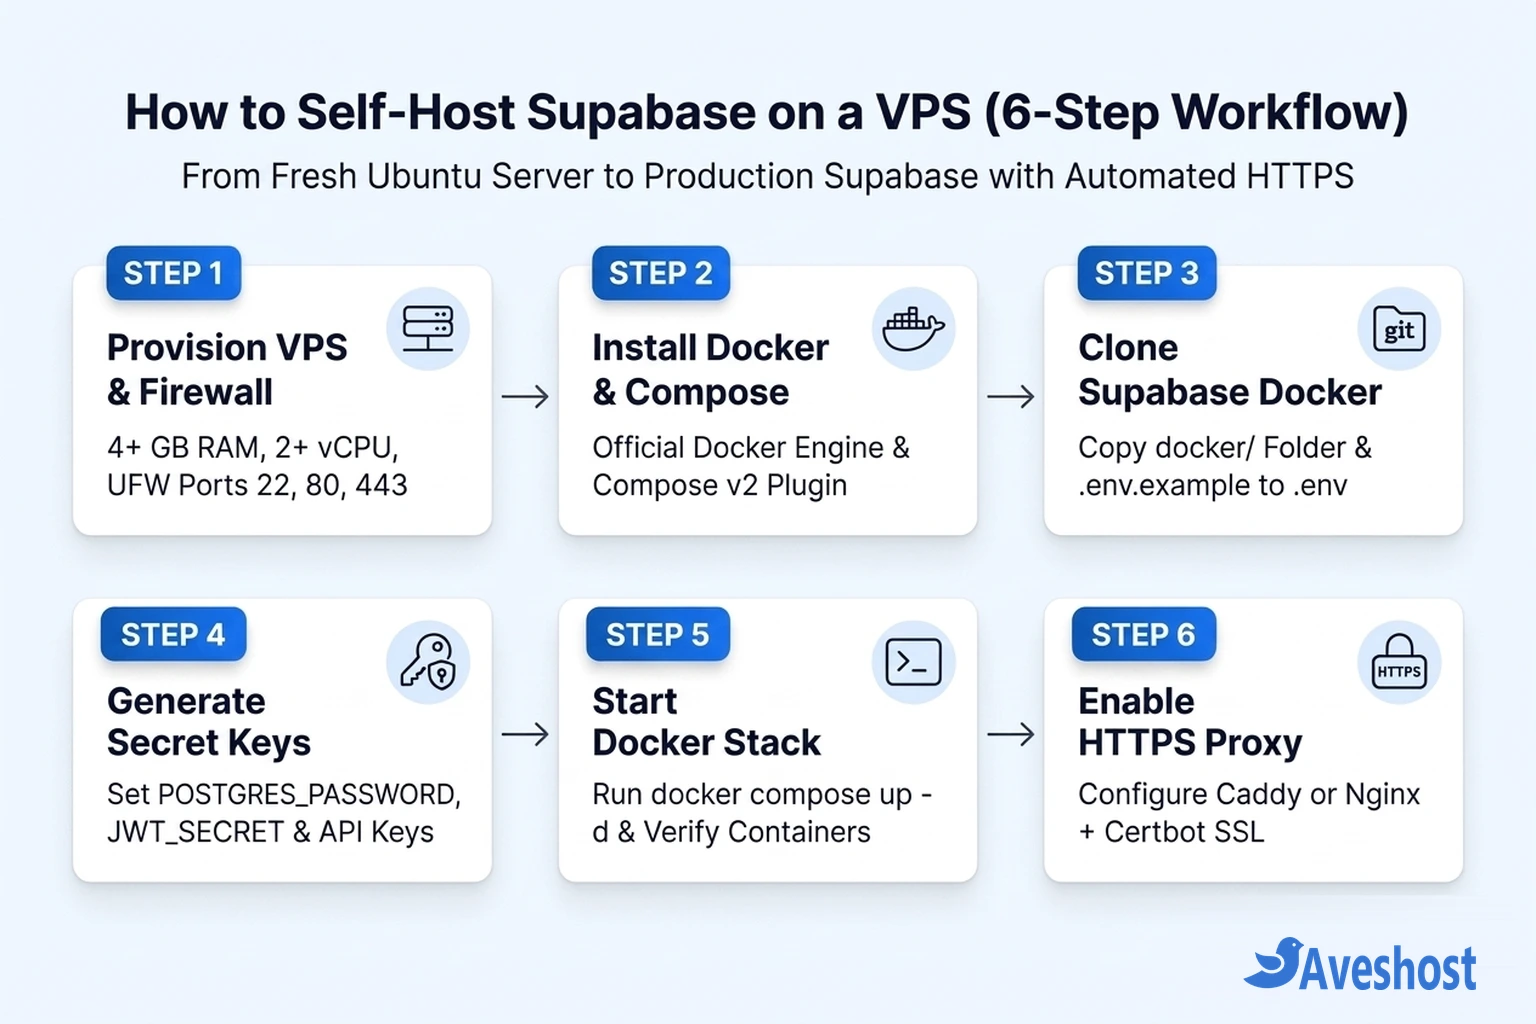
Step 2: Install Docker Engine and Docker Compose v2
Install the official Docker Engine and Docker Compose v2 plugin directly from Docker’s APT repository rather than Ubuntu’s older distribution packages:
curl -fsSL https://get.docker.com | sudo sh
sudo systemctl enable --now docker

# Verify Docker and Docker Compose v2
docker --version
docker compose version
Step 3: Clone the Official Supabase Docker Stack
The main Supabase monorepo is large, so use a shallow clone to download only the latest commit, copy the docker/ deployment folder to /opt/supabase, and create your working .env file from .env.example:
sudo mkdir -p /opt/supabase
cd /opt
sudo git clone --depth 1 https://github.com/supabase/supabase.git supabase-repo
sudo cp -rf /opt/supabase-repo/docker/* /opt/supabase/
sudo cp /opt/supabase-repo/docker/.env.example /opt/supabase/.env
sudo rm -rf /opt/supabase-repo
cd /opt/supabase
Step 4: Generate Cryptographic Secrets and Configure .env
Before starting the containers, you must replace the placeholder credentials in /opt/supabase/.env. Every service in the cluster relies on these core variables:
| Environment Variable | Purpose | Security Requirement |
|---|---|---|
POSTGRES_PASSWORD | Master password for the PostgreSQL database | 32+ character alphanumeric string (avoid @, :, or / to prevent URI parsing errors) |
JWT_SECRET | HMAC-SHA256 signing secret used by GoTrue, Kong, and PostgREST | At least 32–64 random characters |
ANON_KEY | Public client JWT (role: "anon") signed with your JWT_SECRET | Safe for frontend SDKs; strictly enforces PostgreSQL Row Level Security (RLS) |
SERVICE_ROLE_KEY | Admin server JWT (role: "service_role") signed with your JWT_SECRET | Bypasses RLS completely; keep strictly on backend servers, never in browser code |
DASHBOARD_PASSWORD | Password for Supabase Studio basic authentication | Strong unique password paired with a custom DASHBOARD_USERNAME |
SECRET_KEY_BASE & VAULT_ENC_KEY | Encryption keys for Realtime and Supabase Vault | 64-character secret base and exact 32-character Vault key |
Run the official key-generation helper included in /opt/supabase (or generate secrets with OpenSSL):
cd /opt/supabase
# Option A: Run Supabase's built-in secret generator script
sudo bash ./utils/generate-keys.sh

# Option B: Generate clean alphanumeric secrets manually if needed
openssl rand -hex 24   # Use for POSTGRES_PASSWORD and DASHBOARD_PASSWORD
openssl rand -hex 32   # Use for JWT_SECRET and SECRET_KEY_BASE
openssl rand -hex 16   # Use for VAULT_ENC_KEY (32 hex chars)
Next, open /opt/supabase/.env (sudo nano /opt/supabase/.env) and set your public HTTPS domain and transactional email settings (if you need a free transactional relay for testing auth emails, see our guide on how to use the Gmail SMTP server):
SITE_URL=https://app.yourdomain.com
API_EXTERNAL_URL=https://supabase.yourdomain.com
SUPABASE_PUBLIC_URL=https://supabase.yourdomain.com

DASHBOARD_USERNAME=avesadmin
DASHBOARD_PASSWORD=YourStrongDashboardPasswordHere

[email protected]
SMTP_HOST=smtp.yourdomain.com
SMTP_PORT=587
[email protected]
SMTP_PASS=YourSmtpPassword
SMTP_SENDER_NAME=YourApp
Step 5: Lock Down Local Ports and Launch the Containers
By default, Docker’s port mapping (8000:8000) binds to 0.0.0.0 and manipulates iptables directly, which exposes unencrypted HTTP port 8000 to the public internet even when UFW is enabled. To prevent anyone from bypassing your HTTPS reverse proxy, bind Kong’s ports to 127.0.0.1 inside /opt/supabase/docker-compose.yml:
# Inside /opt/supabase/docker-compose.yml under the kong service:
    ports:
      - 127.0.0.1:8000:8000/tcp
      - 127.0.0.1:8443:8443/tcp
Now pull the container images and launch the stack in detached mode:
cd /opt/supabase
sudo docker compose pull
sudo docker compose up -d

# Check that all services report "healthy"
sudo docker compose ps
Verify locally that Kong responds on port 8000 by running curl -I http://127.0.0.1:8000 (it should return an HTTP 401 Unauthorized prompt from Kong’s Basic Auth gate protecting Studio).
Step 6: Enable Automated HTTPS with Caddy or Nginx
To serve your Supabase Studio dashboard and client APIs (https://supabase.yourdomain.com) over TLS with automatic certificate renewal and full WebSocket (wss://) support, install Caddy (the simplest single-file option) or Nginx + Certbot.
Option A: Caddy Reverse Proxy (Automatic Let’s Encrypt SSL)
sudo apt install -y debian-keyring debian-archive-keyring apt-transport-https
curl -1sLf 'https://dl.cloudsmith.io/public/caddy/stable/gpg.key' | sudo gpg --dearmor -o /usr/share/keyrings/caddy-stable-archive-keyring.gpg
curl -1sLf 'https://dl.cloudsmith.io/public/caddy/stable/debian.deb.txt' | sudo tee /etc/apt/sources.list.d/caddy-stable.list
sudo apt update && sudo apt install -y caddy
Replace /etc/caddy/Caddyfile with the following configuration (replace supabase.yourdomain.com with your actual subdomain):
supabase.yourdomain.com {
    encode zstd gzip
    reverse_proxy 127.0.0.1:8000
}
Reload Caddy (sudo systemctl reload caddy). Caddy automatically provisions a Let’s Encrypt TLS certificate, redirects HTTP to HTTPS, and forwards WebSocket upgrades to Kong (127.0.0.1:8000).
Option B: Nginx + Certbot (With WebSocket Upgrade Headers)
If your server already runs Nginx, make sure your server block includes Upgrade and Connection headers so Supabase Realtime WebSockets work properly, then run sudo certbot --nginx -d supabase.yourdomain.com:
map $http_upgrade $connection_upgrade {
    default upgrade;
    ''      close;
}

server {
    server_name supabase.yourdomain.com;
    client_max_body_size 50M;

    location / {
        proxy_pass http://127.0.0.1:8000;
        proxy_http_version 1.1;
        proxy_set_header Upgrade $http_upgrade;
        proxy_set_header Connection $connection_upgrade;
        proxy_set_header Host $host;
        proxy_set_header X-Real-IP $remote_addr;
        proxy_set_header X-Forwarded-For $proxy_add_x_forwarded_for;
        proxy_set_header X-Forwarded-Proto $scheme;
        proxy_read_timeout 86400;
    }
}
You can now open https://supabase.yourdomain.com in your browser, sign in with your DASHBOARD_USERNAME and DASHBOARD_PASSWORD, and connect your frontend or backend apps using:
import { createClient } from '@supabase/supabase-js'

const supabase = createClient(
  'https://supabase.yourdomain.com',
  process.env.NEXT_PUBLIC_SUPABASE_ANON_KEY
)
Production Hardening, Backups, and Safe Upgrades
- Automate Nightly PostgreSQL Backups: Schedule a cron job that runs
docker exec supabase-db pg_dumpall -U postgres | gzip > /backups/supabase.sql.gzand syncs encrypted archives to off-site object storage. - Enable Row Level Security (RLS) on Every Public Table: Because the
ANON_KEYis embedded in browser and mobile apps, any table in thepublicschema without RLS enabled is readable and writable by anyone with your URL and anon key. - Restrict Studio Access by IP (Optional): For high-security environments, restrict the Studio dashboard path in Caddy or Nginx to your office VPN IP while leaving
/rest/v1/,/auth/v1/,/realtime/v1/, and/storage/v1/open to public client apps.
Ready to deploy your own high-performance Supabase cluster? Launch an Ubuntu server on Aveshost Self-Managed VPS Hosting for full root control, choose Aveshost Ghana VDS for dedicated local NVMe performance, or select Aveshost Fully Managed VPS Hosting if you want our engineering team to handle server administration, firewall hardening, and monitoring for you.
Frequently Asked Questions
How much RAM do I need to self-host Supabase on a VPS?
You need at least 4 GB of RAM and 2 vCPU cores (plus a 4 GB swap file) to run the complete self-hosted Supabase Docker Compose stack reliably. For production applications with active users, Realtime WebSockets, or pgvector queries, 8 GB of RAM and 4 vCPU cores is recommended.
Is self-hosting Supabase free?
Yes. Supabase is 100% open-source under OSI-approved licenses (primarily Apache 2.0 and MIT). There are no software licensing fees to self-host Supabase; you only pay for your underlying VPS infrastructure, domain name, and optional off-site backup storage.
Can I host multiple Supabase projects on a single VPS?
A single self-hosted Supabase Docker Compose stack is designed around one PostgreSQL cluster and one Studio project. You can either isolate multiple apps inside the same cluster using separate PostgreSQL schemas and Row Level Security policies, or run separate Docker Compose stacks on a larger VPS (16+ GB RAM) by assigning distinct container names and Kong ports in each stack’s .env file.
How do I update a self-hosted Supabase Docker instance safely?
First, take a full database backup using pg_dumpall and back up your /opt/supabase/.env and volumes/ directory. Then pull the updated docker-compose.yml from the official repository, run sudo docker compose pull, and restart the stack with sudo docker compose up -d.
Does self-hosted Supabase include Edge Functions and Storage?
Yes. The official supabase/docker Compose stack includes the local supabase/edge-runtime container for Deno Edge Functions (loaded from volumes/functions/) as well as the S3-compatible supabase/storage-api and imgproxy containers for file uploads and image transformations.