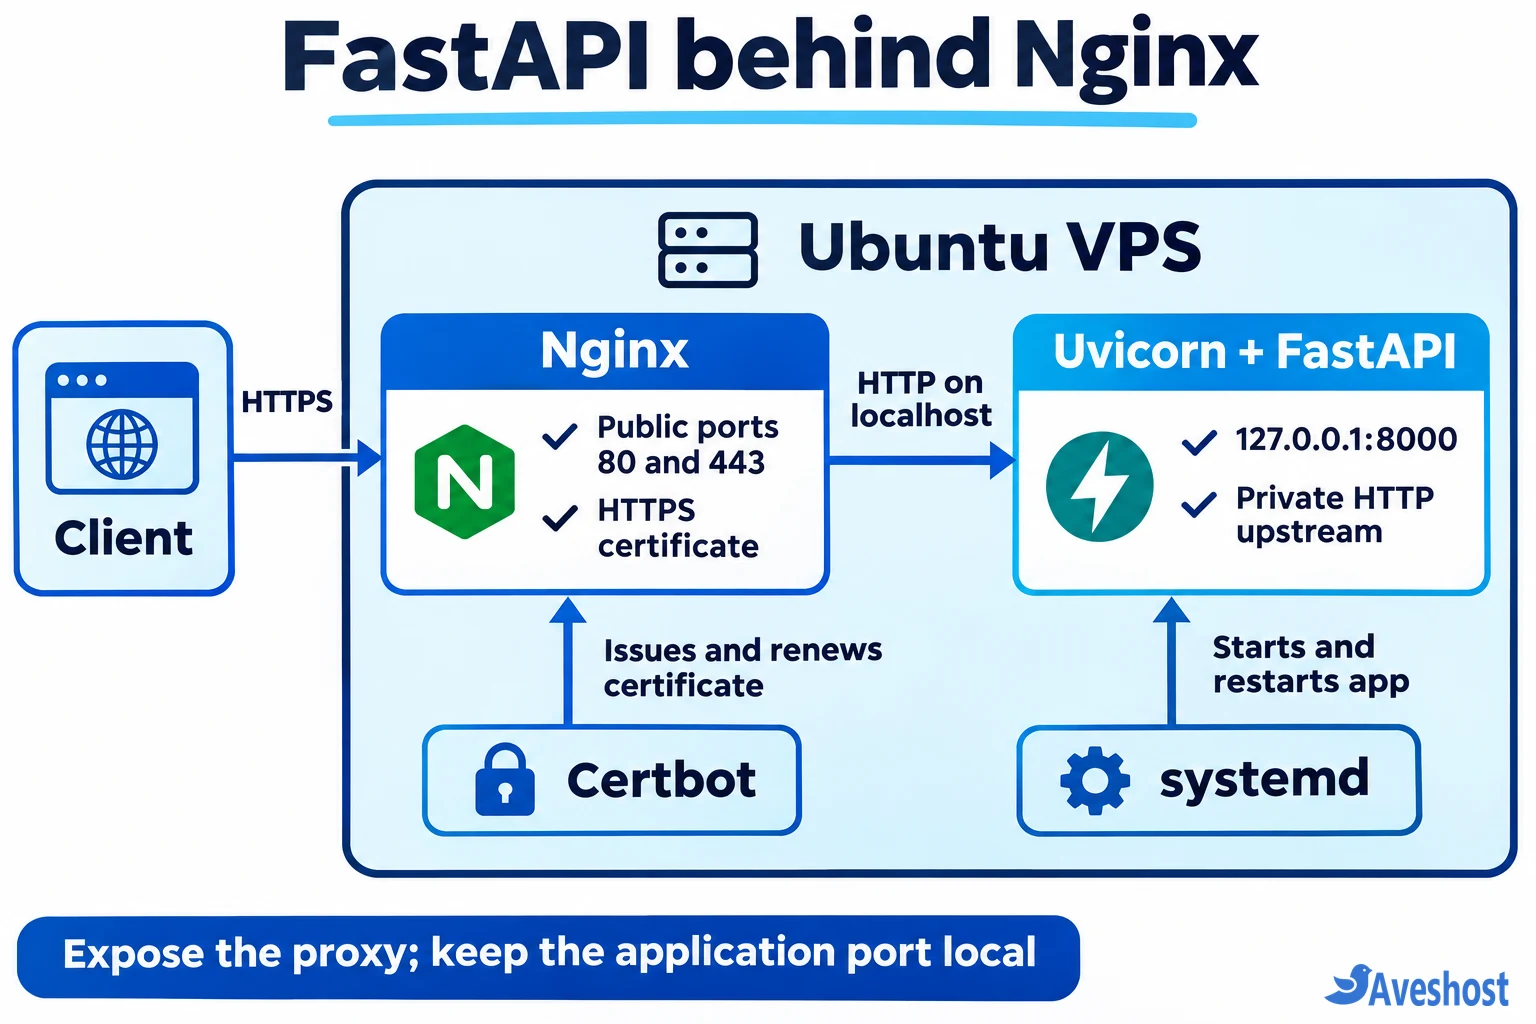
To deploy FastAPI on an Ubuntu VPS, run the application with Uvicorn on 127.0.0.1:8000, supervise it with systemd, and put Nginx in front on ports 80 and 443. Nginx terminates HTTPS while the application remains reachable only through the local upstream.
Our walkthrough takes a small API from a Python virtual environment to a working domain with a renewable certificate. It uses a dedicated service account and includes checks at each layer, so you can identify a failed application, proxy configuration or certificate challenge separately.
Use a fresh Ubuntu 24.04 LTS VPS, SSH access with sudo privileges, and a domain or subdomain you control. Replace api.example.com throughout with your real hostname. This example serves a standard HTTP API at the domain root; it does not configure Docker, WebSockets, streaming, a database or a control-panel-managed Nginx installation.
Table of Contents
1. Prepare the VPS, DNS and firewall
Point the hostname’s A record to the VPS IPv4 address. Add an AAAA record only when IPv6 reaches this same server correctly. Keep an existing SSH connection open and confirm console recovery access before changing firewall policy.
Install the packages used below:
sudo apt update
sudo apt install -y python3-venv nginx curl dnsutils ufw snapd
dig +short A api.example.com
dig +short AAAA api.example.com
For a new server using SSH on port 22, allow SSH and the web-server ports before enabling UFW:
sudo ufw allow OpenSSH
sudo ufw allow 'Nginx Full'
sudo ufw enable
sudo ufw status verbose
If SSH uses another port, allow that actual TCP port first. Preserve existing rules on a server already in use. Apply equivalent access rules to any upstream VPS firewall. Do not open port 8000 publicly. Ubuntu’s firewall guide explains UFW, and its Nginx guide covers the Ubuntu package layout.
For this HTTP-01 certificate workflow, the hostname must be publicly reachable on port 80. Incorrect DNS, including a stale AAAA record, can prevent validation. See Let’s Encrypt’s challenge requirements.
2. Create the application and virtual environment
Create a dedicated system account and project directory. These commands are for a new installation; choose different names if they already exist:
sudo adduser --system --group --home /opt/fastapi fastapi
sudo install -d -o fastapi -g fastapi -m 0755 /opt/fastapi
sudo -u fastapi python3 -m venv /opt/fastapi/.venv
sudo -u fastapi /opt/fastapi/.venv/bin/python -m pip install fastapi uvicorn
The Python virtual environment keeps application packages separate from Ubuntu’s system Python. For an existing project, install its reviewed, pinned requirements instead of replacing them with this demonstration’s dependencies.
Create /opt/fastapi/main.py with sudo nano /opt/fastapi/main.py, paste the following and save:
from fastapi import FastAPI

app = FastAPI()

@app.get("/")
async def root():
    return {"message": "FastAPI is running"}

@app.get("/health")
async def health():
    return {"status": "ok"}
Run the ASGI server in the foreground:
sudo -u fastapi /opt/fastapi/.venv/bin/uvicorn main:app --app-dir /opt/fastapi --host 127.0.0.1 --port 8000In a second SSH session, run curl -fsS http://127.0.0.1:8000/health. Expect {"status":"ok"}. Stop the foreground server with Ctrl+C before starting systemd, freeing port 8000. FastAPI’s server documentation explains the application import string.
3. Keep FastAPI running with systemd
Create an empty environment file for application settings, readable by root and the service group:
sudo install -o root -g fastapi -m 0640 /dev/null /etc/fastapi.envLater, add required NAME=value settings using sudoedit /etc/fastapi.env. The app must explicitly read those settings; creating the file does not configure a database automatically. Keep credentials out of source control and logs.
Create /etc/systemd/system/fastapi.service with sudo nano /etc/systemd/system/fastapi.service and save:
[Unit]
Description=FastAPI application
After=network.target

[Service]
User=fastapi
Group=fastapi
WorkingDirectory=/opt/fastapi
EnvironmentFile=/etc/fastapi.env
ExecStart=/opt/fastapi/.venv/bin/uvicorn main:app --host 127.0.0.1 --port 8000 --workers 1 --proxy-headers --forwarded-allow-ips=127.0.0.1
Restart=on-failure
RestartSec=5
NoNewPrivileges=true
PrivateTmp=true

[Install]
WantedBy=multi-user.target
The absolute executable path removes the need to activate the virtual environment. WorkingDirectory lets Uvicorn import main:app. The service runs as the dedicated account and restarts after failure; repeated failures can still hit systemd’s start-rate limits.
sudo systemctl daemon-reload
sudo systemctl enable --now fastapi
sudo systemctl status fastapi --no-pager
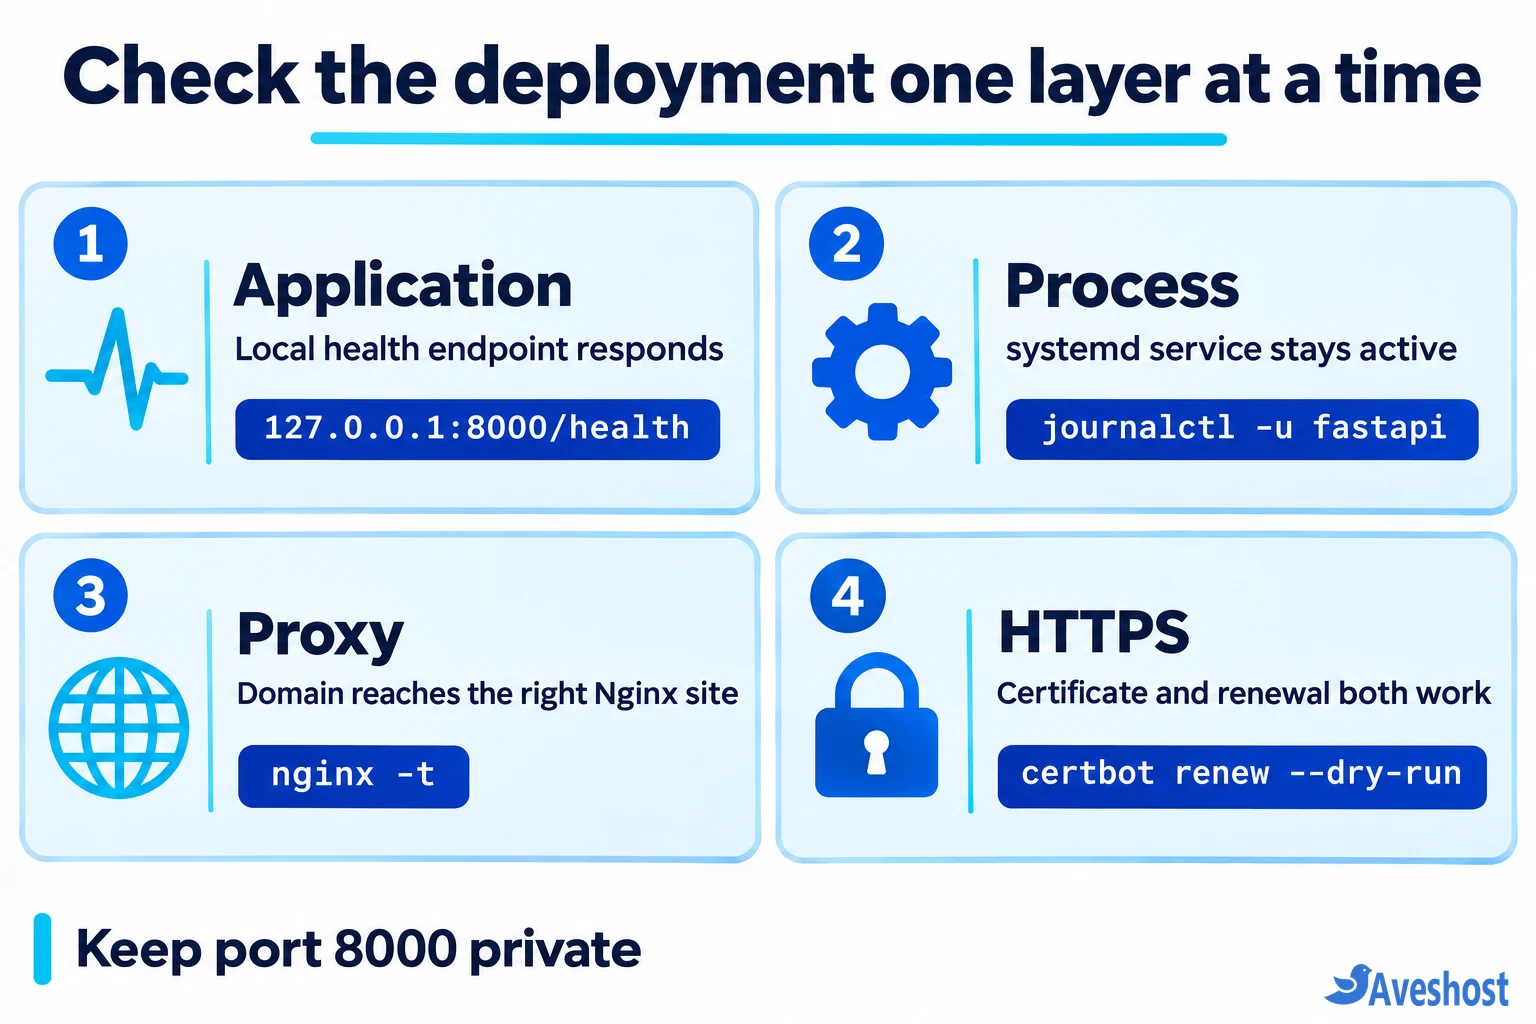
curl -fsS http://127.0.0.1:8000/health
If it fails, inspect sudo journalctl -u fastapi -n 100 --no-pager. See the systemd service reference for supervision and the execution reference for users, directories and environment files.
4. Put Nginx in front of FastAPI
Create /etc/nginx/sites-available/fastapi with sudo nano /etc/nginx/sites-available/fastapi. Use this HTTP configuration first:
server {
    listen 80;
    listen [::]:80;
    server_name api.example.com;

    location / {
        proxy_pass http://127.0.0.1:8000;
        proxy_http_version 1.1;
        proxy_set_header Host $host;
        proxy_set_header X-Real-IP $remote_addr;
        proxy_set_header X-Forwarded-For $remote_addr;
        proxy_set_header X-Forwarded-Proto $scheme;
    }
}
Enable the site, test syntax, then start or reload Nginx:
sudo ln -s /etc/nginx/sites-available/fastapi /etc/nginx/sites-enabled/fastapi
sudo nginx -t
sudo systemctl enable --now nginx
sudo systemctl reload nginx
curl -fsS http://api.example.com/health
Create the symlink only once. On a server hosting other sites, preserve their files and avoid duplicate server_name entries. If IPv6 is disabled at the OS level, omit the IPv6 listen directive rather than publishing a broken AAAA record.
The Nginx proxy module forwards requests to Uvicorn. This single-edge-proxy example overwrites incoming forwarded headers with values from Nginx’s connection; a CDN or additional load balancer requires a separate trusted-proxy design.
Uvicorn trusts proxy headers only from 127.0.0.1 in our service command. Once HTTPS is enabled, that lets FastAPI build correct HTTPS redirects. Avoid trusting every source with a wildcard. FastAPI’s proxy guide explains the trust boundary.
5. Enable HTTPS with Certbot
Confirm the public HTTP hostname returns the health response before requesting a certificate. The endpoint is a harmless demonstration; do not send credentials or sensitive data over HTTP.
This fresh-server workflow uses Certbot’s snap installation. If Certbot already exists through apt or another method, follow its migration instructions instead of mixing installations. Install the snap, then use its explicit executable path:
sudo snap install --classic certbot
sudo /snap/bin/certbot --nginx --redirect -d api.example.com
Follow the prompts for an account email and the certificate authority’s terms. Certbot’s Nginx plugin obtains the certificate and updates the selected site to serve HTTPS and redirect HTTP. Back up an existing Nginx configuration before letting it edit that configuration.
Check the result without bypassing certificate verification:
sudo nginx -t
curl -fsS https://api.example.com/health
curl -fsS https://api.example.com/openapi.json
Visit https://api.example.com/docs and confirm the API documentation loads. HTTPS encrypts transport; it does not authenticate your API’s users. Add the access controls your real endpoints need. The official Certbot instructions cover installation and issuance.
6. Verify renewal and external access
Test automatic renewal and inspect the scheduled jobs:
sudo /snap/bin/certbot renew --dry-run
systemctl list-timers --all
sudo ss -ltnp
Confirm the Certbot renewal timer is present and scheduled. A successful initial certificate does not prove future renewal will work. Keep the required challenge route reachable and monitor expiry independently.
In the listening-socket output, Uvicorn should use 127.0.0.1:8000; Nginx should own the public web listeners. From a workstation outside the VPS, check HTTPS by hostname and verify that port 8000 is unreachable. Test IPv6 separately if the hostname has an AAAA record.
Make a normal API request after a planned reboot and confirm systemctl is-active fastapi nginx reports both services active. The demo health route checks only the process’s HTTP response. For a database-backed app, design readiness checks that also validate critical dependencies without exposing secrets.
7. Troubleshoot the failing layer
Diagnose from the application outward. If localhost is failing, changing DNS or requesting another certificate will not repair the Python process.
Useful logs are sudo journalctl -u fastapi -n 100 --no-pager and sudo tail -n 100 /var/log/nginx/error.log. Redact tokens, cookies and personal data before sharing them. Avoid repeatedly retrying certificate issuance while DNS or network access is still broken.
| Symptom | Check first | Likely action |
|---|---|---|
| 502 Bad Gateway | Local health URL and service logs | Fix import, dependency, process or upstream port |
| Nginx welcome page | DNS and enabled server_name | Route the hostname to the intended site |
| Redirect uses HTTP | Forwarded scheme and trusted proxy IP | Keep Nginx headers and Uvicorn trust aligned |
| Certificate validation fails | Public DNS, port 80 and AAAA record | Correct the challenge path and network reachability |
| 413 or streaming/WebSocket issues | Nginx body limits, buffering and upgrade settings | Configure the application-specific proxy behavior |
8. Deploy FastAPI updates and plan capacity
For application updates, retain a known working release and dependency set, run your tests, deploy the reviewed code, and restart sudo systemctl restart fastapi. Recheck local and public health endpoints. Run daemon-reload before restarting if the unit file changes. A restart can briefly interrupt requests; this single-server setup does not provide zero-downtime releases.
Start with the one worker shown. Increase workers only after measuring CPU, memory and database-connection usage. Each process has its own memory and application state; background tasks or startup jobs may run in each worker. Use shared persistent storage and appropriate job coordination. See FastAPI’s worker guidance.
Protect production documentation and administrative endpoints as appropriate, back up persistent data off-server, monitor errors and disk growth, and keep Ubuntu and dependencies maintained. The empty environment-file creation command is a first-install step; do not rerun it over a populated settings file.
Our self-managed VPS hosting suits teams that want control of this stack. Size the server for your actual workload and management needs; contact our support team to discuss the deployment. Our VPS storage troubleshooting guide is useful when logs or deployment artifacts fill a server.
Frequently asked questions
Do I need Gunicorn to deploy FastAPI on a VPS?
No. This setup uses Uvicorn directly under systemd. Uvicorn can run worker processes itself; choose a process model based on measured load and memory rather than adding a second manager automatically.
Should I run Uvicorn with –reload in production?
No. Reload mode is intended for development. Deploy a reviewed release and restart the supervised service deliberately. Keep the application bound to localhost behind Nginx.
Why does FastAPI work on localhost but return 502 through Nginx?
Compare proxy_pass with the actual listening address and port, then inspect Nginx’s error log. Verify the enabled site configuration and whether the app is still running when the proxy request arrives.
Does my API need its own certificate inside Uvicorn?
Not in this same-host design. Nginx handles public HTTPS and forwards HTTP over loopback. If the upstream moves to another server or network, reassess encryption and trust for that connection.
Can I deploy an existing database-backed FastAPI project this way?
Yes, but add its pinned dependencies, environment settings, database connectivity, migrations, backups and readiness checks. Preserve persistent data outside disposable releases and plan rollback around schema compatibility.