You can start an online radio station in Ghana with a microphone, a reliable internet connection and a Linux VPS running Icecast. Churches, community organisations and independent broadcasters can share sermons, interviews and programmes through a website player that listeners open on their phones.
The VPS distributes your audio to the audience, while an encoder sends the programme from your studio. This keeps listener connections off the studio computer and gives you a streaming setup you can manage and expand.
This Aveshost guide walks through a fresh Ubuntu server deployment, a protected studio connection and an HTTPS player. We also cover costs in Ghana cedis, listener traffic and the work needed to keep programmes available outside live broadcasting hours.
Table of Contents
Decide what your online station will broadcast
Choose a clear audience and a realistic schedule. A church may begin with Sunday services and a weekly teaching programme. A community station may focus on local interviews, announcements and language-specific shows. A newsroom may publish scheduled discussions rather than leaving a silent player online all day.
- Audio equipment: a microphone or mixer output, headphones and a computer with a suitable audio input.
- Studio connection: stable upload bandwidth, backup internet where practical and a power plan for live programmes.
- Streaming infrastructure: a Linux VPS, a domain or subdomain, and a person responsible for its upkeep.
- Listener experience: a mobile-friendly page with a clear play button, programme schedule and contact details.
Set expectations before launch. A VPS can keep the streaming server running while your studio is offline, but it cannot transmit live audio from a computer that has lost power or internet. Recorded programming needs a separate source that continues sending audio.
Confirm broadcasting and music rights
An internet stream reaches listeners through their data connection. It is a different delivery method from transmitting an FM signal, but your organisation should still confirm the obligations for its activities. Check with the National Communications Authority about the authorisations relevant to your proposed service, especially if you also operate an FM, AM or other broadcast outlet.
Clear the rights for what you broadcast. Buying a song or subscribing to a consumer music service does not automatically grant permission to rebroadcast it. Contact GHAMRO and the relevant rights holders about the permissions and licences needed for your music use, including online distribution.
For church online radio streaming in Ghana, check the rights for recorded worship music, backing tracks and performances as well as commercial songs. Obtain appropriate permission for guest interviews and recordings. Keep a record of approved content and any restrictions on replaying or archiving it.
Build your station around original programmes and properly cleared material. Include rights and content review in your launch checklist alongside the technical setup.
Understand the studio-to-listener workflow
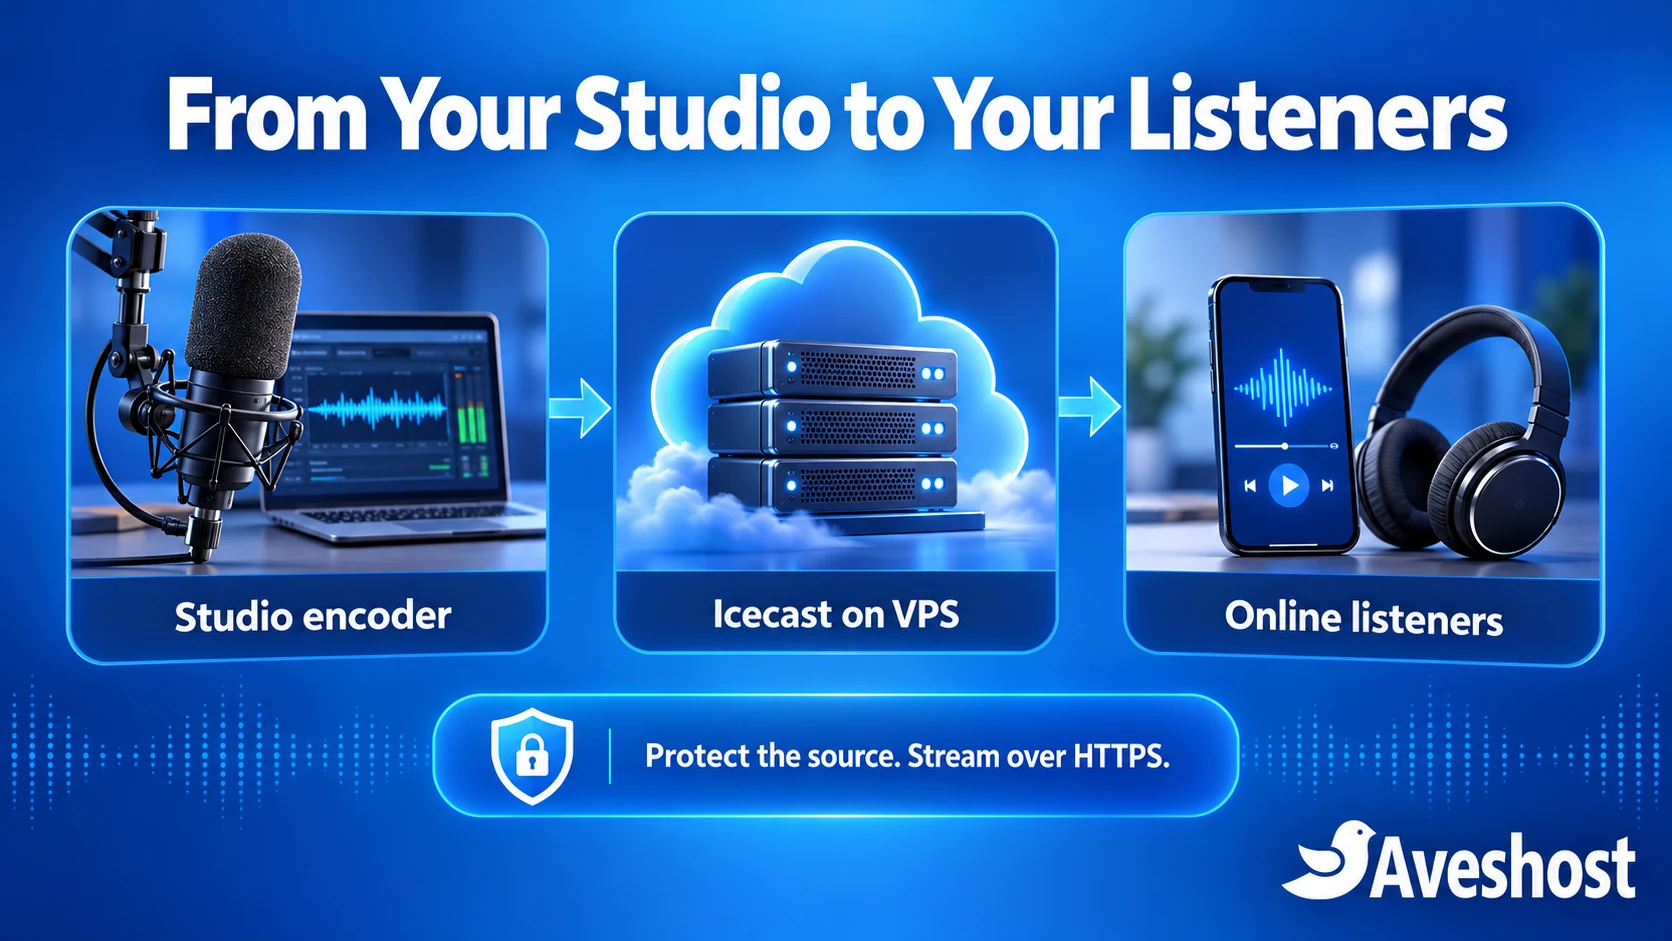
The Icecast basic setup documentation explains the two main parts: a streaming server and a source client. The source client encodes your studio audio and sends it to Icecast. Icecast then distributes that stream to connected listeners.
A mountpoint identifies the stream. In this tutorial, it is /live.mp3. Your public listening address will be https://stream.example.com/live.mp3, after you replace the example hostname with your own subdomain.
| Part | Role in this setup |
|---|---|
| Studio encoder | Captures microphone or mixer audio and sends an MP3 stream |
| SSH tunnel | Protects the studio connection to the private Icecast port |
| Icecast | Receives the source and distributes audio |
| Nginx with HTTPS | Publishes the listening URL without exposing administration |
| Website player | Lets visitors start playback from your station page |
Icecast distributes the audio it receives; it is not a complete studio mixer or playlist scheduler. Keep that distinction clear when planning live shows and unattended programming.
Choose an Aveshost VPS and set your budget
Our self-managed VPS hosting gives you root access and SSD storage for your streaming stack. For a modest single-stream station, start by comparing the resources and monthly traffic allowance, then test your intended audience size.
| Aveshost plan | Resources | Monthly traffic | Monthly price |
|---|---|---|---|
| Cloud VPS 1 | 1 vCore, 2 GB RAM, 20 GB SSD | 1 TB | GH₵100 |
| Cloud VPS 2 | 4 vCores, 8 GB RAM, 100 GB SSD | 32 TB | GH₵170 |
| Cloud VPS 3 | 6 vCores, 12 GB RAM, 200 GB SSD | 32 TB | GH₵300 |
Prices and product information were reviewed at the time of writing. Your budget should also include the domain, studio internet, audio equipment, backups, content permissions and any setup or administration work.
Cloud VPS 1 can suit a small pilot with limited listening hours. Cloud VPS 2 provides a larger traffic allowance for regular programming. The allowance and the network’s available throughput are separate considerations; match both to your audience and confirm your intended streaming workload with our team.
These cloud plans offer deployment locations worldwide. If your station needs Ghana-based infrastructure, discuss that requirement with us and review our Ghana VDS hosting separately. Choose the location and service that fit your audience and operational needs.
Calculate listener bandwidth and monthly traffic
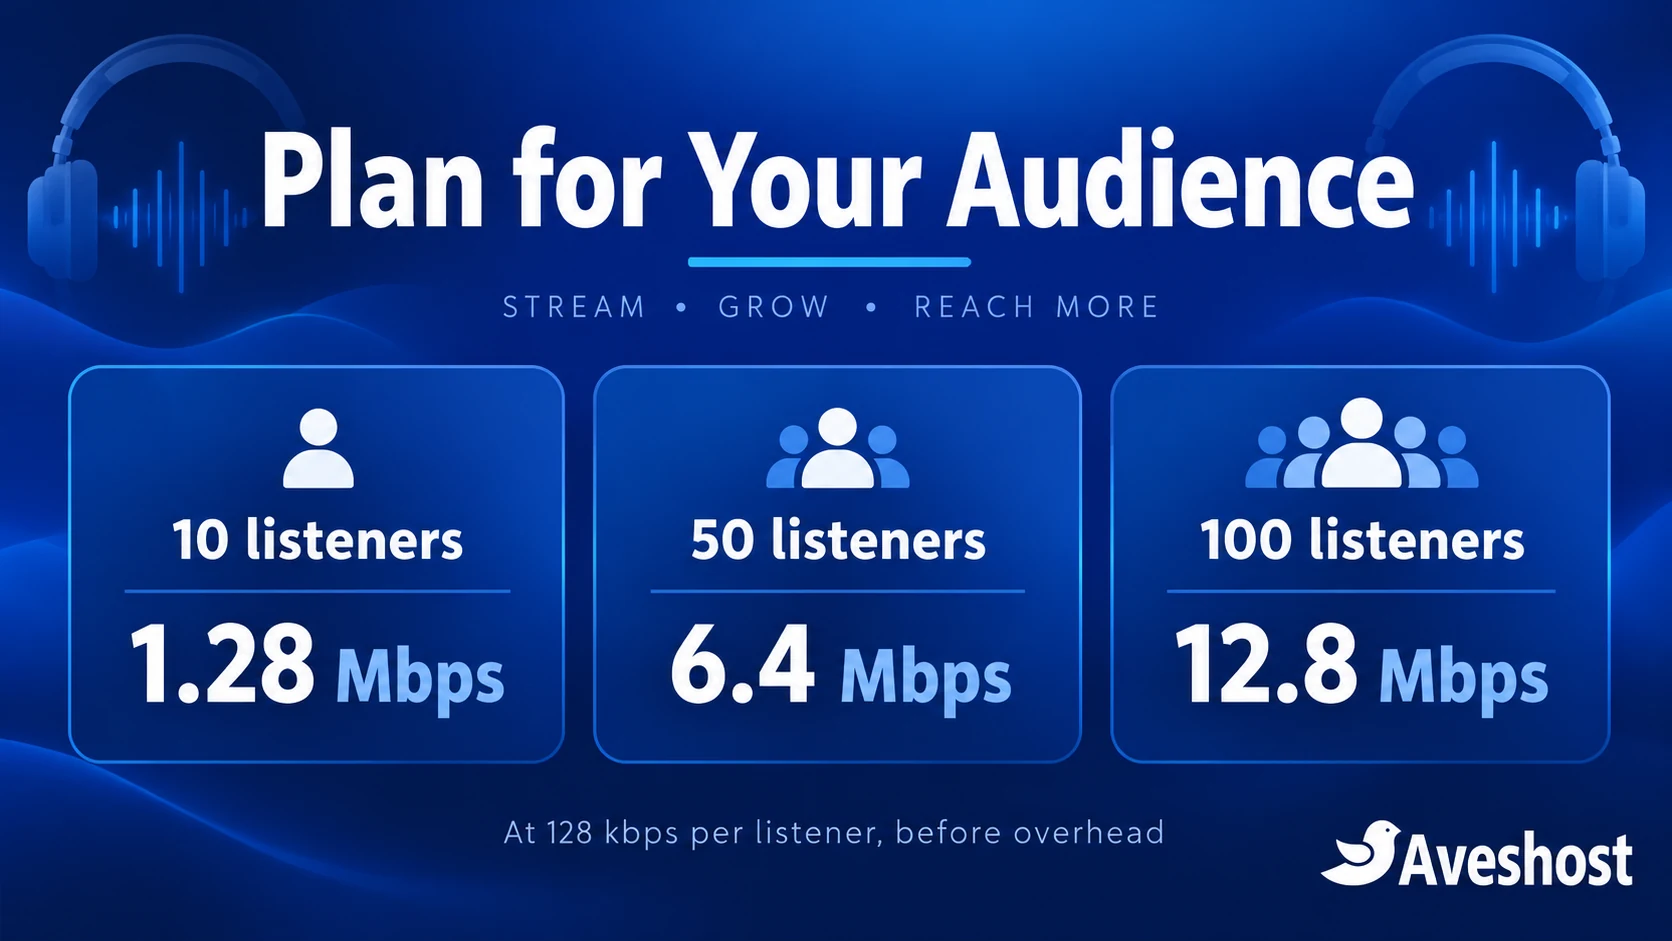
Every listener receives a separate copy of the audio stream. At 128 kbps, ten listeners need about 1.28 Mbps of outgoing audio bandwidth, while one hundred listeners need about 12.8 Mbps. Allow extra capacity for protocol overhead and normal fluctuations.
For a constant bitrate stream, estimate transfer with this formula. Use the average simultaneous audience for monthly transfer, and the peak audience when planning network capacity:
GB ≈ bitrate in kbps × listeners × listening hours × 0.00045| Average listeners at 128 kbps | Audio bandwidth | 2 hours daily for 30 days | 24 hours daily for 30 days |
|---|---|---|---|
| 10 | 1.28 Mbps | 34.56 GB | 414.72 GB |
| 50 | 6.4 Mbps | 172.8 GB | 2,073.6 GB |
| 100 | 12.8 Mbps | 345.6 GB | 4,147.2 GB |
These are decimal GB estimates before overhead, based on 60 or 720 broadcast hours. Add the traffic from any second stream, relays, downloads and other services using the server. Variable bitrate audio needs measurement rather than a single fixed-rate estimate.
One listener at 128 kbps uses about 57.6 MB per hour before overhead. Speech-led programmes can trial a lower bitrate, such as 64 kbps mono, to reduce listener data use. Compare the sound on ordinary mobile headphones before choosing it. Music usually benefits from a higher bitrate.
A 1 TB allowance supports roughly 17,360 listener-hours at 128 kbps before overhead. That is a planning estimate, not a recommended target to exhaust. Monitor actual transfer, leave headroom and upgrade before you reach your allowance.
Install Icecast on a fresh Ubuntu VPS
The commands below target a fresh Ubuntu 24.04 LTS VPS with a named sudo account. They are not a replacement configuration for an existing production server. Replace stream.example.com and VPS_PUBLIC_IP with your own values throughout.
Create a DNS A record for your streaming subdomain pointing to the VPS IPv4 address. Add an AAAA record only when IPv6 is configured and reachable on this server. Keep your studio computer ready for SSH access using your own account and key.
Ubuntu provides an Icecast package. Ensure the Ubuntu Universe repository is enabled on your server image, then install the streaming server and supporting tools:
sudo apt update
sudo apt install icecast2 nginx certbot python3-certbot-nginx libxml2-utils ufw
If the installer asks for Icecast configuration details, enter your hostname and distinct, strong passwords. You will review the configuration in the next step. Check the installed package version with apt policy icecast2.
Before enabling the firewall, allow the SSH port you actually use. On a fresh server using the standard SSH port, the following allows SSH plus HTTP and HTTPS:
sudo ufw allow OpenSSH
sudo ufw allow "Nginx Full"
sudo ufw enable
sudo ufw status
For a custom SSH port, allow that port first. Check any additional network firewall in your hosting setup too. Leave port 8000 closed to the public internet; the studio will reach it through an encrypted tunnel.
Configure Icecast and keep its ports private
Back up the installed configuration, then edit it. Keep the distribution’s existing paths, logging and service-account settings:
sudo cp /etc/icecast2/icecast.xml /etc/icecast2/icecast.xml.backup
sudo nano /etc/icecast2/icecast.xml
Update the matching sections below rather than pasting them as a second configuration. Use three different strong passwords in place of the placeholders. A password manager or openssl rand -hex 24 can generate XML-safe values.
<hostname>stream.example.com</hostname>

<limits>
    <clients>120</clients>
    <sources>2</sources>
</limits>

<authentication>
    <source-password>REPLACE_WITH_SOURCE_PASSWORD</source-password>
    <relay-password>REPLACE_WITH_RELAY_PASSWORD</relay-password>
    <admin-user>admin</admin-user>
    <admin-password>REPLACE_WITH_ADMIN_PASSWORD</admin-password>
</authentication>

<listen-socket>
    <port>8000</port>
    <bind-address>127.0.0.1</bind-address>
</listen-socket>

<mount type="normal">
    <mount-name>/live.mp3</mount-name>
    <max-listeners>100</max-listeners>
</mount>
Retain the other entries within your existing <limits> section. Replace or remove any additional public listening sockets for this design. The Icecast configuration reference describes these settings; use the documentation matching your installed version when extending the setup.
The listener limit here is a controlled starting point. It does not demonstrate that your VPS or network can serve one hundred listeners; verify that through capacity testing. Keep source and administrator passwords separate, and protect the configuration file from other users.
If your package provides /etc/default/icecast2 with an ENABLE=false setting, change it to ENABLE=true after reviewing the configuration. Then validate and start the service:
sudo xmllint --noout /etc/icecast2/icecast.xml
sudo systemctl enable --now icecast2
sudo systemctl restart icecast2
sudo systemctl status icecast2 --no-pager
sudo ss -ltnp
XML validation checks syntax, while the service status and logs reveal startup problems. Confirm that Icecast listens on 127.0.0.1:8000, not a public address. Inspect sudo journalctl -u icecast2 -n 50 --no-pager and the configured Icecast error log if startup fails.
Publish the listener stream over HTTPS
Create an Nginx site for listeners. This example publishes only the audio mountpoint; administrative pages remain private:
sudo nano /etc/nginx/sites-available/radioserver {
listen 80;
server_name stream.example.com;
location = /live.mp3 {
proxy_pass http://127.0.0.1:8000;
proxy_http_version 1.1;
proxy_set_header Host $host;
proxy_set_header Connection "";
proxy_buffering off;
proxy_request_buffering off;
proxy_read_timeout 1h;
proxy_send_timeout 1h;
limit_except GET { deny all; }
}
location / { return 404; }
}The Nginx proxy documentation explains buffering and timeouts. Disabling buffering suits this continuous audio response. GET also permits HEAD in the access rule above. Source uploads are intentionally handled through the private tunnel in the next step.
sudo ln -s /etc/nginx/sites-available/radio /etc/nginx/sites-enabled/radio
sudo nginx -t
sudo systemctl reload nginx
sudo certbot --nginx -d stream.example.com
sudo certbot renew --dry-run
Complete the certificate prompts and select HTTPS redirection when offered. DNS must resolve to this VPS, and certificate validation must reach the required HTTP endpoint. See the official Certbot instructions for current installation and renewal guidance if your operating system differs.
Until an encoder is connected, the mountpoint may return 404. The root page and public admin paths also return 404 by design. Once the source is online, test https://stream.example.com/live.mp3 from outside the VPS.
Connect your studio encoder securely
Install BUTT (Broadcast Using This Tool) from its official website on the studio computer. It supports Icecast and captures audio from a microphone or line input. Choose the mixer or audio device that carries your programme.
Open an SSH tunnel from the studio computer using your VPS account. Replace the account and IP below with your own. Keep this terminal open while broadcasting:
ssh -N -o ExitOnForwardFailure=yes -o ServerAliveInterval=30 -o ServerAliveCountMax=3 -L 127.0.0.1:18800:127.0.0.1:8000 radioadmin@VPS_PUBLIC_IPThe tunnel maps the studio’s local port 18800 to Icecast’s private port 8000. SSH encrypts the connection across the internet. Confirm the server fingerprint through a trusted channel before accepting a first connection.
| Encoder setting | Value for this tutorial |
|---|---|
| Server type | Icecast |
| Address | 127.0.0.1 |
| Port | 18800 |
| User | source |
| Password | Your source password, not the admin password |
| Mountpoint | /live.mp3 |
| Format | MP3 |
| Bitrate | 128 kbps for the initial test |
| TLS in encoder | Off for this loopback connection; SSH protects the remote hop |
Connect the encoder, speak into the microphone and check its input meter. Listen from a separate phone using mobile data. Keep monitor headphones on so that the listening device does not feed back into the studio microphone.
For administration, open http://127.0.0.1:18800/admin/ on the same studio computer while the tunnel is running. Use the separate administrator credentials. Do not put these credentials into the public listening URL.
BUTT is a live encoder, not a file playlist manager. If you want to play music from the studio computer, route the player’s audio through a supported mixer or audio-routing arrangement and verify the input before going live.
Add a Listen Live player to your website
Create a Listen Live page on your website and embed the HTTPS stream. In WordPress, paste this into a Custom HTML block after replacing the hostname:
<audio controls preload="none">
  <source src="https://stream.example.com/live.mp3" type="audio/mpeg">
  Your browser does not support this audio player.
</audio>
Keep a visible play button. Browsers commonly require a visitor’s interaction before audio starts, so design the page around pressing Play. An HTTPS website should load an HTTPS stream to avoid mixed-content problems.
Add your programme schedule, contact details and an offline message for times when the source is unavailable. Share the same listening page through your church or community channels so that people can find the station without remembering a technical stream address.
You can host the station’s website separately from the streaming server. Our managed WordPress hosting supports the website side, while your VPS handles the audio workload. For donation features, see our guide to accepting church offerings and donations with MoMo and WordPress.
Plan continuous programmes, monitoring and recovery
For round-the-clock programming, run a maintained audio scheduler or source process that feeds Icecast when nobody is presenting live. Plan a controlled handover between scheduled audio and live shows. The same mountpoint cannot simply accept two independent sources at once; use a deliberate switching or fallback design and test it.
Keep enough licensed or original content for the schedule. Store recordings with appropriate access controls, track storage growth and make a separate backup of programme files and configuration. A backup of Icecast’s settings does not include recordings stored elsewhere.
- Playback: check the actual audio from an external connection, not only whether the server responds.
- Capacity: monitor listener counts, monthly transfer, CPU, memory and network throughput.
- Continuity: test encoder reconnection, SSH tunnel recovery and scheduled audio after a restart.
- Security: keep Ubuntu, Icecast and Nginx updated; protect SSH keys and rotate shared source credentials when access changes.
- Certificates: check renewal and expiry alerts for the streaming hostname.
- Recovery: back up configuration securely and rehearse rebuilding the station.
Before announcing the launch, listen on Android and iPhone, try different mobile networks, and run a complete programme-length test. Check audio levels, silence, interruptions and the data your listeners consume. Server capacity tests should use authorised traffic and leave enough headroom for real visitors.
If the player shows 404, confirm that the encoder is connected to the exact mountpoint. For 502 errors, check Icecast’s service and private listening address. For repeated dropouts, examine studio upload stability, the tunnel and server logs. Fix the failing part of the path before increasing buffer sizes.
When you are ready to build your online radio station in Ghana, discuss your streaming project with Aveshost. Send your expected peak listeners, average listening hours, bitrate, live schedule and preferred deployment location. We can help you choose a VPS and plan the hosting setup.
Frequently asked questions
How much does it cost to start an online radio station in Ghana?
Our self-managed Cloud VPS 1 starts at GH₵100 per month, while Cloud VPS 2 is GH₵170 per month at the time of writing. Add your domain, studio connection, equipment, content permissions and administration costs to the budget.
Can I use Icecast for church online radio?
Yes. Icecast can distribute a stream of live sermons or other authorised programmes to online listeners. Check permissions for music and recordings, and prepare a reliable source connection from the church or studio.
Do I need an FM frequency for an internet stream?
Listeners access an internet stream through a website or player using their data connection. Confirm your service’s applicable authorisation requirements with the NCA, and obtain any permissions needed for separate FM or other broadcasting activities.
Does Icecast play music files automatically?
Icecast distributes audio supplied by a source. Continuous playlists require a separate scheduler or source process. Plan and test how that source hands over to a live presenter.
How much data does a listener use?
At a constant 128 kbps, one listener uses approximately 57.6 MB per hour before protocol overhead. A lower bitrate reduces data use, but test speech or music quality before choosing it.
How many listeners can a cheap VPS handle?
Capacity depends on bitrate, network throughput, monthly transfer, server limits and other workloads. Calculate traffic and load-test your configuration. A configured listener limit is not evidence of tested capacity.
Can I put the stream on WordPress?
Yes. Add an HTML audio player or a maintained player plugin using the HTTPS listening URL. Test mobile playback and show the programme schedule and offline status clearly.
Why keep Icecast port 8000 private?
In this tutorial, Nginx publishes only the listener stream, while an SSH tunnel carries the studio source and administration access. This avoids exposing the Icecast administration interface directly to the internet.
Will a VPS keep my live show running during a studio power cut?
The server can stay available, but live audio stops if the studio source loses power or connectivity. Arrange backup power and internet, or a tested server-side source for prerecorded programmes.
Can Aveshost help me choose streaming hosting?
Yes. Contact our support team with your bitrate, expected audience, broadcast hours and preferred server location. We can help you choose the hosting configuration for your station.