Learning how to add passkey login to WordPress is one of the most effective security upgrades you can make to protect your administrator dashboard, WooCommerce customers, and editorial team. Instead of typing passwords that can be guessed, reused, or stolen through phishing pages, a WordPress passkey login lets you sign in with Face ID, Touch ID, Windows Hello, Android biometrics, or a hardware security key.
Because WordPress powers over 40% of the web, /wp-login.php and xmlrpc.php are constant targets for automated credential-stuffing bots. Even traditional six-digit authenticator codes (TOTP) can be intercepted by real-time reverse-proxy phishing kits. Passkeys—built on the W3C WebAuthn and FIDO2 public-key cryptography standards—eliminate that risk completely because your private key never leaves your device and is cryptographically bound to your exact domain name.
In this guide, you will learn how passkeys work in WordPress, how to verify your hosting server’s PHP prerequisites, how to set up passwordless login step by step, and how to recover your wp-admin access using backup codes, cPanel File Manager, or WP-CLI if you ever lose a device or migrate domains.
Table of Contents
How Passkey Login Works in WordPress (WebAuthn Explained)
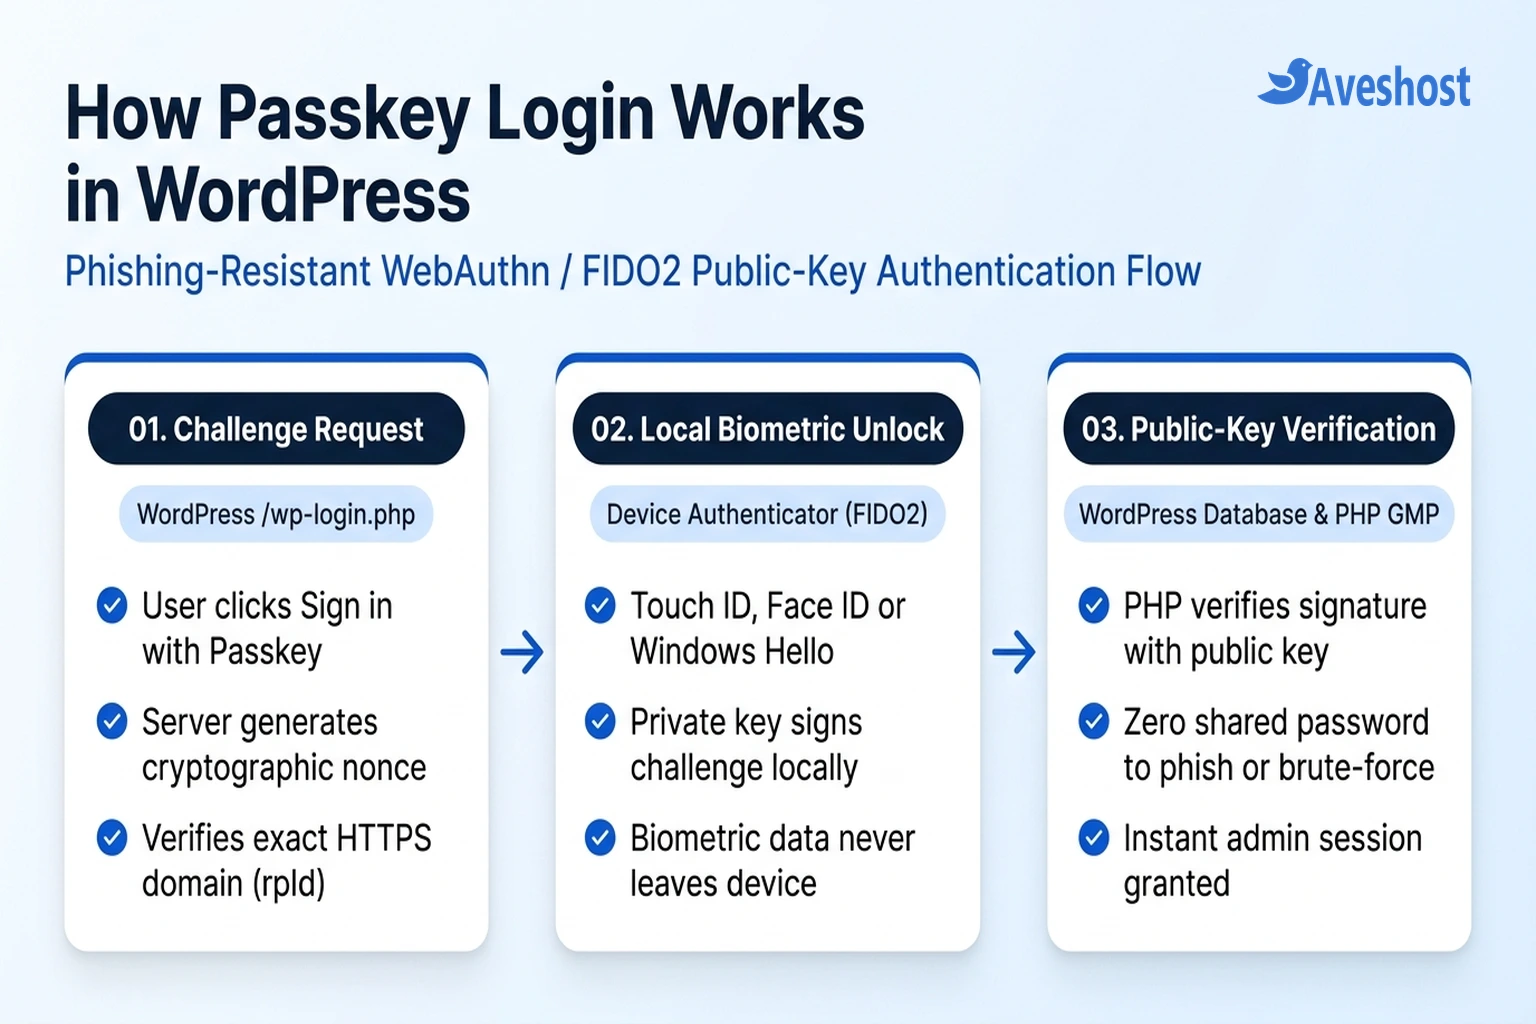
When you add passkey login to WordPress, you replace (or reinforce) the shared password hash in your wp_users database table with an asymmetric cryptographic key pair managed via the browser’s native WebAuthn API (navigator.credentials).
Here is what happens behind the scenes in less than a second whenever you register or sign in with a passkey:
1. Registration Creates a Domain-Bound Key Pair: When you click Register Passkey inside your WordPress profile, your device (Apple iCloud Keychain, Google Password Manager, Windows Hello, 1Password, Bitwarden, or a YubiKey) generates a unique private key and public key tied strictly to your site’s Relying Party ID (rpId)—for example, yourdomain.com. WordPress stores only the public key and credential ID in wp_usermeta.
2. Login Uses a Cryptographic Challenge: When you click Sign in with a Passkey on /wp-login.php, WordPress generates a single-use random cryptographic nonce (challenge). Your device unlocks its secure enclave using your fingerprint, face scan, or PIN, signs the challenge locally with your private key, and sends only the signed proof back to WordPress.
3. Zero Shared Secrets to Steal: Even if an attacker compromises a database backup or sets up a lookalike phishing domain, they cannot log in—the database holds only public keys, and your browser refuses to sign WebAuthn challenges if the domain name does not match your registered rpId.
Step 1: Verify Your Server and PHP Prerequisites Before Setup
Before installing a passkey plugin, verify three hosting requirements. Skipping this check is the number-one reason site owners encounter cryptic WebAuthn verification errors during setup:
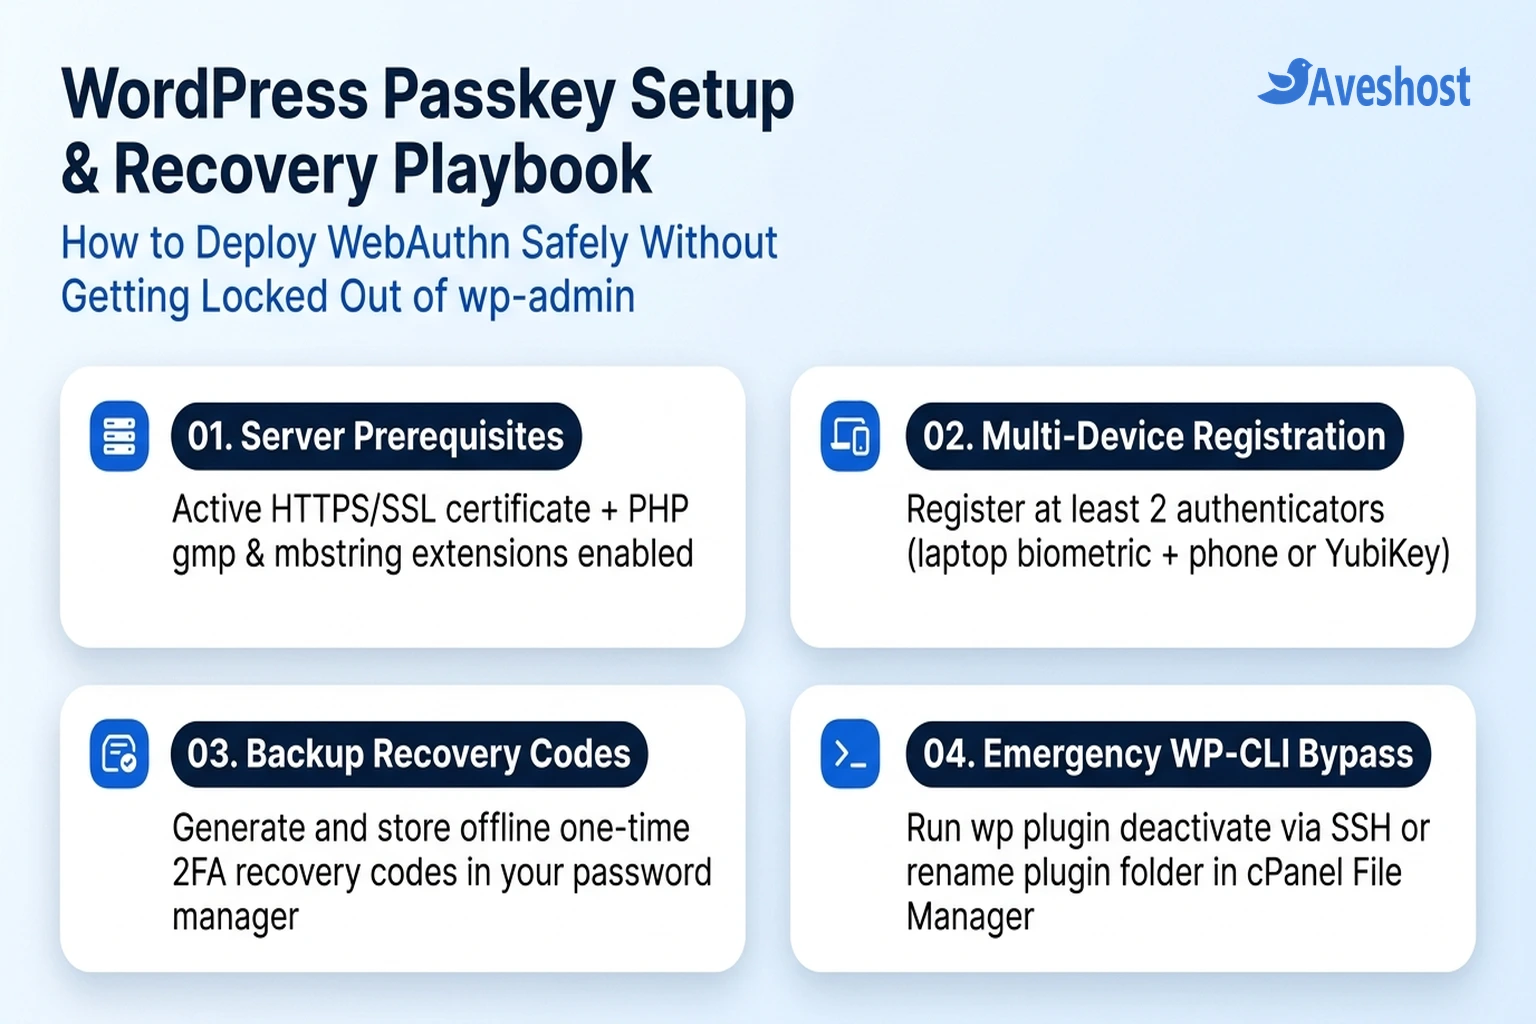
1. Active HTTPS (TLS/SSL) Connection: Modern browsers block the WebAuthn API on unencrypted http:// URLs (everywhere except localhost). Both your WordPress Address (URL) and Site Address (URL) under Settings → General must begin with https://.
2. Canonical Domain Consistency (www vs non-www): Because passkeys bind to your exact hostname (rpId), logging into https://www.yourdomain.com/wp-login.php when your passkey was registered on https://yourdomain.com can trigger a Relying Party mismatch if the plugin defaults to the full subdomain. Force a single canonical domain via .htaccess or Nginx.
3. PHP gmp, mbstring, and openssl Extensions: WebAuthn libraries in PHP perform elliptic-curve (ES256 / EdDSA) and RSA big-integer math to verify cryptographic signatures. This requires the GNU Multiple Precision (gmp) and mbstring PHP extensions.
On Aveshost Managed WordPress Hosting and WordPress Hosting plans, HTTPS AutoSSL, mbstring, and gmp are already enabled by default. If you run WordPress on an Aveshost Self-Managed Linux VPS, verify and install the required PHP modules via SSH:
# 1. Check whether gmp, mbstring, and openssl are active in your PHP environment
php -m | grep -E 'gmp|mbstring|openssl'

# 2. If gmp is missing on Ubuntu/Debian (adjust 8.3 to match your PHP version):
sudo apt update && sudo apt install -y php8.3-gmp php8.3-mbstring
sudo systemctl restart php8.3-fpm

# 3. Confirm WordPress uses HTTPS for both home and siteurl via WP-CLI:
wp option get home
wp option get siteurl
You can also check these modules without SSH inside your WordPress dashboard by navigating to Tools → Site Health → Info → Server.
Step 2: Choose the Right WordPress Passkey Plugin for Your Site
WordPress supports passkeys through two main approaches: dedicated passwordless WebAuthn plugins (which let users log in with one click on /wp-login.php or WooCommerce My Account pages without typing a username or password) and security suite / 2FA plugins (which add passkeys alongside firewall protection and backup recovery codes).
Compare the four most reliable options before installing:
| Plugin Name | Authentication Mode | WooCommerce & Frontend Support | Best Use Case |
|---|---|---|---|
| Secure Passkeys | Passwordless primary login or 2FA passkey prompt | Built-in support for WooCommerce, MemberPress, and Ultimate Member + shortcodes | Best all-around choice for wp-admin, WooCommerce stores, and membership sites |
| WP-WebAuthn | Passwordless WebAuthn (supports usernameless login) | Includes Gutenberg blocks and shortcodes for custom login pages | Best lightweight open-source plugin for pure WebAuthn passwordless login |
| Two-Factor (Official WordPress Feature Plugin) | Second-factor WebAuthn security key + backup codes | Works on standard WordPress login flows | Best minimal setup for administrators who want official WordPress.org core-track 2FA |
| Wordfence / Solid Security | Passkey + 2FA integrated with WAF and login rate limiting | Supports WordPress login and WooCommerce compatibility modes | Best when you already run Wordfence or Solid Security for firewall and brute-force protection |
Step 3: How to Add Passkey Login to WordPress Step by Step
Follow these steps to configure passwordless passkey login safely without risking an accidental administrator lockout:
1. Install and Activate Your Passkey Plugin: In your WordPress dashboard, go to Plugins → Add New Plugin, search for Secure Passkeys (or WP-WebAuthn), click Install Now, and click Activate.
2. Keep Password Fallback Enabled During Initial Setup: Open the plugin’s settings page and verify that Allow standard password login remains enabled while you register and test your first passkeys. Never disable password fallback globally until you have tested passkey login in a separate private browser window.
3. Register Your Primary Passkey in Your User Profile: Navigate to Users → Profile, scroll down to the Passkeys / WebAuthn Authenticators section, and click Register New Passkey (or Bind Authenticator). Give the key a clear label—such as MacBook Touch ID (iCloud) or Windows 11 Hello—and complete the biometric prompt in your browser.
4. Register a Second Backup Passkey Immediately: Before logging out, click Register New Passkey a second time and register an independent authenticator—such as a mobile phone via QR cross-device verification, a password manager vault (1Password or Bitwarden), or a physical USB/NFC hardware key (such as a YubiKey).
5. Test the Passkey Login Flow in an Incognito Window: Open a new Incognito/Private browser window while keeping your current logged-in admin tab open. Visit https://yourdomain.com/wp-login.php, click Sign in with a Passkey, complete your biometric verification, and confirm that you land inside wp-admin cleanly.
Step 4: WordPress Passkey Recovery Guide (If You Lose a Device or Get Locked Out)
What happens if your phone or laptop is lost, you switch domain names during a site migration, or you enforced passwordless-only mode and cannot complete the WebAuthn prompt? Because you control the underlying WordPress server, you can always recover administrator access safely.
Use this four-tier recovery playbook depending on the level of access you have:
Recovery Method 1: Use Your Secondary Passkey or One-Time Recovery Codes: If you registered a synced passkey (such as iCloud Keychain, Google Password Manager, or 1Password) or a backup hardware YubiKey, sign in from any secondary device synced to that vault. If you use the official Two-Factor or Wordfence plugin, click Use a recovery code on the login screen and enter one of your saved offline backup codes.
Recovery Method 2: Deactivate the Passkey Plugin via WP-CLI (Fastest Server Fix): If you have SSH or cPanel Terminal access, use WP-CLI to deactivate the passkey plugin or reset your user authentication metadata without touching any other site functionality:
# Navigate to your WordPress root directory (e.g., public_html)
cd ~/public_html

# 1. List active passkey / 2FA plugins
wp plugin list --status=active

# 2. Deactivate the passkey plugin to restore standard password login immediately
wp plugin deactivate secure-passkeys
# (Or for WP-WebAuthn: wp plugin deactivate wp-webauthn)

# 3. Optional: If you changed domains and broke WebAuthn rpId, update site URLs first:
wp option update home 'https://yourdomain.com'
wp option update siteurl 'https://yourdomain.com'

# 4. Optional: Reset your administrator password if you previously randomized it:
wp user update admin_username --user_pass='NewStrongTemporaryPassword!2026'
Recovery Method 3: Rename the Plugin Folder in cPanel File Manager or SFTP (No SSH Required): If you do not use SSH, log into your hosting control panel, open cPanel → File Manager, and navigate to public_html/wp-content/plugins/. Right-click the passkey plugin folder (for example, secure-passkeys or wp-webauthn) and rename it to secure-passkeys-disabled. WordPress automatically deactivates the missing plugin and restores normal username-and-password login on /wp-login.php. Once inside wp-admin, rename the folder back and register your new device’s passkey.
Step 5: Harden Your WordPress Login Surface After Enabling Passkeys
Adding a passkey protects interactive browser logins, but automated bots can still hammer background WordPress authentication endpoints if you leave legacy password pathways exposed.
Complete these three hardening checks to lock down your WordPress authentication layer:
1. Disable XML-RPC Password Authentication: Even when passkeys are active on /wp-login.php, WordPress’s legacy xmlrpc.php endpoint still accepts standard username-and-password requests unless disabled. Block xmlrpc.php at the web-server level or via your security plugin.
2. Audit Application Passwords: WordPress 5.6+ includes built-in Application Passwords under Users → Profile for REST API integrations. Revoke any unused Application Passwords and restrict their creation to administrator accounts that genuinely need external API publishing.
3. Combine Passkeys with Edge Bot Protection: Pair your passkey login setup with Cloudflare WAF protection or a custom WordPress login URL so brute-force bots are stopped at the network edge before they ever execute PHP workers on your server:
# Add to public_html/.htaccess to block XML-RPC brute-force attacks while keeping Passkey logins fast
<Files xmlrpc.php>
  <IfModule mod_authz_core.c>
    Require all denied
  </IfModule>
</Files>
Frequently asked questions
Does WordPress support passkey login natively?
WordPress core supports WebAuthn security keys through the official Two-Factor feature plugin developed by WordPress core contributors, and full passwordless one-click passkey login through dedicated plugins like Secure Passkeys, WP-WebAuthn, Wordfence, and Solid Security.
What are the server requirements to add passkey login to WordPress?
Your WordPress site must run over a valid HTTPS (SSL/TLS) connection on a consistent domain name, and your server should run PHP 7.4 or newer (PHP 8.1+ recommended) with the gmp, mbstring, and openssl PHP extensions enabled.
What happens if I lose my phone or computer with my WordPress passkey?
If your passkey is stored in Apple iCloud Keychain, Google Password Manager, 1Password, or Bitwarden, it syncs automatically across your other signed-in devices. If you lose your only authenticator and have no backup recovery codes, you can regain access in under a minute by deactivating the passkey plugin via WP-CLI or renaming its folder in cPanel File Manager.
Can I use passkeys with WooCommerce customer logins?
Yes. Plugins like Secure Passkeys and WP-WebAuthn integrate directly with the WooCommerce My Account login form, allowing shoppers to sign in with Face ID, Touch ID, or Windows Hello instead of resetting forgotten passwords at checkout.
Why did my WordPress passkey stop working after migrating my site to a new domain?
WebAuthn passkeys are cryptographically bound to the exact domain name (Relying Party ID or rpId) where they were created. If you change your domain name, browsers will refuse to use passkeys registered under the old domain. Log in with your backup password or recovery code and register a fresh passkey on the new domain.