

To protect your website with Cloudflare, proxy the website’s DNS records, secure the connection to your hosting server and apply rules that fit your application. This guide shows the practical setup for WordPress and WooCommerce, Laravel and static websites.
Complete the common setup first, then jump to your platform’s section. You will find copyable rule examples, dashboard screenshots and checks to keep logins, forms, payments and APIs working. Deploy only the rules your site needs.
Table of Contents
Before you start
Cloudflare filters eligible proxied web requests before they reach your hosting server. It does not replace application authentication, updates, backups or sufficient server capacity. Apply only the WordPress, Laravel or static-site instructions that fit your website.
- Have access to your registrar, Cloudflare and hosting dashboard, with a recovery route if a rule blocks you.
- Record your DNS and email settings, normal resource use and existing security rules.
- List actual login, checkout, API and webhook paths, including custom or translated routes.
- Check your plan’s rule allowances and available actions. Replace domain.com and example paths with your own values.
The expressions below belong in Cloudflare’s expression editor. Add one rule at a time and test it before deploying the next.
Connect your domain to Cloudflare and enable the proxy
Step 1: connect your domain
- Add your root domain to Cloudflare and select a suitable plan.
- Compare imported DNS records with your existing provider. Preserve website records, MX, SPF, DKIM, DMARC and other service records.
- For a full-zone setup, change the registrar’s nameservers to the exact pair Cloudflare assigns. Coordinate existing DNSSEC before the change.
- Wait until the zone is active, then check both website and email access.
Follow our Cloudflare DNS setup guide for the complete onboarding walkthrough. Managed platforms may use different domain instructions; follow their supported setup.
Step 2: check the orange cloud for every website hostname
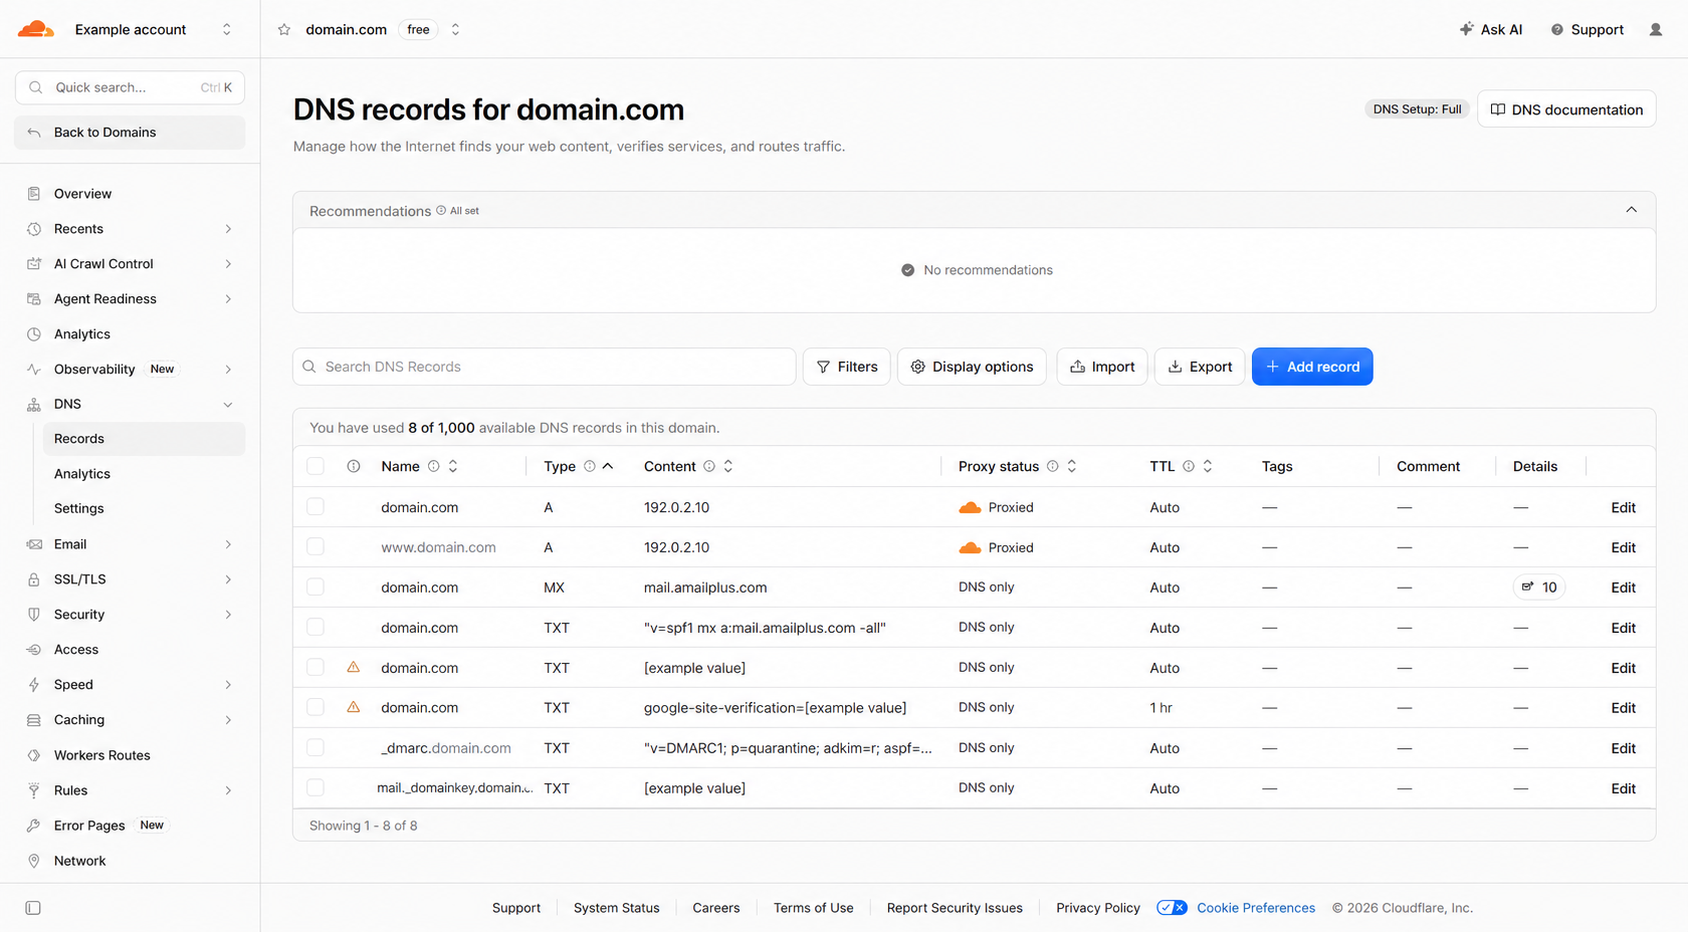
- Open the domain in Cloudflare and go to DNS → Records.
- Find the record that serves your website, such as
domain.com. Click Edit if it shows DNS only. - Set Proxy status to Proxied, shown by the orange cloud, and save. Repeat for
www.domain.comand other website hostnames that should use Cloudflare. - Check the actual hostname visitors use. Protecting the root record alone does not protect a DNS-only web subdomain.
Only eligible record types, including A, AAAA and CNAME, can be proxied. MX and TXT records remain DNS only. Hostnames used for mail or other services that need a direct connection normally remain DNS only unless that service supports a suitable Cloudflare product. Do not orange-cloud mail indiscriminately. See Cloudflare’s proxy-status documentation.
Step 3: configure HTTPS and Full (Strict) encryption
There are two HTTPS connections to consider: visitor to Cloudflare and Cloudflare to your origin server. Install a valid certificate on your hosting server before requiring strict validation. The certificate must be unexpired, match the hostname, and be issued by a trusted certificate authority or Cloudflare Origin CA. Your origin must accept HTTPS on the appropriate port.
- Open SSL/TLS → Overview. In the dashboard shown here, click Configure to open encryption mode settings.
- Select Full (Strict) after checking the origin certificate, then click Save.
- Return to the settings and confirm that Full (Strict) remains selected.
- Check the edge certificate under SSL/TLS → Edge Certificates. Once HTTPS works, configure a consistent HTTP-to-HTTPS redirect. Check application URL settings as well, so redirects do not loop.
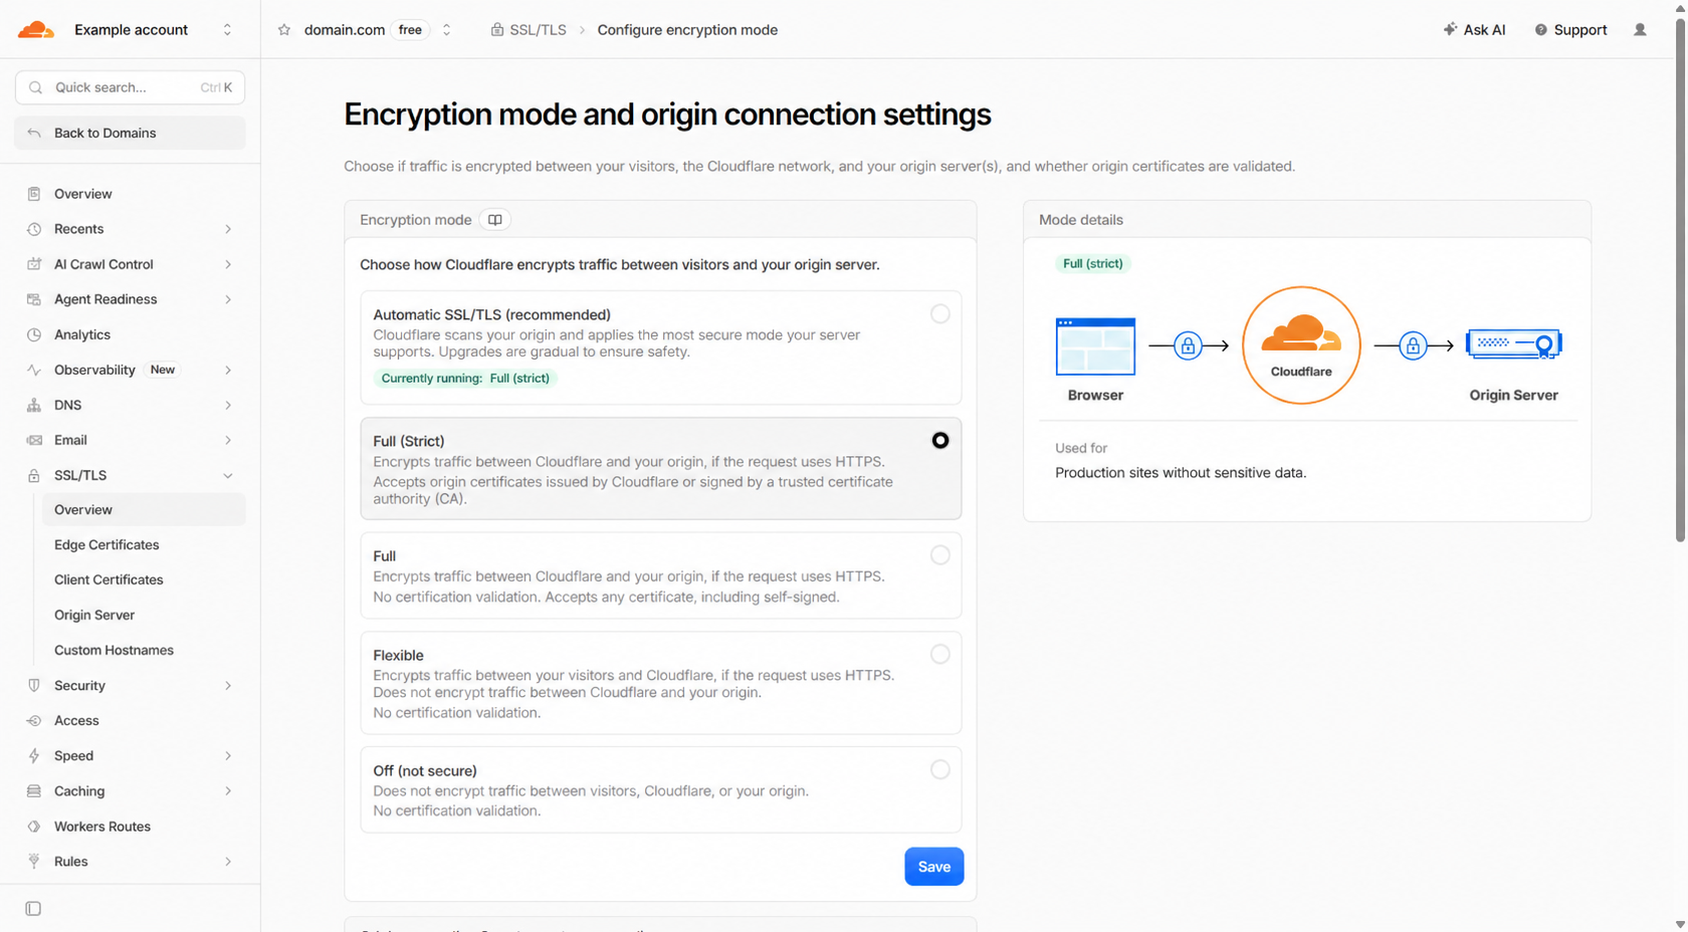
Flexible encrypts the visitor connection but leaves Cloudflare’s connection to the origin unencrypted. Full encrypts that connection without the same certificate validation. Use Full (Strict) with a correctly configured origin. A Cloudflare Origin CA certificate is intended for the Cloudflare-to-origin connection and is not generally trusted by ordinary browsers connecting directly to the server.
If strict mode produces a certificate error, fix the certificate, hostname, chain, or origin HTTPS configuration. Do not treat disabling validation as the permanent solution. Add HSTS only after HTTPS and all relevant subdomains are ready; its effects can persist in visitors’ browsers.
How to create a Cloudflare security rule
- Open your domain and go to Security → Security rules → Create rule → Custom rules. Older dashboards may use WAF labels.
- Name the rule, open Edit expression and paste the relevant example.
- Adapt the hostnames and paths, select the stated action and review rule order.
- Click Deploy, verify that the rule is active, then test normal workflows and review security events.
Managed Challenge verifies browser requests; Block rejects matching requests. Use an API-compatible policy for unattended clients. A Skip exception should bypass only the specific protection that needs an exception.
Rules run in order, and terminating actions can prevent later rules from running. Put strict access restrictions before overlapping challenges and review any existing broad Allow or Skip entries. See Cloudflare’s custom-rule documentation.
If your zone hosts several applications, combine a rule with a hostname condition such as http.host eq "shop.domain.com". For private staff areas, consider an identity-based access gate or a narrowly scoped trusted-IP policy. Country filtering is not proof of identity; broad geographic blocks can also disrupt search crawlers, customers and payment providers.
Part 1: protect a WordPress website with Cloudflare
Step 1: protect WordPress login and administration
Repeated requests to /wp-login.php can run authentication code even when nobody knows your password. WordPress administration should not be treated like a public blog post. The example below uses Managed Challenge for login and admin requests while leaving two common application endpoints outside this particular challenge rule.
Challenge login and admin requests. Use this option when administrators should be able to complete Cloudflare verification before signing in.
Rule name: Guide – WordPress admin challenge
Action: Managed Challenge
(http.request.uri.path eq "/wp-login.php" or http.request.uri.path eq "/wp-admin" or starts_with(http.request.uri.path, "/wp-admin/")) and not (http.request.uri.path in {"/wp-admin/admin-ajax.php" "/wp-admin/admin-post.php"})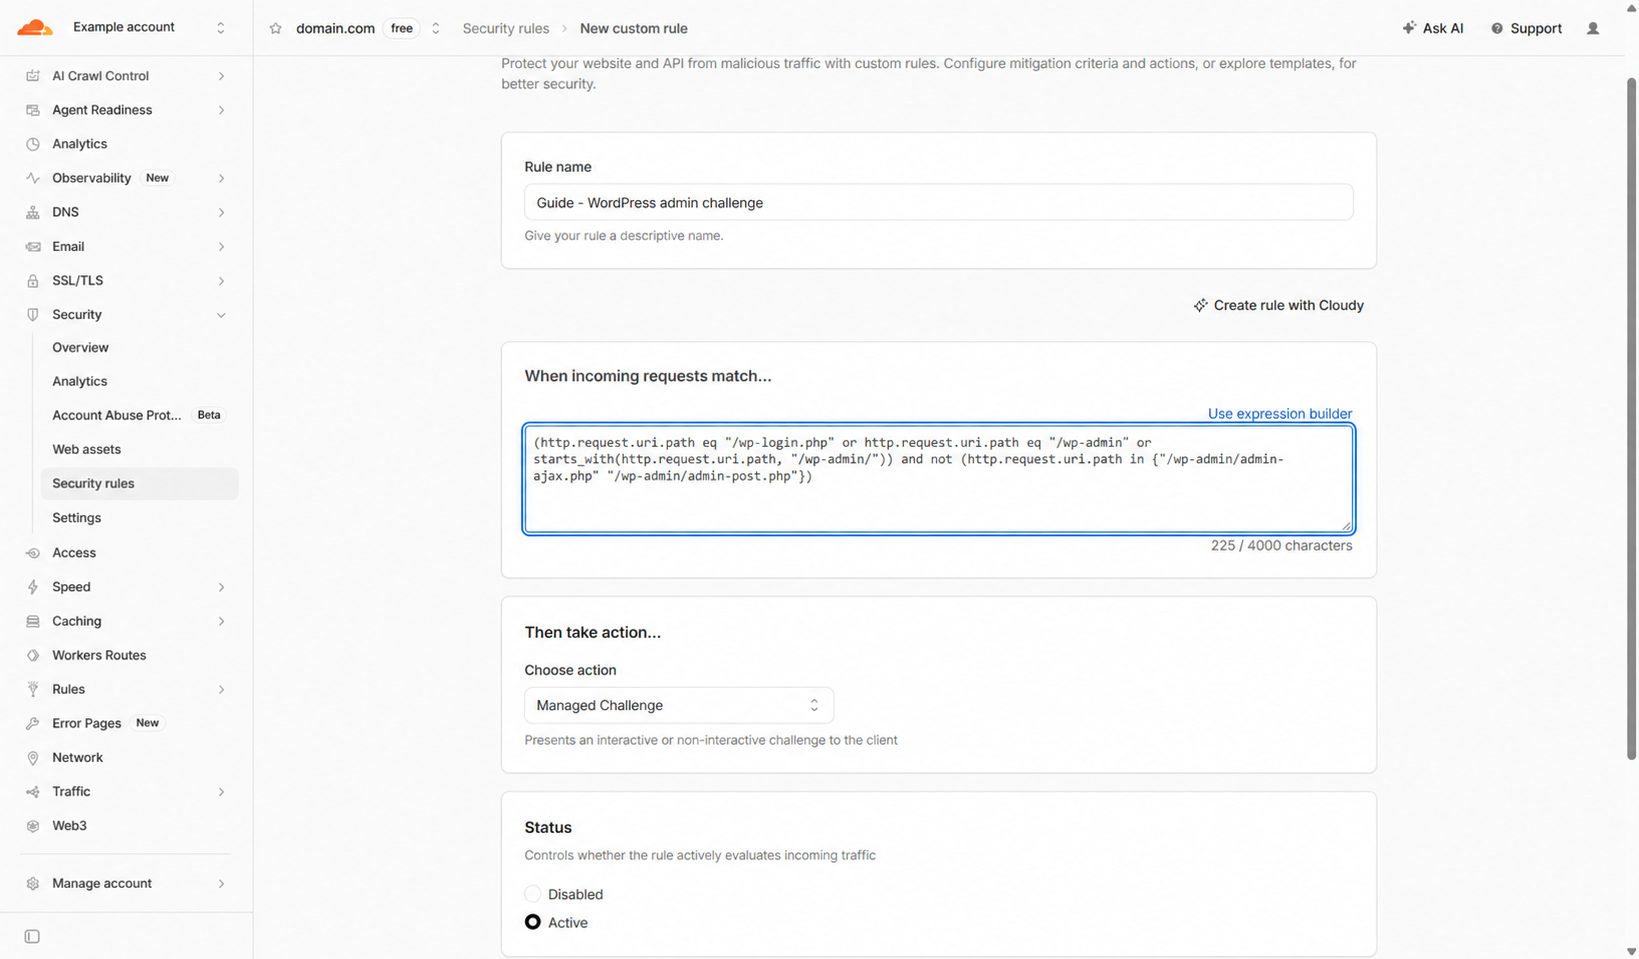
- Create a custom rule using the Security rules steps above.
- Paste the expression exactly, choose Managed Challenge, keep it active, and deploy.
- Open your login page in a private browser window. Complete any verification Cloudflare requests, then sign in normally.
- Open the WordPress dashboard, save a draft, upload media, and try the public contact form. Check any front-end feature that relies on AJAX.
- If a legitimate integration fails, identify its exact path and authentication method before changing the expression. Keep the rest of your protection in place.
The exclusions do not give anonymous users permission to perform administrative actions. WordPress and each plugin must still validate permissions and requests. They only stop this rule from forcing browser verification on endpoints that may serve front-end forms or AJAX. Those endpoints may still require application rate limits or other targeted protections.
If WordPress is installed under /blog/, adjust every relevant path to include that prefix. If a plugin changes the login URL, add the real path. XML-RPC, application passwords, mobile apps and REST integrations need their own review: a browser challenge can break unattended clients. If you do not use XML-RPC, disable it with an appropriate application/server configuration; check for integrations that depend on it before disabling it.
A successful Cloudflare challenge is not administrator authentication. Use WordPress login protection and two-factor authentication as well. For a private staff-only site, Cloudflare Access can provide an additional identity gate, but carefully design exclusions for public forms, callbacks and integrations before applying it to shared WordPress paths.
Step 2: rate-limit login bursts
Rate limiting reduces how quickly a client can request an endpoint. It can help keep login bursts from reaching PHP and the database. A limit that is too low does not usually crash the server; it rejects legitimate requests and makes a working site feel broken. A single page view can trigger many requests, so “10 requests per minute for the entire site” is often a poor starting point.
- Open Security → Security rules → Create rule → Rate limiting rules.
- Name the rule Guide – Login burst limit. Use the login path expression below; remove the Laravel path if this is only a WordPress site.
- Choose the counting characteristic available to your plan. In this example, select IP address.
- Set a threshold based on legitimate activity. For example, you could start with 20 requests in 10 seconds, with Block for 10 seconds. Adjust these values to your normal login traffic rather than applying them to every website.
- Deploy the rule and confirm its active status. Check successful logins and review the rule’s events before reducing its threshold.
(http.request.uri.path eq "/wp-login.php" or http.request.uri.path eq "/login")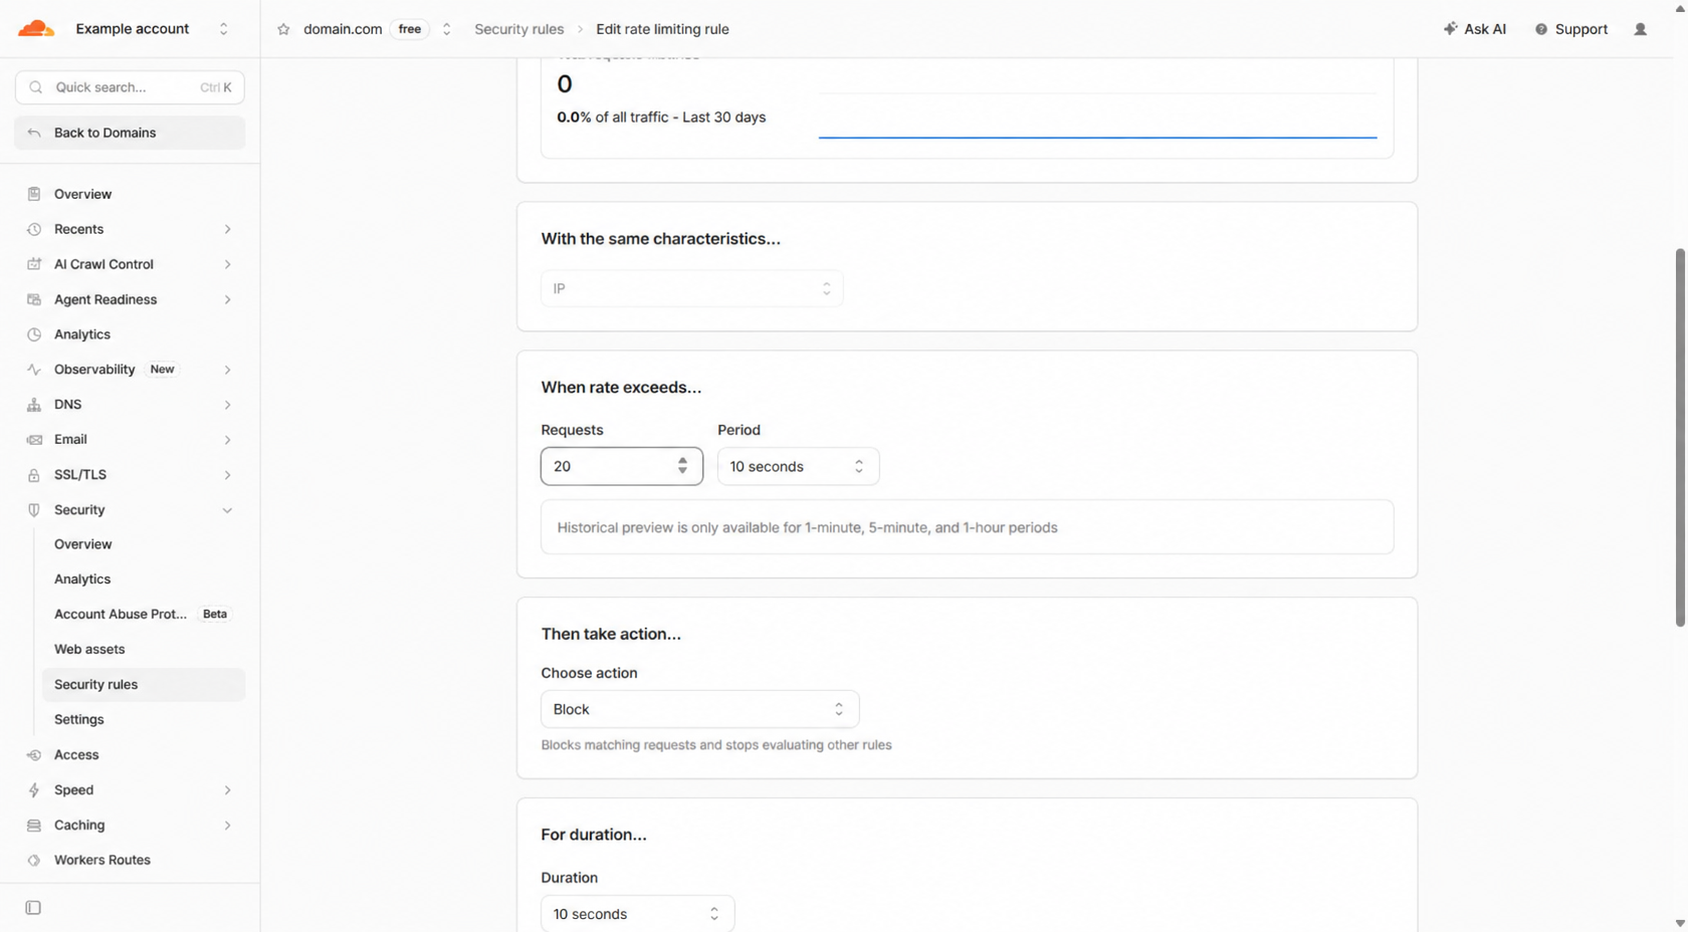
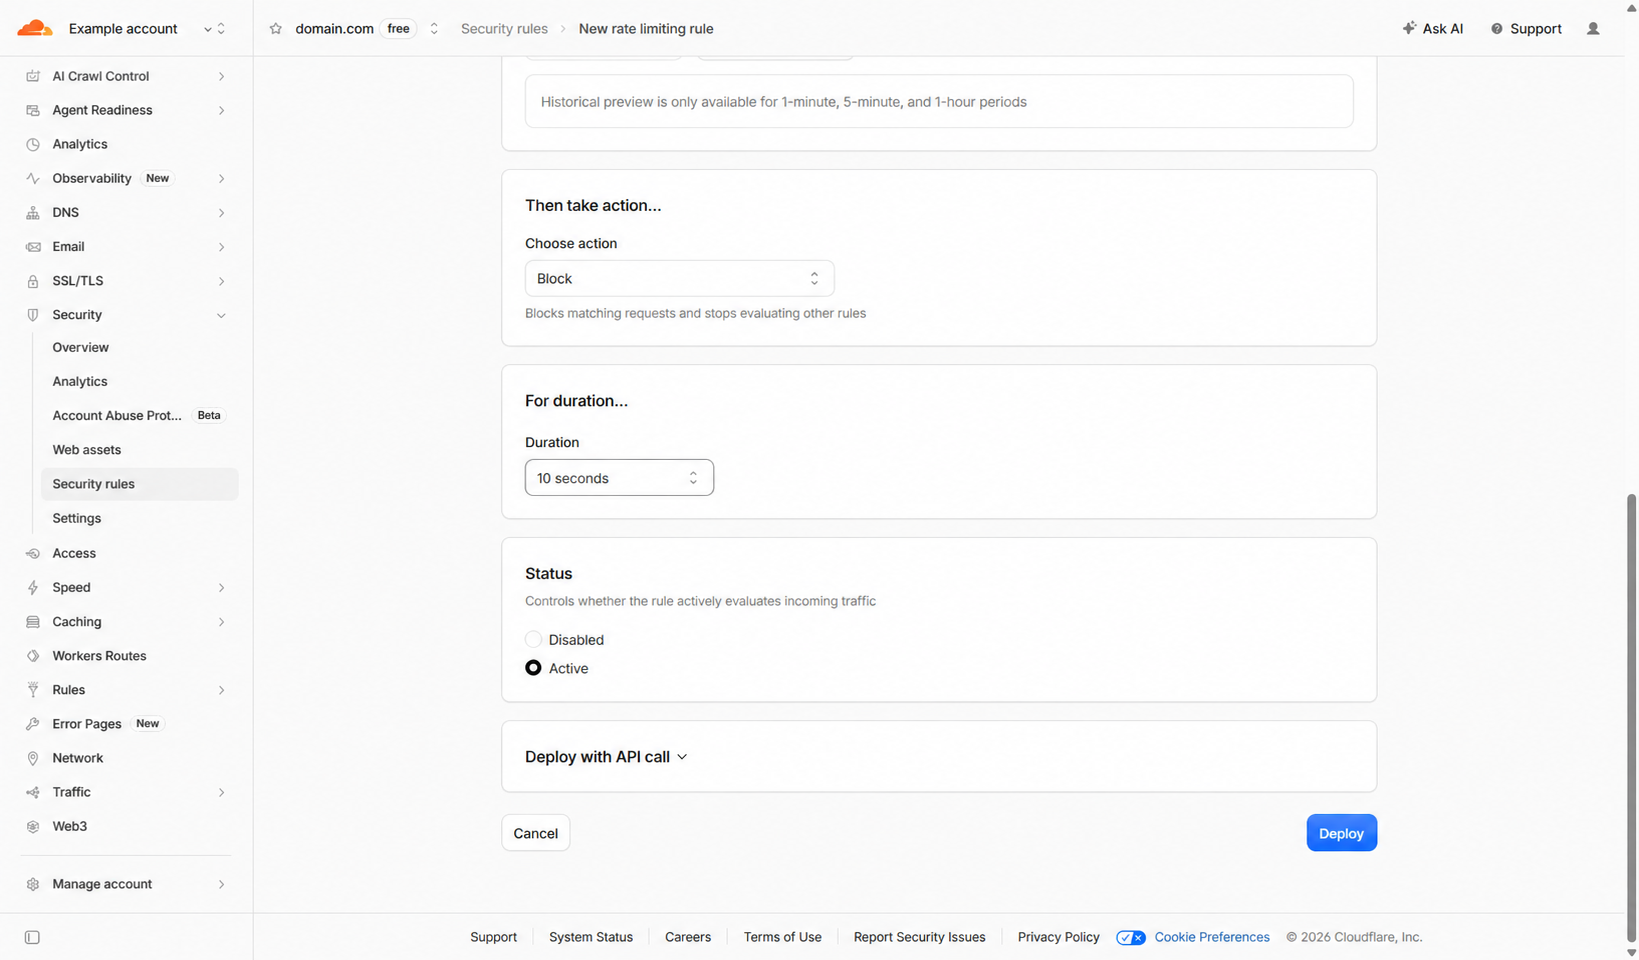
The Free-plan controls shown here include a single rate rule with short 10-second periods. Other plans may offer more rules, counting options, matching fields or actions. Use only controls available in your own dashboard. Where supported, target authentication submissions more precisely, rather than counting normal login-page views.
Many users can share one public IP at an office, mobile network or school. An IP-based limit can group them together. Conversely, a distributed attacker can rotate IPs and avoid a per-IP limit. Pair Cloudflare’s burst protection with account-aware login throttling, strong authentication, and application monitoring. Challenge Passage does not exempt traffic from rate limiting.
Step 3: bypass cache for WooCommerce sessions
- Open Caching → Cache Rules and choose Create rule → Cache Rules.
- Name it Guide – Bypass WordPress WooCommerce sessions. Choose a custom filter expression and open the expression editor.
- Paste the expression below. Change the cart, checkout and account slugs if your store uses different URLs.
- Under Cache eligibility, select Bypass cache. Deploy and confirm the rule is active.
- If you also have broad cache-eligibility rules, review their order. For conflicting cache settings, the last matching Cache Rule wins; ensure the private-content bypass remains effective.
(http.request.uri.path eq "/wp-login.php" or starts_with(http.request.uri.path, "/wp-admin") or starts_with(http.request.uri.path, "/wp-json/") or starts_with(http.request.uri.path, "/cart") or starts_with(http.request.uri.path, "/checkout") or starts_with(http.request.uri.path, "/my-account") or http.request.uri.query contains "wc-ajax=" or http.request.uri.query contains "wc-api=" or http.request.uri.query contains "add-to-cart=" or http.cookie contains "wordpress_logged_in_" or http.cookie contains "woocommerce_items_in_cart" or http.cookie contains "woocommerce_cart_hash" or http.cookie contains "wp_woocommerce_session_")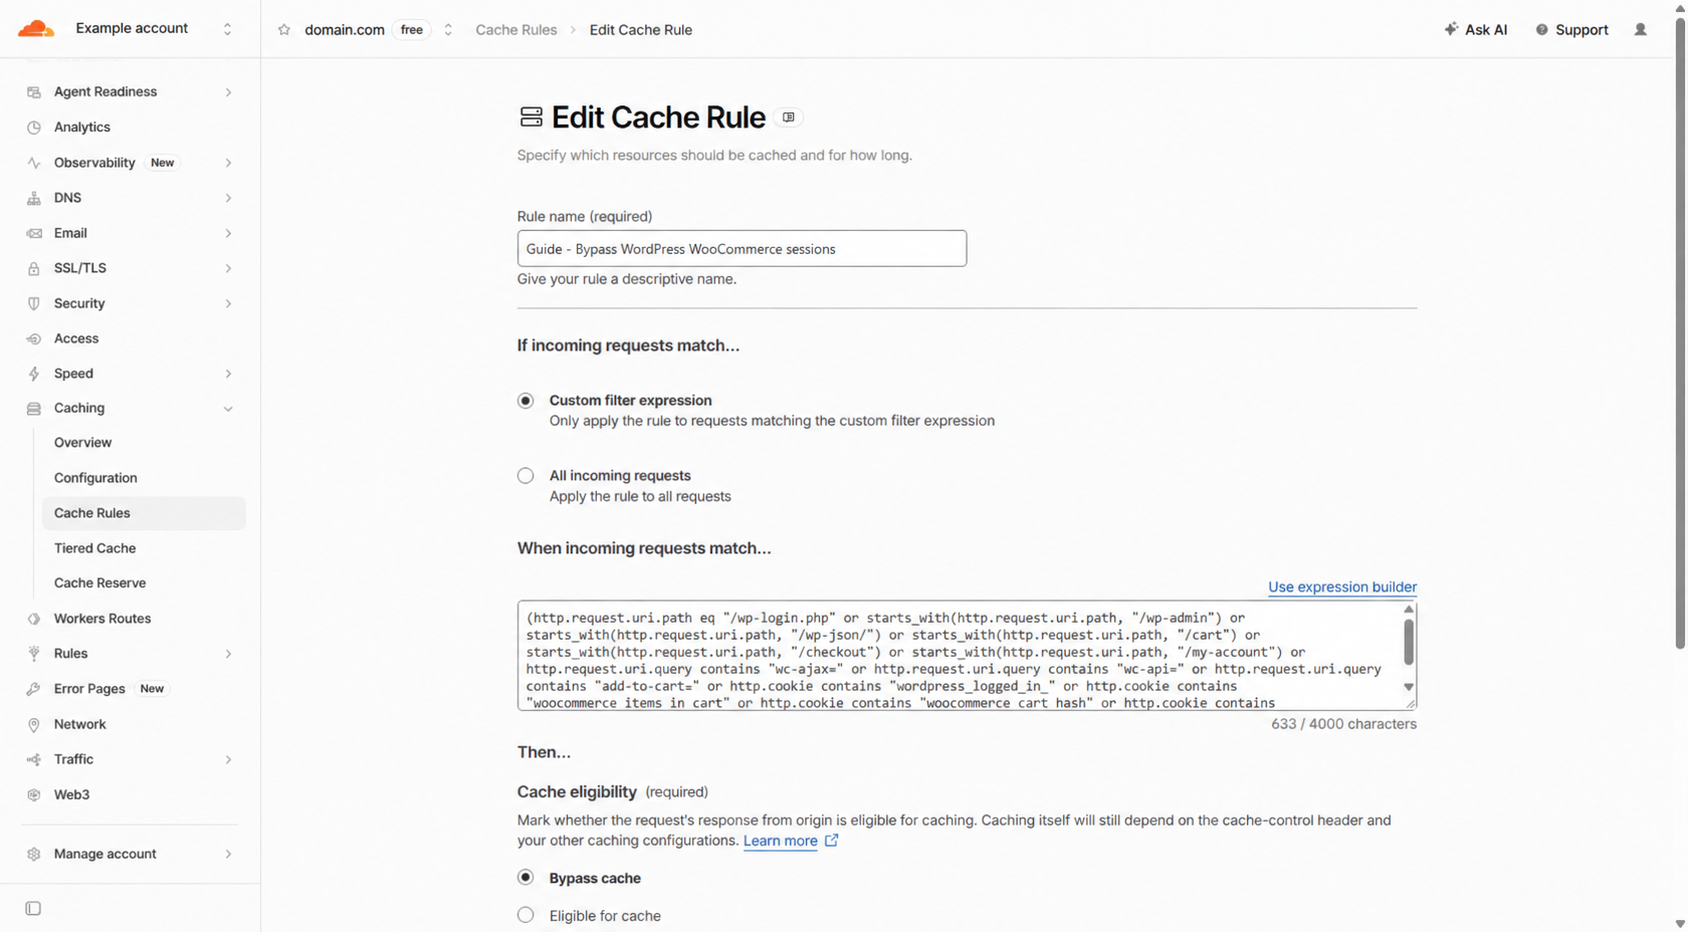
This starter expression covers common defaults, not every plugin. Add custom payment-return routes, wishlists, membership pages, subscription dashboards and any private content your installation serves. Store API requests normally use paths under /wp-json/, but inspect your actual requests. Cookie names and site paths can vary. Cache exclusions based on cookies are cache decisions, not proof of a user’s identity.
A cache bypass ensures that Cloudflare does not use shared cache for matching content. It does not exempt a request from WAF, a country challenge, rate limiting, or application authentication. Keep the same exclusions in your WordPress caching plugin and hosting cache; a Cloudflare bypass cannot fix a private page cached incorrectly at the origin.
Step 4: keep checkout, payments and AJAX working
Keep country and “challenge all visitors” rules away from payment webhooks, background AJAX and authenticated APIs. A webhook has no person waiting to click a verification box. A payment can succeed at the processor while your store misses the callback that marks the order as paid. Monitor callback delivery and order status after any security change.
- List the exact webhook URL supplied by each payment plugin or provider. Include old-style
wc-apiquery callbacks and newer REST endpoints where used. - Exclude those paths from your own broad browser-challenge rules, while retaining the provider’s signature verification in the application.
- If a managed WAF rule rejects a legitimate callback, use the event details to make a narrow exception for that specific rule and endpoint. Do not disable the whole WAF to fix one callback.
- Use the provider’s current published verification method. Do not trust a User-Agent string or a country match as payment authentication.
- Place a test order in the payment provider’s sandbox. Confirm cart updates, shipping/tax totals, payment return, callback delivery, email, and the final order status.
Free Bot Fight Mode can interfere with automated clients, and a custom Skip rule is not a general bypass for that product. Check the behavior and the available controls before enabling it on an API-heavy store. Features with more precise exceptions may require a different plan. A blanket bot setting is not a substitute for protecting the particular expensive endpoints your logs identify.
Step 5: test the blog and store
- Anonymous visitor: read posts, use search, open images and submit a form.
- Administrator: log in, save content, upload a file, and use the dashboard.
- Shopper: add two products, change quantities, apply a coupon, calculate shipping and complete sandbox checkout.
- Returning customer: sign in, open orders, log out, and compare the page with a second private session. One user must never see another user’s cart or account data.
- Integration: verify REST calls, webhooks, scheduled tasks and monitoring. Look for Cloudflare HTML returned where JSON was expected.
- Operations: compare CPU, memory, PHP workers, errors and order conversion after deployment. A quieter origin with broken checkout is not a successful configuration.
Part 2: protect a Laravel website with Cloudflare
Step 1: proxy the app and secure the Laravel origin
The same DNS and strict HTTPS foundation applies to Laravel, but its URLs and cookies are application-specific. A Laravel application may serve a public website, a staff dashboard, JSON APIs, Livewire requests, queues and payment webhooks. Start by recording which host and path serves each workflow. Do not copy WordPress-only rules into a Laravel app.
Set the web server document root to Laravel’s public directory. Keep environment files, source, storage, backups and repository metadata outside the public document root. Disable debug output in production, use secure session settings, update dependencies, and protect administrator accounts. An edge rule is a second layer; the application must remain safe if a request reaches the origin.
Configure trusted proxies using the guidance for your installed Laravel version and hosting architecture. The app must correctly recognize the original HTTPS scheme and client address for redirects, secure cookies, logs and rate limiting. Trust forwarded headers only from your actual trusted proxy chain; do not make attacker-supplied headers authoritative on a directly exposed origin. See Laravel’s trusted-proxy documentation.
Step 2: choose access protection for Laravel login and admin
Challenge browser login and admin pages. Use Managed Challenge for browser navigation while keeping machine-client endpoints on an API-compatible policy.
Rule name: Guide – Laravel browser admin challenge
Action: Managed Challenge
(http.request.method in {"GET" "HEAD"}) and (http.request.uri.path eq "/login" or http.request.uri.path eq "/admin" or starts_with(http.request.uri.path, "/admin/"))Use this rule only if your app actually uses /login and /admin. The method condition confines this example to GET and HEAD browser navigation; it does not challenge login POST submissions. Your application must still validate and throttle those submissions. If admin pages make JSON GET requests under /admin/, exclude those exact endpoints as well.
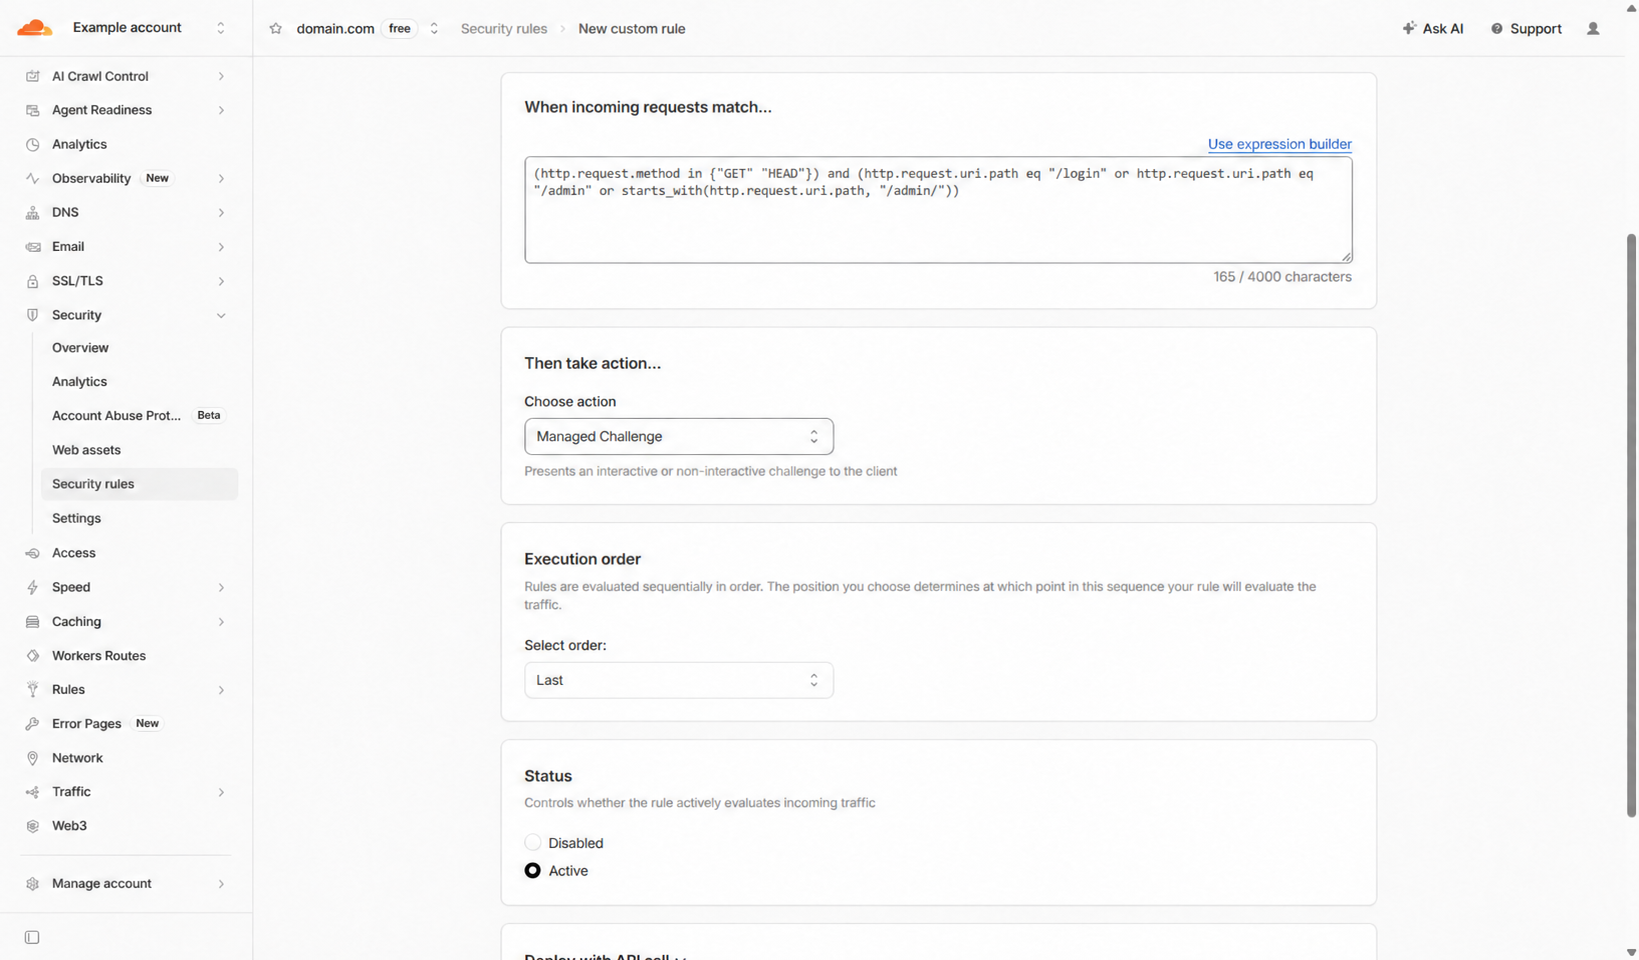
- Create a custom rule under Security → Security rules.
- Paste the expression, select Managed Challenge, keep the rule active and deploy.
- Test a fresh browser visit to the login and admin pages. Then test the normal login submission, password reset and logout.
- Test Livewire, SPA requests, uploads and dashboard actions. A Cloudflare HTML challenge in a fetch response can make the app display an unexplained error.
- Change the matcher to fit custom admin panels, tenancy paths and API hosts. Use an identity control such as Cloudflare Access for a private staff dashboard where appropriate, alongside Laravel authorization.
Step 3: protect APIs with authentication and targeted limits
An API client typically cannot solve a browser challenge. Keep /api/, webhook endpoints, OAuth callbacks and background application requests outside broad browser-challenge rules. That does not mean those requests should be unprotected: require valid credentials or signatures, validate input, check authorization, and apply limits appropriate to the endpoint.
For a browser login burst, you can adapt the login-rate example to /login. For an API, choose a narrowly defined endpoint and an action that a machine client can handle. Keep Laravel’s own limiter keyed to the authenticated user, account or appropriate credential where needed, so many customers behind one NAT address are not treated as a single person.
Cloudflare’s per-IP burst limit and Laravel’s application limiter serve different purposes. Cloudflare can reject excess edge traffic before it consumes app resources; Laravel understands accounts and application operations. Do not blindly count all API reads and writes together, and do not place a low limit on health checks, queued callbacks or a mobile client that legitimately makes several parallel requests.
See Laravel’s rate-limiting documentation for your installed version. Confirm the actual client IP the app records before trusting an IP-based limit. If all requests appear to come from a Cloudflare address, a proxy configuration error can group every visitor together.
Step 4: keep sessions and authenticated responses out of shared cache
Cache fingerprinted public assets under paths such as /build/ or /assets/ when their headers permit it. Treat dashboards, JSON with private data, login, CSRF endpoints and session-specific HTML as dynamic. Do not broadly cache pages simply because the application is written in Laravel.
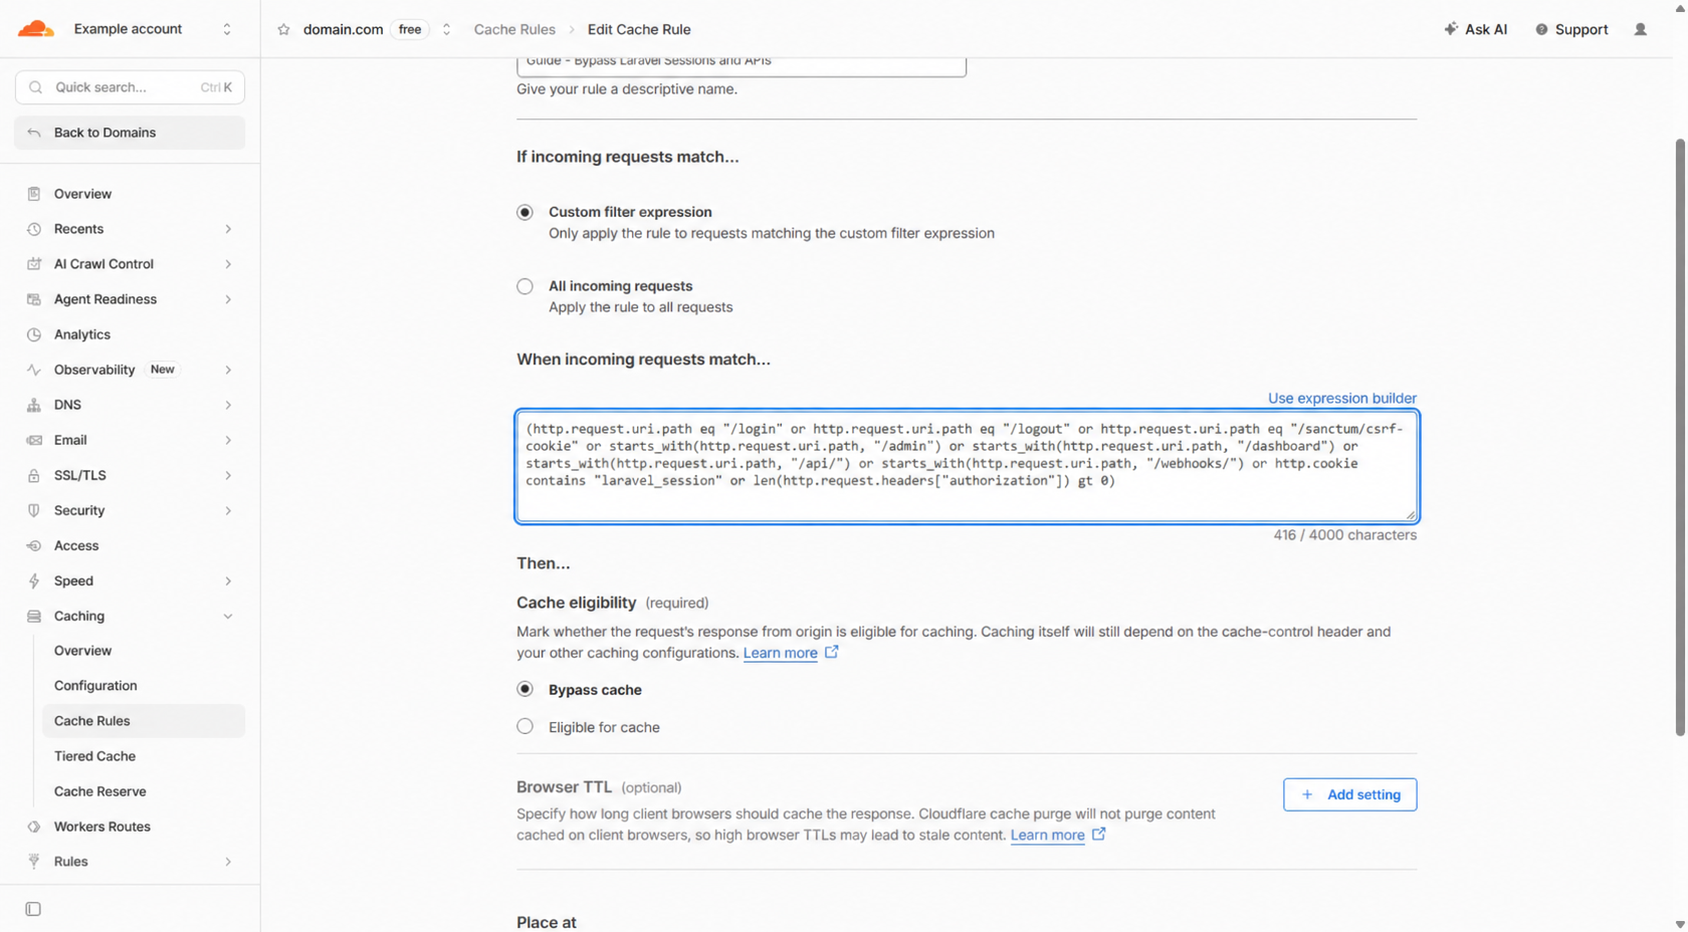
To create a conservative Laravel bypass, open Caching → Cache Rules → Create rule, choose a custom expression, paste the example below, select Bypass cache, and deploy. Adapt every path and replace laravel_session with the real configured session-cookie name. Use a descriptive name such as Guide – Bypass Laravel sessions and APIs.
(http.request.uri.path eq "/login" or http.request.uri.path eq "/logout" or http.request.uri.path eq "/sanctum/csrf-cookie" or starts_with(http.request.uri.path, "/admin") or starts_with(http.request.uri.path, "/dashboard") or starts_with(http.request.uri.path, "/api/") or starts_with(http.request.uri.path, "/webhooks/") or http.cookie contains "laravel_session" or len(http.request.headers["authorization"]) gt 0)Review header-field availability for your plan before using that example. Private API responses should have suitable origin cache headers and must not become public if an edge rule changes. The screenshot below shows the Laravel rule and the selected Bypass cache control.
Step 5: block probes for environment and repository files
Attackers commonly request /.env or /.git/ to look for secrets and source history. The following supplemental rule blocks common root-level probes. It is useful for Laravel and static deployments, and can be used on other stacks as well.
Rule name: Guide – Block private file probes
Action: Block
(http.request.uri.path eq "/.env" or starts_with(http.request.uri.path, "/.env.") or http.request.uri.path eq "/.git" or starts_with(http.request.uri.path, "/.git/"))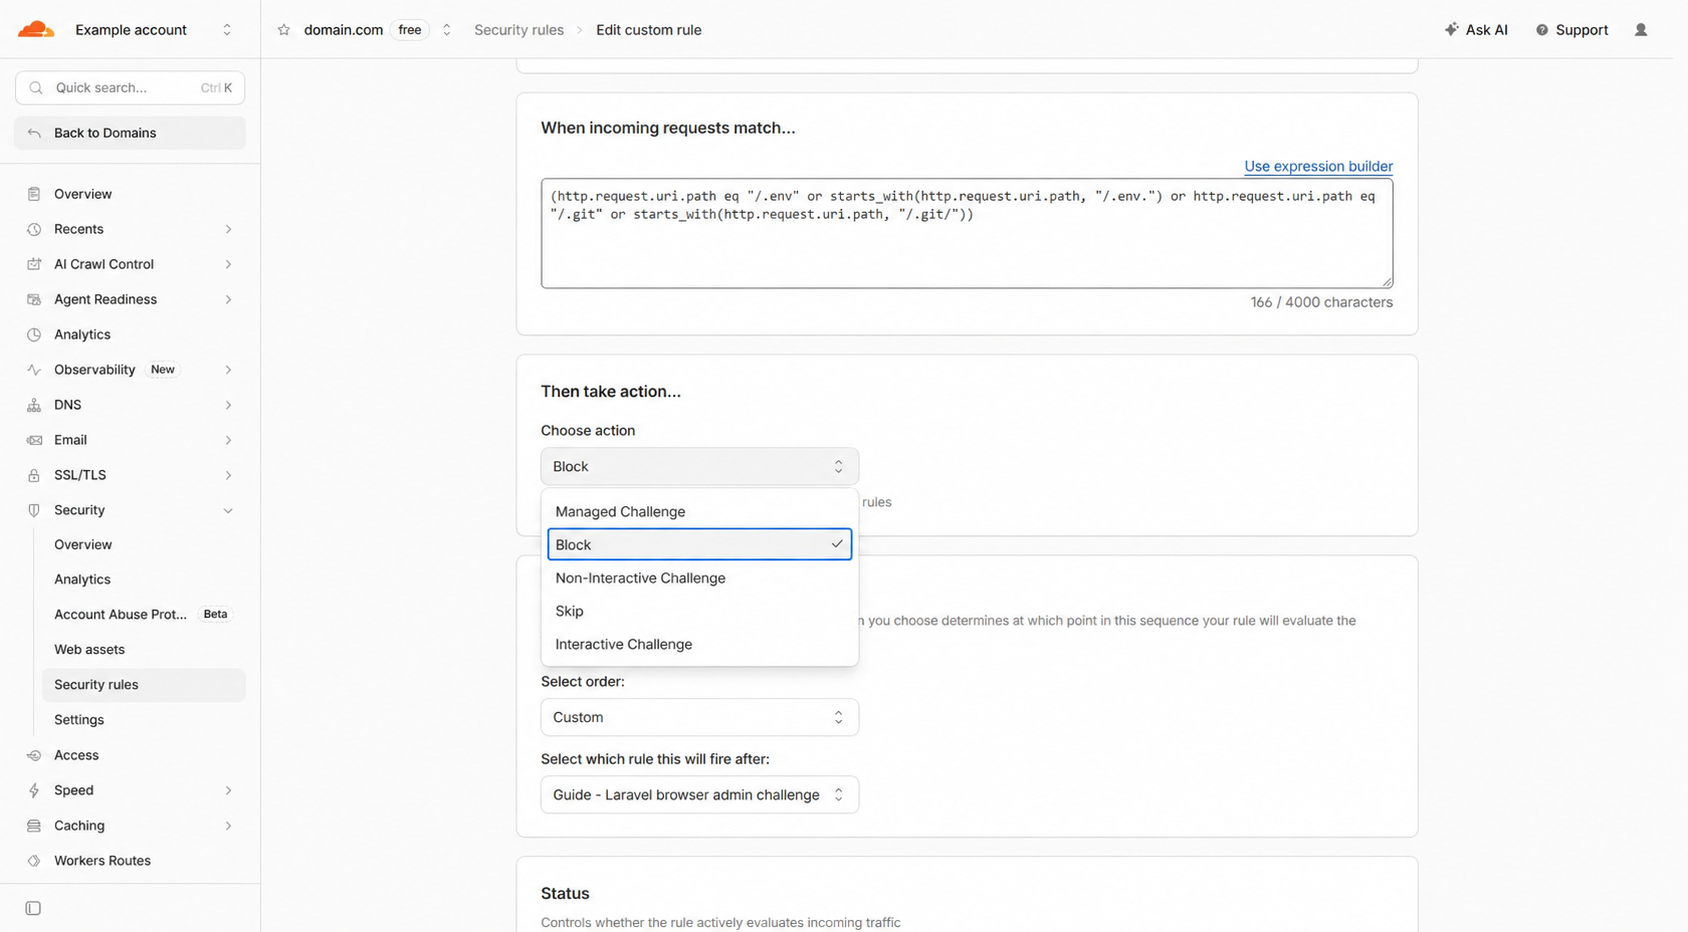
- Create a custom rule, paste the expression, choose Block, and deploy.
- Verify the active rule in the list. On a site you own, request a known nonexistent private-file path and inspect the security event rather than exposing a real secret for testing.
- Check that the origin independently denies access to private files. Remove accidental public backups and configuration files.
- Add actual sensitive paths found in your deployment review. Encoded paths, different casing, backups at other locations and other filenames need server-level protection; this short expression is not an exhaustive secret scanner.
Do not block every URL beginning with a dot. Public /.well-known/ paths may be required for verification or other standards. Keep the matcher focused on files that should never be served, and preserve legitimate application routes.
Step 6: validate Laravel after each change
- Log in and out, reset a password, open a protected dashboard and check authorization.
- Submit a form with CSRF protection and upload a file. Confirm Livewire/SPA responses remain the expected type.
- Call the API with valid and invalid credentials. A valid response should remain JSON; errors should follow the application’s contract.
- Replay a sandbox webhook using the provider’s verification process. Check queue jobs and resulting records.
- Compare request IPs and HTTPS detection with your real proxy topology. Inspect redirects for loops.
- Verify private pages do not appear as a shared cached response between two accounts. Check logs and Cloudflare events for false positives.
Part 3: protect a static website with Cloudflare
Step 1: protect the public host and deployment
A static site usually serves prebuilt HTML, CSS, JavaScript and images. It does not run WordPress or Laravel for every page request, which reduces some server-side risks. It can still be scraped, attacked at the origin, misconfigured, or linked to vulnerable forms and APIs. Public JavaScript and everything you upload to a public site can be read by visitors.
Enable the orange-cloud proxy for a conventional hosted static origin, use strict HTTPS, and keep the deployment account secure. If you use Cloudflare Pages or another managed static platform, follow that platform’s custom-domain instructions; do not invent an origin IP or change its managed TLS setup using the conventional-server example.
Upload only the intended build output. Exclude .env, Git metadata, credential files, private source data and backups. Browser-delivered API keys and environment variables are public if bundled into client JavaScript. Use server-side credentials for operations that require secrets. The private-file Block rule shown in the Laravel section can add edge protection for common probes, but it cannot make a secret safe after you have shipped it to the browser.
Step 2: cache public resources with a clear boundary
Public immutable assets with versioned filenames can be cached longer than HTML that changes frequently. Start with your hosting platform’s correct Cache-Control headers and Cloudflare’s default handling of eligible assets. You do not need a blanket HTML cache rule simply to benefit from Cloudflare’s proxy and security.
- Check which responses are truly identical for every visitor. Separate public files from form endpoints and API calls.
- Use sensible origin headers for public HTML and versioned assets. Keep private or authenticated responses out of shared cache.
- If you add an HTML Cache Rule, scope it to proven public pages and GET/HEAD requests, then review all other rules that can override its settings.
- Deploy a page update and verify the new content appears after the intended cache lifetime or purge. Keep a repeatable purge/deployment process.
- Inspect a sample response in browser developer tools. A
CF-Cache-Statusvalue describes that request’s cache handling; it is not proof the entire site is cached or protected.
An asset cache can reduce origin requests and bandwidth during scraping. It does not stop all scraping, and a cache hit still counts as website traffic. Use bot policies and targeted security controls where the logs show abuse, rather than making every stylesheet solve a challenge.
Step 3: secure forms and attached services separately
A static contact page may submit to an external form provider, a serverless function, or an API on another hostname. A rule for domain.com may not protect that destination. Identify the actual endpoint and its hosting platform before adding a security rule.
Use server-side input validation, request limits and spam controls on the form handler. Cloudflare Turnstile can help where supported, but the server must verify the token; adding a widget to the page alone is insufficient. Keep automated callbacks outside browser challenges and authenticate them with the provider’s documented method.
Apply security rules to the actual form or API host. A rule protecting your public pages may not cover a separate service hostname.
Step 4: verify the static website
- Open the homepage and a deep link in a fresh browser session. Check CSS, scripts, fonts, downloads and images.
- Submit the contact form and inspect its result. Verify its handler receives the request.
- Deploy a small public content change and check cache invalidation.
- Confirm no private build files are served, and verify the origin’s own access controls.
- Check crawler metrics, security events and origin bandwidth after introducing bot rules. Preserve the search crawlers you deliberately want.
Control AI crawlers without blocking useful traffic
Decide separately whether to permit AI search, user-directed agent visits and training crawls. These categories can overlap. A Training block can affect mixed-purpose crawlers even when Search remains allowed.
Configure and test your crawler policy
- Open Security → Settings → Configure AI bot policies. Review Search, Agent and Training individually.
- Choose Allow, Block on pages with ads or Block on all pages according to your policy. Check the effective crawler list for overlapping classifications.
- For a selective policy, review individual crawler controls in AI Crawl Control. An unblocked individual switch does not override a separate category or WAF block.
- Save, reopen the settings and inspect crawler requests and security events. Confirm desired search crawlers can still access public pages.
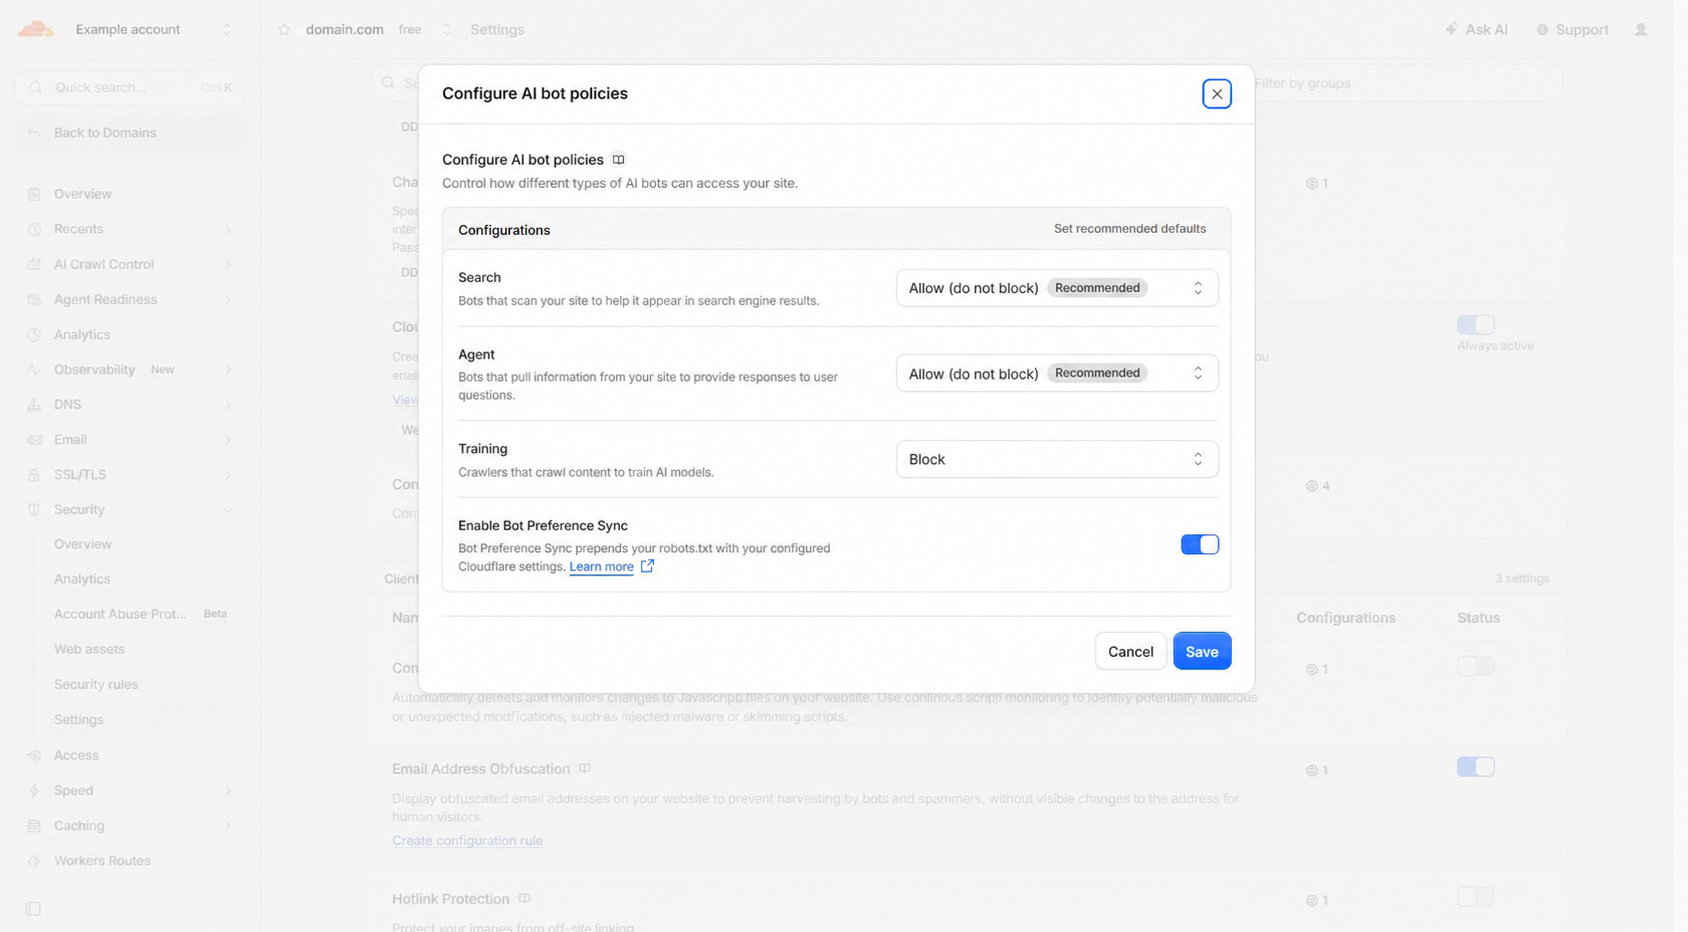
Use the current AI policy documentation to configure the settings for your zone. A bot’s User-Agent header can be spoofed; use request patterns and suitable detection alongside named-crawler controls.
robots.txt communicates preferences to cooperative crawlers; it does not enforce a firewall block. Google-Extended is a robots control token, not a separate HTTP User-Agent. For diagnosis, crawler-policy choices and origin protection, follow our AI scraper bot guide.
Close the direct-origin gap and monitor performance
Cloudflare protects requests passing through its proxy. A known origin address can bypass edge rules if the web server still accepts direct requests. DNS history, email infrastructure and unproxied hostnames may expose that address.
- Ask your host about restricting website ports to Cloudflare’s current IP ranges, accounting for IPv4, IPv6 and necessary monitoring.
- Consider enforced Authenticated Origin Pulls or a suitable Tunnel setup where supported. Preserve administration, mail and recovery access.
- Trust forwarded visitor headers only through the configured trusted proxy chain.
- Compare origin CPU, memory, workers, errors and cache misses with edge events after each change.
On shared hosting, work with your provider rather than attempting server-wide firewall changes. If legitimate demand still exceeds capacity after filtering and optimisation, review our hosting options or contact our support team.
Troubleshooting: fix false positives without dropping all protection
| Symptom | What to check | Focused fix |
|---|---|---|
| Administrator sees repeated verification | Login/admin path match, clearance cookies, redirects and browser settings | Inspect the event and narrow the specific matcher; fix HTTPS and redirect configuration |
| Checkout or payment callback fails | Country/custom rules, bot feature, WAF event and actual callback URL | Exclude the machine endpoint from browser challenges; retain signature checks |
| API client receives HTML instead of JSON | Cloudflare challenge response and matching rule | Use an API-compatible policy on that endpoint and keep authentication |
| Users see the wrong cart or account data | Edge, plugin and origin caching; session cookie exclusions | Stop the offending cache rule, purge affected cache and restore private-content exclusions |
| 429 or temporary blocks for genuine users | Rate counter, NAT/shared IP, threshold and mitigation window | Tune the targeted limit based on logs and application use |
| 525/526 TLS errors | Origin HTTPS, certificate chain, hostname and validity | Repair origin TLS/certificate configuration while maintaining strict validation |
| Site still hits resource limits | DNS-only web hosts, direct origin, cache misses and expensive URLs | Close bypass paths, optimize the app and review hosting capacity |
| Search traffic or crawler access drops | Effective AI policy, locked crawler blocks, robots and WAF | Review mixed-purpose category restrictions and verify desired crawler access |
When investigating a blocked request, record the time, URL, action, matching rule and Cloudflare Ray ID if present. Find the corresponding security event and change the smallest relevant condition. Disabling a recently added custom rule for diagnosis is different from permanently disabling all security. Keep a record of what you changed so you can restore the intended policy.
Final Cloudflare protection checklist
- Domain active on Cloudflare; all intended website hostnames orange-cloud proxied.
- Email and other non-web DNS records preserved and working.
- Origin HTTPS valid; Full (Strict) confirmed; redirects tested.
- Only application-appropriate custom rules deployed, with host/path conditions reviewed.
- Login burst threshold measured and tuned; no low limit applied to all requests.
- WordPress/WooCommerce private paths and session responses bypass shared cache.
- Laravel APIs, CSRF flows and callbacks tested without browser challenges.
- Static deployment contains only public output and no bundled secrets.
- Country rules match only your intended locations, with appropriate exclusions for customers and integrations.
- Effective AI crawler access matches your search, agent and training choices.
- Origin access restrictions, backups and resource monitoring reviewed.
- A rollback path and real-user workflow tests completed before relying on the setup.
You do not need every rule in this guide. Choose the protections that fit your website, review their order, and test normal workflows after each change. For WooCommerce, prioritize checkout and payment callbacks; for Laravel, check sessions and APIs; for a static site, verify forms and connected services.
Frequently asked questions
Does Cloudflare protect a DNS-only website?
Cloudflare’s edge web protections apply to eligible proxied website traffic. A DNS-only web record directs traffic outside that proxy path. Enable Proxied for the intended website hostnames and also address direct-origin access.
Can I protect WordPress with Cloudflare Free?
The Free plan provides useful proxy, HTTPS and security features, with limits on rules, actions and detection options. Check the controls in your dashboard. Rule allowances and advanced features depend on your plan.
Should WooCommerce cart and checkout pages be cached?
Keep personalized cart, checkout, account and session responses out of shared cache. Public assets can be cached. Any public HTML caching needs tested exclusions in Cloudflare, the WordPress plugin and the hosting cache.
Does Bypass cache also skip Cloudflare security?
No. Cache Rules control caching. Custom security rules, rate limiting and other applicable protections can still evaluate a request that bypasses cache.
Can I allow OpenAI search but block GPTBot?
You can choose separate access for OAI-SearchBot and GPTBot, but verify the effective Cloudflare category policy, individual blocks, WAF and robots directives. An individual off switch is not a universal allowlist or a bypass of other security rules.
Does Cloudflare guarantee my website cannot crash?
No. It can reduce unwanted edge traffic and origin work, but application bugs, insufficient hosting capacity, direct-origin attacks and other failures still require monitoring, backups and correct server configuration.
Start with the proxy and secure HTTPS, protect the expensive endpoints, and test the customer journey. If you need help interpreting hosting resource errors, contact our support team with the affected URLs, timestamps and relevant Cloudflare event details.