
Artificial Intelligence is changing how websites and applications are built. With tools like Google AI Studio, developers can quickly generate AI-powered web applications, prototypes, chatbots, and interactive tools without spending weeks coding from scratch.
But after building your app, the next big question is:
How do you deploy your Google AI Studio web app online?
Table of Contents
While Google defaults to its cloud services, moving your AI Studio app onto a high-performance hosting platform like Aveshost gives you full control over your files, emails, and database environments—without breaking the bank.
In this easy guide, we will walk step-by-step through syncing your code from Google AI Studio to GitHub and deploying it seamlessly onto your Aveshost server. Let’s bring your AI creation to the real world!
Sync Your Google AI Studio Project with GitHub
Google has removed the direct Export feature from Google AI Studio. To download or access your project files, you now need to sync or push the project to GitHub.
Follow these steps:
- Click the Settings gear icon in the top-right corner of Google AI Studio.
- Select the GitHub option.
- Connect your GitHub account. To avoid permission or authentication errors, it is recommended to use the same email address for both your Google account and GitHub account.
- Enter a short and simple repository name, such as: mycool-webapp
- Click Push to sync your project to GitHub.
Once the sync is complete, your project files will be available in your GitHub repository, where you can clone or download.
Step 2: Grab Your Aveshost Server Credentials
To push your files online, you will need the login details to your hosting control panel.
- Check Your Email: When you first purchased your web hosting package from Aveshost, an automated welcome email was sent to you containing your server hostname, username, password, and control panel link.
- Can’t Find It? No sweat! Simply log into your Aveshost Client Area, go to the support section, and open a quick ticket. The customer support team will securely resend your login details right away.
If you don’t already have hosting, you can get started with Aveshost Web Hosting.
For larger or more resource-intensive projects, we recommend choosing a VPS plan for better performance and flexibility: Aveshost Self-Managed VPS Hosting
Deploy Your Web App Using AI
Remember the traditional dance of launching a web application? It usually looked something like this: open a clunky FTP client or SSH terminal, carefully drag and drop hundreds of files, manually log into a control panel to create a MySQL database, map the database user permissions, copy-paste long connection strings into an environment file, and pray that nothing breaks along the way.
And if you ran into a hidden configuration bug or a missing package error? You were stuck scouring Stack Overflow forums for hours just to get your homepage to load.
Not anymore. Welcome to the era of AI-driven deployment.
With modern AI tools like Codex Desktop connected to your project folder, the entire deployment infrastructure becomes completely conversational. Instead of bouncing back and forth between terminal windows and your hosting dashboard, you can stay comfortably right inside your local computer environment.
You simply tell the AI: “Deploy this project for me using my server credentials.”
In the background, the AI acts as your senior DevOps engineer. It securely connects to your Aveshost server, logs into your control panel via secure automated routines, uploads your code, and intelligently parses your project structure. If it notices your application requires a database, it will automatically provision the database, create a secure user, map the connection variables, and run your backend migrations for you simultaneously.
Even better? If there’s a missing dependency or a minor path conflict between your local environment and your production server, the AI doesn’t just error out and throw a cryptic log code at you. It analyzes the deployment error, diagnoses the issue, auto-fixes the bug directly from your local PC, and pushes the working version live—all without you ever having to manually log into your hosting control panel or VPS.
It turns what used to be a stressful, error-prone 30-minute chore into a seamless, hands-free conversation that takes less than two minutes.
Step 3: Secure Your Credentials in Your Project Folder
Because we are using Codex Desktop to handle the heavy lifting, the AI assistant needs the keys to your hosting environment. However, security always comes first. You must lock down your sensitive server details so they remain safely on your local machine and never accidentally leak into a public GitHub repository.
Here is how to set up a secure gateway right inside your code editor:
- Open your project folder in Visual Studio Code or your preferred code editor.
- In the root directory, create a brand-new file and name it exactly:
.serverCredentials - Open your project’s
.gitignorefile (create one in the root folder if it doesn’t exist yet) and add.serverCredentialson a fresh line.
🔒 Security Check: By adding the file name to your
.gitignore, Git will completely ignore it. Even if you push updates to GitHub, your passwords will stay completely local and safe.
Option A: For DirectAdmin Control Panels (Shared Hosting)
DirectAdmin_url: https://yourhostname.com:2222 or https://yourdomainname.com:2222
Username: your_username_here
Password: your_password_here
Option B: For Virtual Private Servers (VPS)
If you are deploying your web app directly onto a clean Aveshost Cloud VPS via secure shell, fill out this server block instead:
IP: your_vps_ip_address
User: root
Password: your_root_password_here
Port: 22
Once you have filled out your specific server blocks, hit save in VS Code. Your workspace is now fully prepared for hands-free AI deployment!
Step 4: Let AI Handle the Deployment (The Prompt Blueprints)
Launch the Codex Desktop app, or download and install it if you haven’t already.
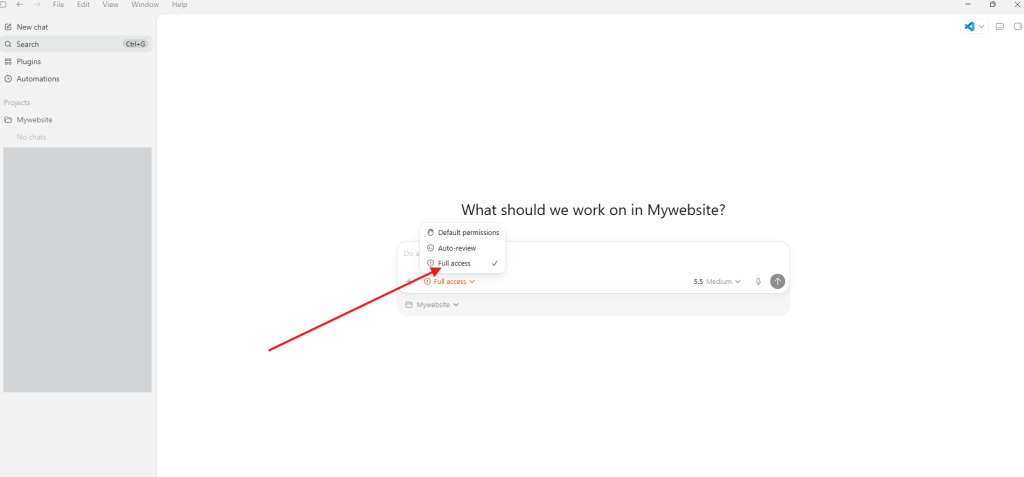
Grant Codex Full Access Permissions.
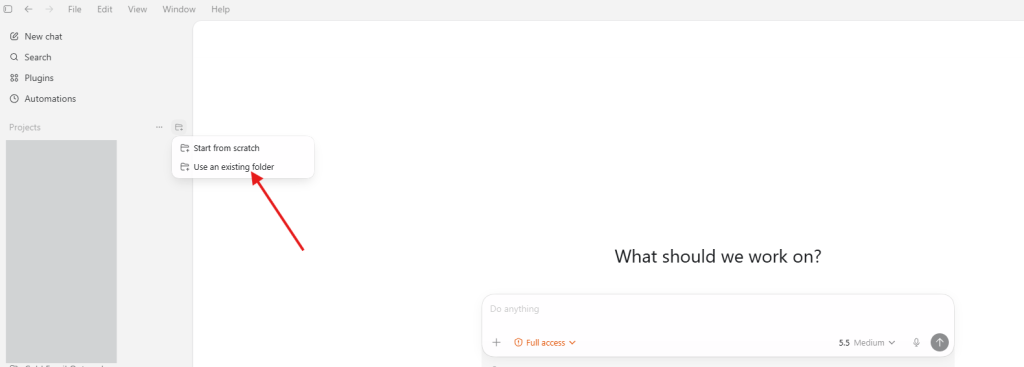
Next, go to the Projects panel, select “Use an Existing Folder”, and choose your project directory from your computer.
Go back to VS Code or your code editor, right-click your .serverCredentials file, select Copy Path, and use the blueprint that matches your application setup:
Special Step for VPS Deployments: Bulletproof Your Server Security First
If you are deploying on a fresh Virtual Private Server (VPS), you are working with a clean slate. Operating directly out of the default root account on standard port 22 leaves your server wide open to automated brute-force attacks.
Before you push a single line of your application code, you can leverage Codex to completely harden and lock down your server infrastructure automatically.
Simply feed your initial root login details into your .serverCredentials file and pass this security blueprint prompt to the AI:
AI Server Hardening Prompt: “Using the root login details provided in my
.serverCredentialsfile, please secure this VPS by completing the following steps:
- Create a brand-new, isolated system user and grant them full
sudoadministrative privileges.- Switch configuration contexts over to this new user.
- Install and configure Fail2Ban to automatically detect and block malicious IP addresses trying to brute-force the server.
- Change the default SSH port from
22to a unique, non-standard port number [e.g., 2284] to hide the server from automated scanners.”
Going Passwordless: Setting Up SSH Keys with AI
For maximum, enterprise-grade security, you should completely eliminate password logins in favor of cryptographic keys. You don’t have to navigate complex terminal configurations to set this up:
- Open PuTTYgen (or your terminal’s key generator) on your local computer and click Generate.
- Save your private key safely on your PC, and copy the long string of text representing your public key.
- Hand that public key over to the AI with this follow-up prompt:“Take this generated public SSH key:
[Paste your public key string here]and configure it for the newly created sudo user on my server. Once successfully injected, disable password authentication entirely so the server only accepts SSH key connections.”
Once Codex completes these automated tasks, remember to update your local .serverCredentials file with your new username, new port, and private key path before proceeding with your application deployment!
Note: The configuration above applies only to VPS hosting users.
1. Deploying a Static Website (No Database)
If your site is built using pure HTML/CSS/JavaScript, or is a static build from a framework (like an Angular or React build output), use this prompt:
AI Prompt: “Use the server login details located here:
C:\Users\P C\Documents\Project\.serverCredentialsand deploy the website on the server for me.”
Codex will read the credentials, log into your file manager via the control panel API, zip up your static files, upload them, and extract them directly into your public_html directory.
Note: If your hosting plan supports multiple domains, make sure you specify the exact domain where the website should be deployed.
3. Deploying App Engines (Node.js and Python Apps)
Application servers require a runtime environment to be explicitly initialized on the server backend before they can receive traffic. You have two excellent ways to handle this with AI:
- The Hybrid Approach: Log into your Aveshost control panel manually, navigate to “Setup Node.js App” or “Setup Python App”, and click create. Once the shell environment exists, jump back to Codex and prompt:“I have initialized the Node/Python environment in my control panel. Please use the server login details here
C:\Users\P C\Documents\Project\.serverCredentialsto deploy my application code into that environment, install dependencies, and start the application engine.” - The Fully Autonomous Approach: If you prefer to stay entirely hands-off, you can command the AI to use browser automation:“Use the server login details here
C:\Users\P C\Documents\Project\.serverCredentialsand launch a headless Chrome instance to log into my control panel. Create a new Node.js/Python application environment first, and then deploy my local project files directly into it.”
For VPS users, you can simply instruct Codex to automatically set up and configure the required Node.js or Python environment needed for your deployment.
Instead of manually installing runtimes, dependencies, process managers, or configuring your server through SSH, AI can help automate the entire setup process directly on your VPS.
Step 5: Pushing Future Updates Without Breaking the Site
As you continue to use “vibe coding” in Google AI Studio to tweak features, add colors, or add new tools, pushing updates to your live site is incredibly seamless.
When syncing or pushing a new build to GitHub from AI Studio, you want to make sure your live production database environment strings are never accidentally overwritten or deleted on the live server.
Whenever pushing an incremental update via Codex, always use this safeguard prompt structure:
“Please deploy my new changes to production using the server credentials at
C:\Users\YourName\Documents\MyAIApp\.serverCredentials. Crucial: Ensure that the existing production.envfile (and database configuration details) currently residing on the live Aveshost server are completely preserved and NOT overwritten. Only push the new code changes.”
Final Thoughts
You don’t need a massive, confusing cloud infrastructure bill just to run a prototype you built over the weekend. By combining the unmatched speed of Google AI Studio’s generation engine with the reliable, and affordable power of Aveshost, you get the absolute best of both worlds: hyper-fast AI creation and professional web hosting control.
Are you ready to take your AI app live? Head over to Google AI Studio, grab your code framework, and let’s get it launched on your custom domain today! If you hit any snags configuring your Node.js app environment, just reach out to the Aveshost technical support team—they are always ready to help.
Suggested Reading:
- How to Deploy Your Website from VS Code Using AI
- How to Use Gemini for SEO (Prompts, Tips & Strategies)
- How to set up DNS records for your domain in a Cloudflare
- How to Get a Free Domain Name – Here’s How (No Tricks)
- Top 90+ Essential Linux Commands Plus Cheat Sheet
- 50+ Essential Git Commands (With Downloadable Cheat Sheet)
Frequently Asked Questions (FAQs)
What is Google AI Studio?
Google AI Studio is a platform from Google that allows developers to build AI-powered applications using Gemini models and AI tools. It can be used to create chatbots, AI assistants, automation tools, and web applications.
Can I host a Google AI Studio web app on Aveshost?
Yes. You can host your Google AI Studio web app on Aveshost using shared hosting, Node.js hosting, Python hosting, or VPS hosting depending on your project requirements.
Why did Google remove the direct export option in AI Studio, and is GitHub safer?
Yes, it is significantly safer! Google shifted to a direct GitHub sync because modern full-stack web applications require version control. Syncing with GitHub ensures your source code is securely backed up in the cloud, tracks revisions automatically, and gives you a clean way to pull code down to your local PC or push it directly to your production environments.
Can Codex Desktop automatically create databases for any type of web app?
Absolutely. As long as you provide valid server credentials (whether DirectAdmin, cPanel, or root VPS access), Codex’s AI engine can read your application framework (like WordPress, Node.js, or Laravel), determine the database dependencies, log into your hosting backend, create the database and database user, map them together, and seamlessly inject those production credentials right into your live .env or configuration file.
Do I need SSH or FTP knowledge to deploy my app?
Not necessarily. Traditional deployment often required FTP, SSH, or manual control panel configuration, but AI-assisted workflows can simplify much of the process and reduce the need for advanced server management knowledge.
Is VPS hosting better for AI applications?
For larger AI-powered applications, VPS hosting is usually the better option because it provides more server resources, flexibility, scalability, and better performance for handling AI workloads and backend processing.
Will updating my website using AI overwrite user data or break my live site?
Not if you use a preservation prompt. If you simply tell an AI to “overwrite everything,” it might replace your live, production .env file with your local test configuration. To prevent this, always include a safety clause in your prompt, such as: “Deploy my new code changes but preserve the existing production database and .env configuration file on the server without overwriting them.”