

Coolify on a VPS gives you a familiar way to deploy applications while keeping your hosting environment under your control. Connect a Git repository, build your Next.js project or Docker stack, attach a domain and publish through HTTPS—all on our self-managed cloud VPS.
If you are ready to move beyond Vercel or Heroku, the appeal is straightforward: choose your server capacity, run several suitable projects together and manage the deployment workflow from one dashboard. You can keep the convenience of automated releases while building around a cloud hosting budget you choose.
This guide takes you from a fresh Linux VPS to Git-based Next.js deployments and a Docker Compose stack. It also covers environment variables, persistent storage, migration, backups and troubleshooting so your platform remains useful after the first successful deployment.
- Next.js route: deploy a production Node.js application with Nixpacks.
- Docker route: use a Dockerfile or a repository-based Compose stack.
- Hosting foundation: our self-managed cloud VPS, full root access and SSD storage.
- Production essentials: HTTPS, private databases, health checks and tested recovery.
Table of Contents
Why use Coolify on a VPS?
Coolify is a deployment platform that runs applications as containers on servers you connect. It helps organise projects, source repositories, builds, domains, variables and services. In the self-hosted approach used here, you install the Coolify dashboard on your VPS and deploy your initial applications to that environment.
This is especially useful for developers running client projects, SaaS products, internal tools or an API with background workers. You can choose the application runtime, share available server capacity across suitable workloads and grow the hosting configuration as demand increases.
| What you want | How this setup helps |
|---|---|
| Git-based releases | Connect your repository and configure deployments from the chosen branch. |
| Flexible application hosting | Run Next.js, custom Docker images and multi-service Compose definitions. |
| Control over your environment | Choose your Linux configuration, storage, application versions and server region. |
| A capacity-based budget | Select a cloud VPS plan and account for storage, backups and supporting services. |
A normal running container stays available between requests; it is not a per-request serverless function. That makes the setup useful for long-running APIs and workers. Restart policies, health checks and maintenance keep the service operating well.
Self-hosted Coolify is available without a Coolify Cloud subscription. Our hosting provides the cloud infrastructure, while you manage the Linux system, Coolify and your application releases. The result is an application platform shaped around your projects.
Choose the right self-managed cloud VPS
Start with our self-managed cloud VPS packages. They provide full root access, SSD storage and a choice of server regions. You do not need cPanel or DirectAdmin for this workflow; our self-managed plan comes without those control panels, and Coolify supplies the deployment dashboard.
Coolify’s installation guide lists two CPU cores, 2 GB RAM and 10 GB free disk space as its minimum requirements. Your applications, database, build process and retained images need capacity beyond that minimum. A Next.js production build can use substantially more memory than the running application.
| Plan | RAM | SSD storage | Listed monthly USD | Useful starting role |
|---|---|---|---|---|
| Cloud VPS 2 | 8 GB | 100 GB | $15.51 | A modest application stack with room for builds. |
| Cloud VPS 3 | 12 GB | 200 GB | $27.38 | More headroom for active apps and a database. |
| Cloud VPS 4 | 24 GB | 300 GB | $38.33 | Larger builds or several busier projects. |
These plan-page prices were checked on 12 October 2026. Your selected region, storage, billing cycle and add-ons determine the order total. Include your domain, backup storage, email delivery and any external services in the full monthly budget.
Choose a region near the people using the application and leave storage room for images, build cache, logs and persistent data. Start with a workload-sized plan, measure CPU and memory during both builds and normal traffic, then increase resources when the measurements call for it.
1. Prepare your server and deployment plan
Use a fresh VPS with a supported Linux distribution, such as Ubuntu 24.04 LTS. Sign in through SSH, apply system updates and confirm your administrator access works. Keep a working SSH session available while adjusting network rules so you can recover from a configuration error.
apt update
apt upgrade -y
apt install -y curl
free -h
df -h
Run these commands as root. They update the OS, install the download tool and show available memory and disk space. Install Coolify only after reviewing the current official prerequisites. Its automated installer can prepare Docker for a fresh environment; an existing customised Docker installation deserves a review before changes.
Plan separate hostnames, such as panel.example.com for Coolify and app.example.com for your application. Replace example.com with a domain you control. Decide which Git branch represents production, which data must survive redeployments and where recovery copies will be kept.
| Connection | Port in this guide | Access approach |
|---|---|---|
| SSH | 22/TCP, unless changed | Restrict administrative access to trusted sources. |
| Public web traffic | 80/TCP and 443/TCP | Allow the proxy to serve websites and obtain certificates. |
| Bootstrap dashboard | 8000/TCP | Use a restricted path during initial setup. |
| Direct dashboard features | 6001/TCP and 6002/TCP | Required for direct-IP real-time updates and terminal access. |
| Application and database backends | 3000 and 5432 internally | Route through the proxy; keep database access private. |
Follow the official Coolify firewall guide for your deployment. Docker-published ports need Docker-aware rules; a basic host firewall configuration alone may not control them as you expect. Check both IPv4 and IPv6 exposure, and do not open database ports just to make the application connect.
2. Install Coolify and secure the dashboard
Review the official installer, then run its current command as root on the VPS:
curl -fsSL https://cdn.coollabs.io/coolify/install.sh | bashWait for the success message and dashboard address. Keep initial dashboard access restricted and create the administrator account immediately. The first person reaching an unclaimed installation can register as its administrator, so account creation belongs in the installation process.
An SSH tunnel provides a private bootstrap route. From your own computer, use the following command and keep the SSH connection open:
ssh -L 8000:127.0.0.1:8000 \
    -L 6001:127.0.0.1:6001 \
    -L 6002:127.0.0.1:6002 root@YOUR_VPS_IP
Replace YOUR_VPS_IP with your server address. Open http://localhost:8000 on your computer to reach the dashboard through the encrypted tunnel. The tunnel does not itself block public access, so keep the corresponding public ports restricted using the firewall guidance.
Create your administrator, complete onboarding and open Servers. Validate the localhost server connection and confirm that the proxy is running. Configure your dashboard hostname with HTTPS before making it your normal access method, and enable supported two-factor authentication.
Save a protected copy of /data/coolify/source/.env, including its APP_KEY, outside the live server. The key is needed to decrypt saved instance secrets after recovery. Once the dashboard, real-time connection and terminal work through its HTTPS domain, the firewall guide allows public access to 8000, 6001 and 6002 to be closed.
3. Connect your Git repository
Create a project and choose an environment, then add a new resource. For a public application repository, use its HTTPS URL and Check Repository. For a private repository, configure a supported Git integration or a scoped deploy key with access to the repository you intend to deploy.
Select the production branch and the correct base directory. Use / for a project at the repository root. A monorepo needs the appropriate app directory and a build setup that includes its shared packages. Commit the package lockfile so the build installs a reproducible dependency set.
Keep application secrets in Coolify’s environment settings, rather than committed .env files. Give staging separate credentials and data. A preview deployment should never accidentally run writes against the production database.
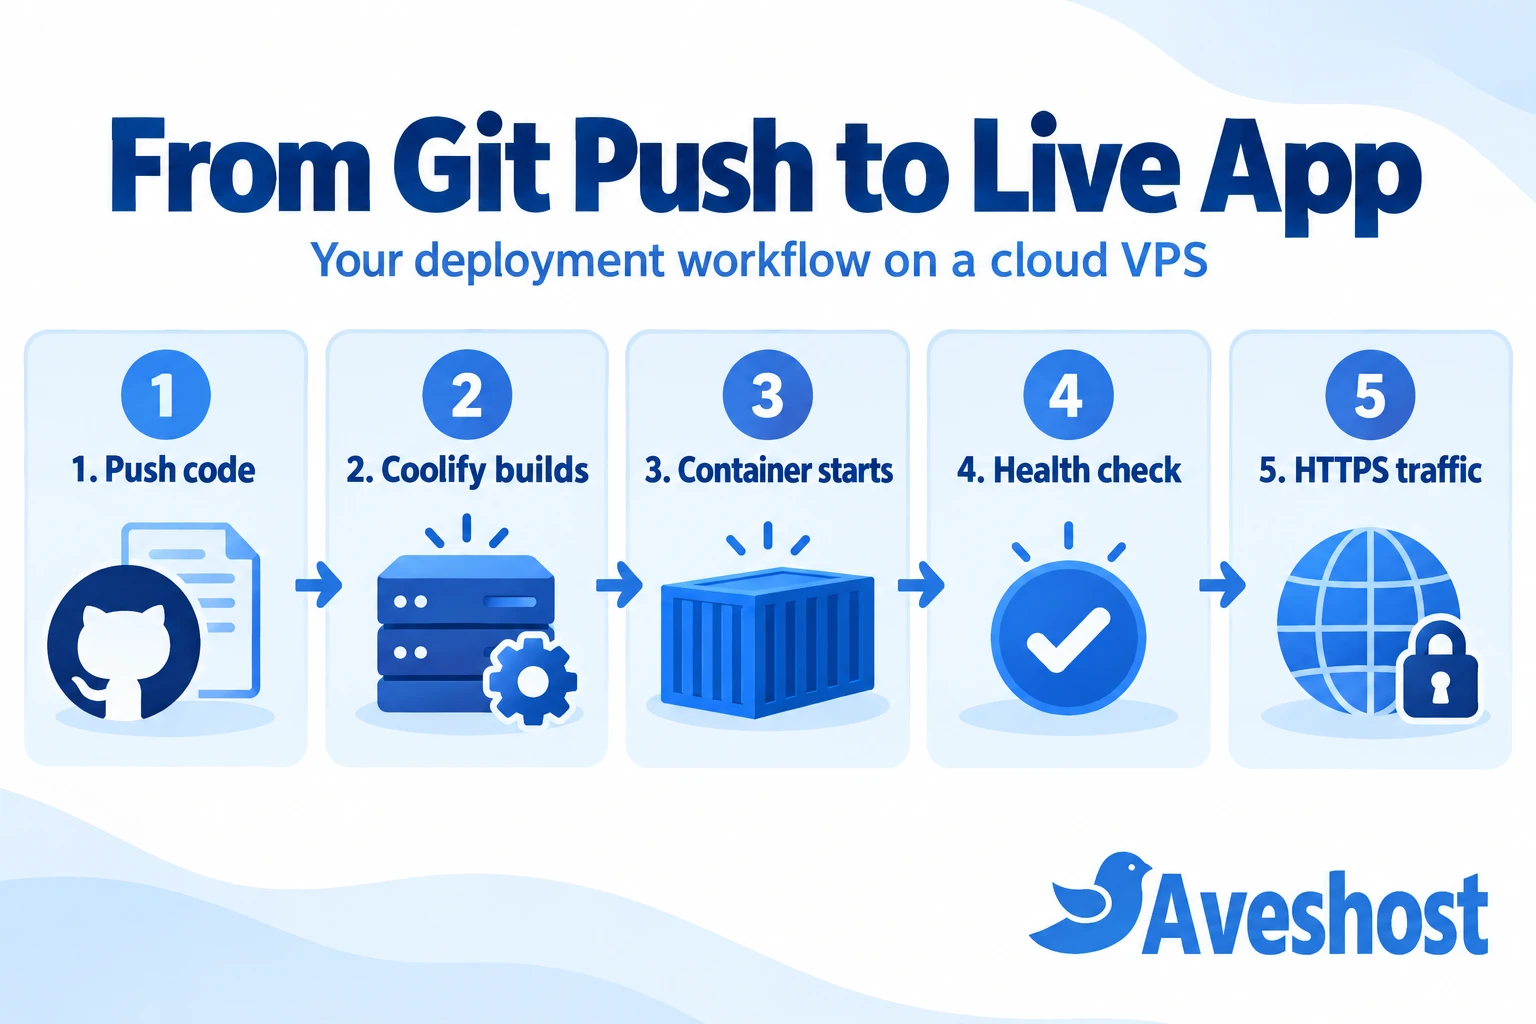
4. Deploy a Next.js application
Prepare the production scripts
Use the supported Node.js version for your application and verify its production build locally. For a standard npm project, the relevant package.json scripts look like this:
"scripts": {
  "dev": "next dev",
  "build": "next build",
  "start": "next start -H 0.0.0.0 -p 3000"
}
Merge these scripts into the existing package.json; this fragment is not a complete replacement file. Run npm ci and npm run build before publishing the repository changes. Production uses the compiled application, not next dev.
Configure the Coolify resource
Following Coolify’s Next.js example, choose Nixpacks as the build pack. In the current configuration interface, this becomes Build strategy under General > Build pipeline. Select a dynamic web application for a server-rendered project.
| Setting | Standard npm Next.js example |
|---|---|
| Base Directory | / for a repository-root project |
| Install Command | npm ci |
| Build Command | npm run build |
| Start Command | npm run start |
| Internal listening port / Ports Exposes | 3000 |
| Site type | Dynamic / Web application |
Review the detected commands first and override them when your project requires it. Choose a Node version compatible with your installed Next.js release and dependencies. The Nixpacks deployment guide explains the repository, command and variable settings.
Separate build-time values from server secrets
Add the environment variables your app needs and mark values as available during build only when the build must read them. NEXT_PUBLIC_ values are embedded in the browser bundle by Next.js during the build. Changing them requires a new build, and they must never contain passwords, private API keys or database credentials.
Server-side values can be read at runtime where your application supports it. A route generated during the build may still need its configuration at build time. Check the actual rendering path to establish which values are needed during the build and at runtime. The Next.js self-hosting guide covers these distinctions and cache behaviour.
Add a small health endpoint and deploy
For an App Router project, create app/api/health/route.ts, or the matching path under src/app:
export const dynamic = 'force-dynamic';

export async function GET() {
  return Response.json({ status: 'ok' });
}
Configure the resource’s health check to request /api/health on internal port 3000. This endpoint checks that the web process answers; add separate checks for database-backed workflows. Use a reasonable startup grace period for your app.
Select Deploy and inspect the deployment logs. Once the container is healthy, test a page, API route, image and login flow through the application URL. Confirm database access and any server-rendered features you use. A static export is suitable only when the project does not need server-only Next.js features.
5. Deploy Docker apps and multi-service stacks
Use a Dockerfile for a portable Next.js image
Choose Dockerfile when the repository should define its own runtime and build stages. For a standalone npm-based Next.js app, add output: 'standalone' to your existing next.config configuration:
const nextConfig = {
  output: 'standalone',
};

export default nextConfig;
This example uses an ESM configuration such as next.config.mjs. Preserve your other settings and use the syntax appropriate to your project. Next.js standalone output includes a minimal runtime; copy public files and .next/static into the final image as shown below.
FROM node:24-bookworm-slim AS dependencies
WORKDIR /app
COPY package.json package-lock.json ./
RUN npm ci

FROM node:24-bookworm-slim AS build
WORKDIR /app
COPY --from=dependencies /app/node_modules ./node_modules
COPY . .
RUN mkdir -p public && npm run build

FROM node:24-bookworm-slim AS runtime
WORKDIR /app
ENV NODE_ENV=production
ENV HOSTNAME=0.0.0.0
ENV PORT=3000
RUN groupadd --gid 1001 appuser     && useradd --uid 1001 --gid appuser --create-home appuser
COPY --from=build --chown=appuser:appuser /app/public ./public
COPY --from=build --chown=appuser:appuser /app/.next/standalone ./
COPY --from=build --chown=appuser:appuser /app/.next/static ./.next/static
USER appuser
EXPOSE 3000
CMD ["node", "server.js"]
Save this as Dockerfile at the repository root. This Dockerfile is designed for package-lock.json, npm scripts, and a standalone app without monorepo-specific tracing requirements. Use the same supported Node major locally and in the container; this example uses Node 24. Keep the base image and application dependencies updated, and include any native system libraries your dependencies need.
Add a .dockerignore to keep local dependencies, build output and secrets out of the Docker build context:
node_modules
.next
.git
.env*
npm-debug.log*
Commit the files, choose the Dockerfile build strategy in Coolify, select port 3000 and configure the application domain. The image starts server.js directly. If your app uses public build-time variables, explicitly declare and pass the needed non-secret build arguments before npm run build; the Dockerfile above does not inject them automatically.
Deploy a Next.js and PostgreSQL Compose stack
A Compose definition is useful when the application and its supporting services should be managed together. The following example builds the web app from the Dockerfile above and adds a private PostgreSQL service with persistent storage:
services:
  web:
    build:
      context: .
      dockerfile: Dockerfile
    restart: unless-stopped
    expose:
      - "3000"
    environment:
      NODE_ENV: production
      DATABASE_URL: "postgresql://appuser:${DB_PASSWORD:?}@database:5432/appdb"
    depends_on:
      database:
        condition: service_healthy
    healthcheck:
      test: ["CMD", "node", "-e", "fetch('http://127.0.0.1:3000/api/health').then(r=>process.exit(r.ok?0:1)).catch(()=>process.exit(1))"]
      interval: 30s
      timeout: 5s
      retries: 3
      start_period: 60s

  database:
    image: postgres:18
    restart: unless-stopped
    environment:
      POSTGRES_DB: appdb
      POSTGRES_USER: appuser
      POSTGRES_PASSWORD: ${DB_PASSWORD:?}
    volumes:
      - database-data:/var/lib/postgresql
    healthcheck:
      test: ["CMD-SHELL", "pg_isready -U $$POSTGRES_USER -d $$POSTGRES_DB"]
      interval: 10s
      timeout: 5s
      retries: 5

volumes:
  database-data:
Save this as compose.yaml beside the Dockerfile. Add a strong, URL-safe DB_PASSWORD in Coolify—for example, a randomly generated hexadecimal password. If the password contains reserved URL characters, encode them correctly in the database connection string.
The database-data mount uses /var/lib/postgresql for the PostgreSQL 18 image shown here. Check the image’s documented data layout before changing major versions. This example gives the web container a connection string; your application still needs a database driver or ORM, its schema, and an explicit migration process to use it.
In your project, add a Git-based application and select Compose as the build strategy. Set the base directory to / and the Compose location to /compose.yaml, then save and review the parsed definition. In Domains, add the web service domain as https://app.example.com:3000.
The :3000 suffix in that Coolify setting identifies the container’s internal port. Visitors still use https://app.example.com on the normal HTTPS port. The example has no public database port mapping. Deploy, check each service’s logs and test persistence by writing sample application data and redeploying.
Use the official Compose guide for the exact configuration workflow. Git-based Compose applications support repository events; Docker Compose Empty creates a pasted Service without Git events. Keep normal managed routing enabled unless you deliberately maintain all proxy labels and networks yourself.
Already building images in CI? Choose a Docker Image resource, supply the registry image reference and the internal port, then configure domains and variables. Prefer an immutable release tag or digest for repeatable deployments. An nginx image with internal port 80 is a simple first routing test, as shown in Coolify’s first-app guide.
6. Add your domain and HTTPS
Create an A record for the application hostname pointing to the VPS IPv4 address. Add an AAAA record only when IPv6 is configured and reachable. A stale AAAA record can send some visitors and certificate checks to the wrong destination.
Enter the HTTPS domain in the appropriate Coolify resource, confirm the proxy is running and deploy the configuration. Allow HTTP port 80 for the certificate challenge and HTTPS port 443 for the site. Resolve DNS and certificate issues before asking users to sign in.
Keep application ports internal and let Coolify’s proxy route web traffic. For a Compose resource, choose the correct receiving service and internal port; for a single app, set Ports Exposes correctly. A process listening only on 127.0.0.1 inside the container cannot normally be reached by a proxy in another container—use 0.0.0.0 inside the application container.
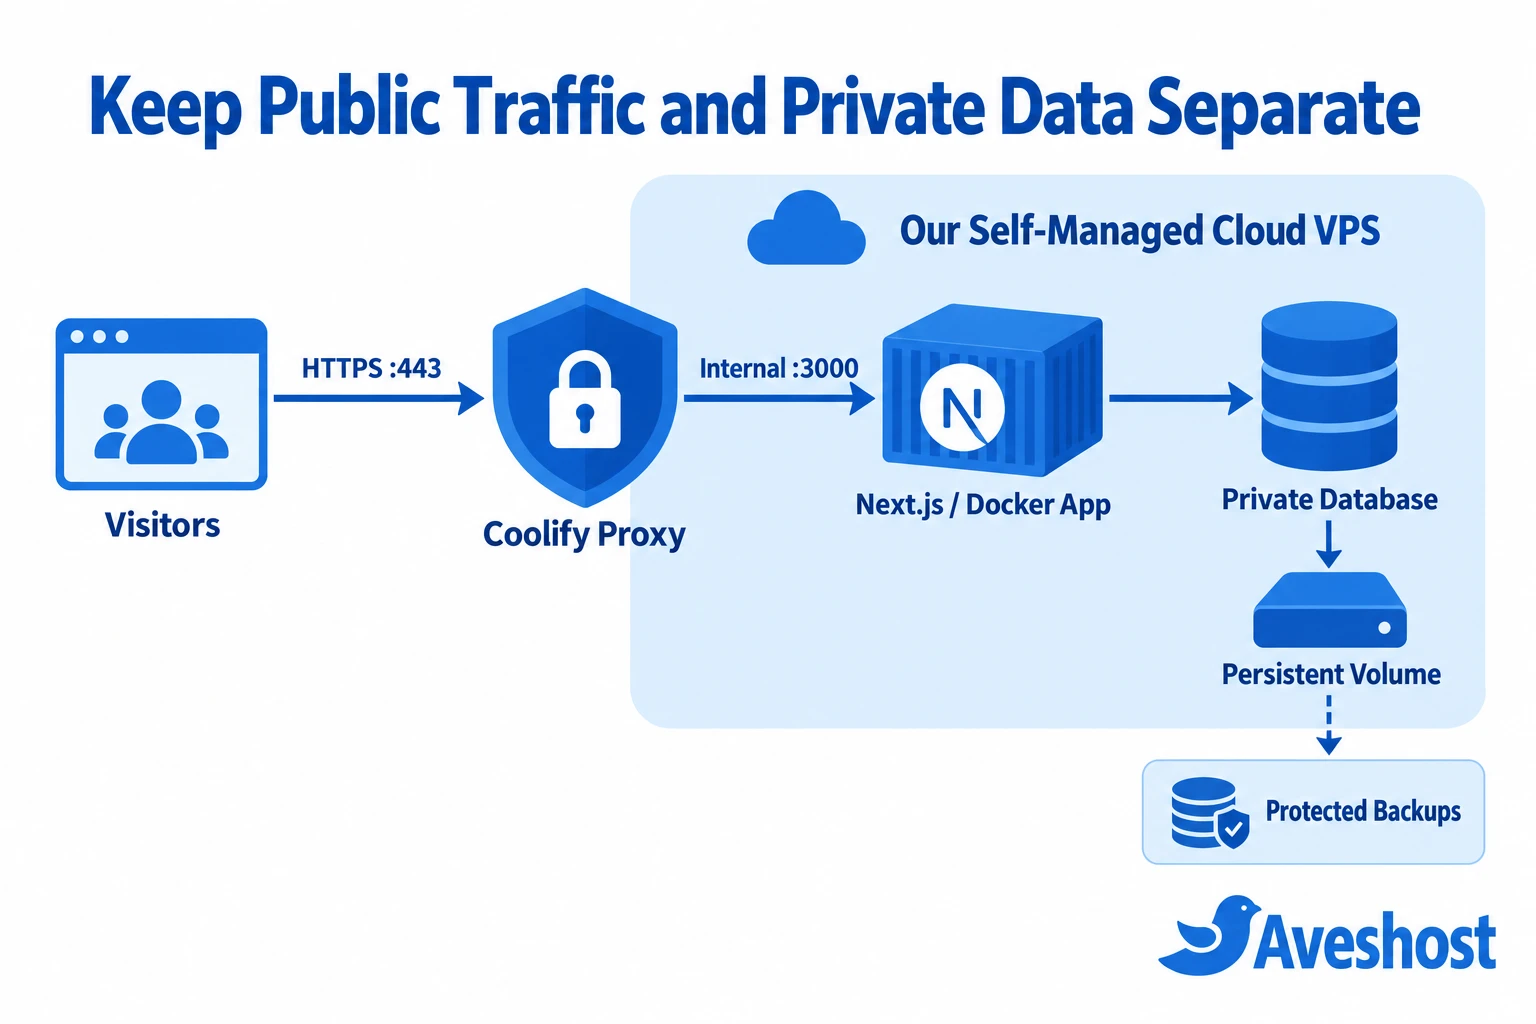
If you add Cloudflare, follow our website protection guide. Use valid origin certificates and Full (strict) where appropriate. Preserve WebSockets and streaming, and respect Next.js cache headers so authenticated or personalised responses do not enter a public cache.
7. Automate releases and plan rollbacks
First make a manual deployment work. Then enable automatic deployment for the production branch. With a supported Git integration, Coolify’s current documentation uses Advanced > Deployment > Auto deploy > Deploy on push (webhooks). Public-URL and deploy-key sources need the corresponding manual provider webhook setup.
Follow the automatic deployment guide, push a small change and confirm the matching commit appears in deployment history. Keep tests and review in your Git workflow before merging to production. Creating a repository connection alone does not establish every deployment trigger.
Retain suitable previous images so a known release remains available. The rollback guide explains how to select an older retained image. Review current variables and mounts for compatibility before rolling back, then test the domain, health endpoint and critical user flow.
Plan database migrations alongside releases. Prefer backward-compatible schema changes when old and new code may overlap. An image rollback does not undo a database migration or restore uploaded files. Data recovery uses its own tested backup process.
8. Back up, monitor and grow your stack
Protect three layers: the Coolify instance configuration, your application databases, and persistent files. In Coolify, open Settings > Backup, configure a schedule and storage destination, and confirm a successful execution. Preserve the instance APP_KEY separately.
The Coolify instance-backup guide covers the dashboard’s own data. Configure database-consistent backups and copies of uploads separately, then keep protected recovery copies outside the live application environment. Add the server backup option you need when ordering our VPS and include it in the budget.
| Layer | What to protect | What to verify |
|---|---|---|
| Coolify | Instance backup and installation encryption key | Projects, settings and saved secrets recover correctly. |
| Database | Consistent database backups and required roles | The restored app can read and write representative data. |
| Files | Uploads and other persistent volumes | Files survive redeployments and open after restoration. |
| Release | Source, build configuration and retained images | A known application version can be deployed again. |
Monitor disk growth, CPU, RAM, health-check failures, HTTPS renewal and backup results. Build images and logs can consume disk even when your application data grows slowly. Configure image cleanup with enough retained releases for your rollback policy; preserve live volumes during routine maintenance.
As your projects grow, expand our cloud VPS resources or separate the build workload from the application server. A dedicated build server or CI-built registry image keeps heavy compilation away from live request handling. When you run multiple Next.js instances, plan shared cache behaviour, compatible Server Function encryption keys and consistent deployment versions using the self-hosting documentation.
Fix common Coolify deployment problems
| Symptom | First checks |
|---|---|
| Build fails | Read the earliest useful build error; verify lockfile, Node version, base directory and build variables. |
| No Available Server or gateway error | Confirm proxy status, healthy container, listening address and internal port. |
| HTTPS certificate fails | Check A/AAAA records, port 80, port 443 and domain configuration. |
| App cannot connect to PostgreSQL | Use the Compose service name database, correct credentials and internal port 5432. |
| Public config stays unchanged | Rebuild after changing NEXT_PUBLIC_ values. |
| Uploaded files disappear | Mount persistent storage at the path the application actually writes to. |
| Build exhausts memory or disk | Measure build use; increase capacity, clear safe unused images or build externally. |
| Git push does not deploy | Check configured branch, integration or webhook, and the Auto deploy setting. |
Fix the configuration that produced the error and redeploy a small, understandable change. Use deployment logs for build failures and runtime logs for a container that starts but cannot serve requests. Avoid opening more public ports as a shortcut for an internal networking problem.
Move from Vercel or Heroku with a clear cutover
Before switching, list what your current platform provides: builds, runtime variables, scheduled jobs, database connections, file storage, email, domains and external integrations. Put each item into the VPS deployment plan. Platform-specific SDKs or storage services may need a replacement or can remain connected while you migrate the app.
- Create a staging deployment: reproduce the production build with separate credentials and a test domain.
- Migrate data deliberately: restore the database and persistent files with version-compatible tools, then verify representative records.
- Test real workflows: login, payments, uploads, emails, scheduled work and background jobs.
- Prepare cutover: reduce DNS TTL ahead of time, plan the final data transfer and stop conflicting writes or duplicate jobs.
- Switch and observe: update DNS, check HTTPS and monitor errors while keeping a defined rollback path.
- Retire old resources: do this after the application and recovery checks pass and you have retained the data you need.
For a cost comparison, add up the VPS, backups, storage and supporting services, then compare that total with the platform resources you can retire. Several modest applications can share a cloud VPS budget efficiently. Let your actual workloads and operating requirements determine the saving.
Build your deployment platform with us
Coolify on a VPS brings Git-based deployment, container management and HTTPS routing to an environment you control. Start with one Next.js application, add the Docker services it needs and build a repeatable release-and-recovery routine.
Explore our self-managed cloud VPS plans to choose your starting capacity, or talk to our team about your server region, storage and backup requirements. Our cloud VPS gives you the root access and flexibility to grow your applications on your terms.
Want more uses for your server? Follow our self-hosted cloud guide for files, team documentation and password management. Allocate each new workload the resources and recovery plan it needs.
Frequently asked questions
Is Coolify a Vercel or Heroku alternative?
Coolify provides a self-hosted deployment workflow for applications, databases and Docker services on servers you choose. It is a useful alternative when you want Git-based deployments and more control over infrastructure. Map any platform-specific functions, storage and integrations before migrating.
Can Next.js run on our self-managed cloud VPS?
Yes. Next.js supports production Node.js and Docker deployments. Coolify can build and run the application, route HTTPS traffic and manage deployment settings. Use a production build and start command, then test your application’s server-side features.
Do I need cPanel or DirectAdmin for Coolify?
No. Our self-managed cloud VPS comes without those control panels. Coolify supplies the application deployment interface for this guide, while you retain root access and manage the Linux environment.
How much RAM should I start with?
Coolify lists a minimum of 2 GB RAM, two CPU cores and 10 GB free disk space for its installation. Applications and builds need additional capacity. Cloud VPS 2 offers 8 GB RAM and 100 GB SSD as a practical starting configuration for a modest stack; choose more capacity for heavier builds, databases or concurrent traffic.
Does a Coolify deployment sleep when visitors leave?
A normal running container on your VPS continues running until it is stopped, fails or is affected by a configured lifecycle action. It does not use a per-request serverless startup model. Keep restart policies, health checks, monitoring and sufficient resources in place.
Is self-hosted Coolify free?
The self-hosted Coolify software is available without a Coolify Cloud subscription. Your VPS, domain, backups, optional storage and any paid services still have their own costs.
Should I open port 3000 publicly for Next.js?
For this design, visitors use the Coolify proxy on HTTPS port 443. Set the application’s internal listening port to 3000 and let the proxy route to it. Avoid public host-port mappings for the app or database unless a specific integration requires them.
Will my public environment variables change after restarting?
Next.js NEXT_PUBLIC_ variables are included in the browser bundle during the build. Rebuild after changing them. Keep server secrets out of NEXT_PUBLIC_ variables and configure the correct build-time or runtime scope for each setting.
Does rolling back an image restore my database?
No. An image rollback changes application code and image contents. Database migrations, uploaded files and other persistent data need a separate compatible migration or restore plan. Keep suitable images and tested data backups.
Can I host several projects on one VPS?
Yes, Coolify can manage multiple resources within the capacity of your plan. Use separate domains, environments, credentials and persistent storage. Monitor CPU, memory and disk use, then expand resources or separate workloads as your applications grow.