How to Make Your WordPress Website Load Under 2 Seconds.
When it comes to websites, speed is everything. Imagine clicking on a site and waiting… and waiting. Chances are, you’d leave before the page even loads. In fact, studies show that if your website takes more than 3 seconds to load, most visitors bounce away. That’s lost traffic, lost sales, and lost trust.
And it’s not just about user impatience. Search engines like Google also factor in site speed when ranking websites. That means a slow site can hurt both your visibility and your credibility. Whether you’re running a blog, an online store, or a business website, every extra second of loading time is costing you opportunities.
But here’s the good news: with WordPress, you can absolutely get your website to load in under 2 seconds — even if you’re not a tech wizard and even if you’ve never optimized a website before. With the right setup and a few smart tweaks, lightning-fast performance is within reach.
Table of Contents
In this guide on How to Make Your WordPress Website Load Under 2 Seconds, I’ll walk you through the exact steps you need to take to speed up your WordPress site, cut down those frustrating delays, and give your visitors the smooth browsing experience they expect.
So grab a coffee (or tea), settle in, and let’s dive in step-by-step.
Why Website Speed Matters
Before we jump into the “how,” let’s quickly talk about the “why”:
- Better User Experience: Nobody likes waiting. A slow site frustrates visitors, while a fast one keeps them engaged and encourages them to explore more pages.
- Improved SEO Rankings: Google has confirmed that page speed is a ranking factor. Search engines favor websites that load quickly, meaning faster sites often rank higher and attract more organic traffic.
- More Conversions: Whether it’s signing up for a newsletter, filling out a form, or buying a product, speed plays a huge role. Every extra second of delay increases the chance of losing a potential customer.
In short, website speed directly affects your traffic, visibility, and revenue. Now that we understand what’s at stake, let’s roll up our sleeves and start optimizing!
Step 1: Choose a High-Performance Hosting Provider
At Aveshost, we’ve built our platform with performance features in mind. All our hosting plans run on SSD storage with LiteSpeed technology, and we provide free built-in caching to ensure your WordPress site loads at lightning speed. With data centers strategically located close to your target audience, your visitors get faster response times no matter where they’re browsing from.
Step 2: Use a Lightweight WordPress Theme
Not all WordPress themes are created equal. While some are beautifully designed, they often come bloated with unnecessary code, flashy animations, and features you may never use. The result? A sluggish website that frustrates your visitors and hurts your SEO.
Lightweight themes, on the other hand, are built with speed and performance in mind. They strip away the clutter and give you a clean, fast-loading foundation to build on. You can then add only the features you actually need through plugins, keeping your site lean and efficient.
Some excellent lightweight themes to consider are:
- OceanWP – versatile, lightweight, and great for building professional business sites.
- Astra – very popular, works well with most page builders.
- GeneratePress – highly customizable and performance-focused.
- Neve – modern, lightweight, and optimized for mobile.
- Blocksy – feature-rich yet lightweight, perfect for Gutenberg users.
The key is to choose a theme that’s optimized for speed first, and then tailor it to your brand with customizations. It’s far better to start with a lightweight base and add plugins selectively than to rely on one bulky theme that tries to do everything but slows your site down in the process.
Step 3: Install and Configure WP Fastest Cache
Caching is like taking a snapshot of your site and showing that to visitors instead of building every page from scratch — it’s one of the fastest wins for page speed. Below is a practical, step-by-step guide that uses only WP Fastest Cache (no other caching plugins).
Quick explanation
WP Fastest Cache creates and serves static HTML files to visitors, adds useful server rules (GZIP, browser caching), and can rewrite static asset URLs for CDNs. We’ll install it, enable safe defaults, and walk through the options you should test and why.
Before we begin
Before installing and setting up WP Fastest Cache, let’s make sure a few things are in place.
- Backup your site (files + database)
Always make a backup before adding or configuring performance plugins. This way, if something goes wrong, you can roll back quickly without losing work. - Deactivate and remove any other caching plugins.
- Check compatibility with your theme and page builder
WP Fastest Cache works smoothly with most themes, including the popular Divi Theme. However, if you’re using Elementor, you may run into occasional conflicts because Elementor has its own performance optimization features. To avoid errors and styling issues, adjust these settings: Elementor Performance Tab (step-by-step):- Go to your WordPress dashboard and open Elementor → Settings.
- Click on the Performance tab.
- Set CSS Print Method to External File.
- Set Element Cache to Disable.
Once you’ve taken these steps, you’re ready to install and configure WP Fastest Cache without running into unnecessary conflicts.
Step 1 — Install and activate WP Fastest Cache
- Log in to your WordPress dashboard.
- Go to Plugins → Add New.
- In the search bar, type WP Fastest Cache.
- Click Install Now, then click Activate.
After activation, you’ll see WP Fastest Cache in the left-hand sidebar of your dashboard.
Step 2 — Open the settings panel
Click on WP Fastest Cache in the sidebar. You’ll land on the Settings page, which looks like a checklist of performance options. This makes things easy — you just tick boxes and save.
Step 3 — Configure the basic settings
Here’s the recommended setup (tick these boxes):
- ✅ Cache System — This is the core feature. It enables caching and stores static HTML files for your site.
- ✅ Preload — Creates cached versions of all your pages in advance, so the first visitor doesn’t experience slow load times. (Choose your preferred preload interval, e.g., once every 10 minutes.)
- ✅ Logged-in Users — Keep this unchecked. You don’t want admin/dashboard views cached.
- ✅ Mobile — Enable caching for mobile visitors (important if your site gets traffic from phones).
- ✅ New Post / Update Post — Check these so the cache clears automatically when you publish or update content.
Click Submit at the bottom to save your changes.

Step 4 — Enable optimization options
Scroll further down in the settings and enable the following (test each one because some themes/plugins can conflict):
- ✅ Minify HTML — Strips unnecessary characters from HTML, making it lighter.
- ✅ Minify CSS — Makes CSS files smaller, speeding up delivery.
- ✅ Combine CSS — Combines multiple CSS files into one, reducing requests.
- ✅ Minify JS — Compresses JavaScript files.
- ✅ Combine JS — Combines multiple JS files (can break some sites, so test thoroughly).
- ✅ Gzip Compression — Compresses site files before sending them to the browser. This is a must.
- ✅ Browser Caching — Tells browsers to store static files locally so repeat visitors don’t have to re-download them.
Click Submit to save changes.
Step 5 — Exclude critical pages (especially for eCommerce sites)
If you’re running WooCommerce, Easy Digital Downloads (EDD), or any other online store, you must exclude dynamic pages like Cart, Checkout, and My Account from caching.
- Go to WP Fastest Cache → Exclude.
- Add rules to exclude:
/cart//checkout//my-account/
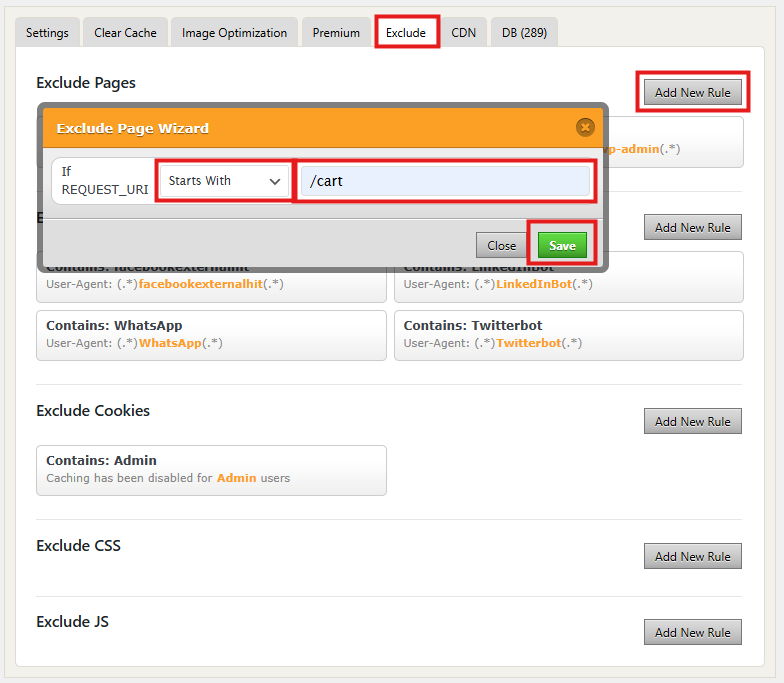
This prevents customers from seeing cached versions of their shopping carts or payment pages.
Step 6 — Use the Preload feature wisely
In the Preload tab:
- Set a schedule (e.g., preload the cache every 10 or 20 minutes).
- Choose “All” if you want every page/post cached, or just select homepage and categories for lightweight sites.
Pro tip: If your hosting plan is limited on resources, don’t preload everything too frequently — it can cause CPU spikes.
Step 7 — Clear and test your cache
Now it’s time to check if caching is working.
- Visit your site in a private/incognito browser.
- Right-click and view the page source — scroll to the very bottom. If WP Fastest Cache is working, you’ll see a comment like:
<!-- WP Fastest Cache file was created in (xx.xx seconds) -->
Step 8 — Extra options (optional)
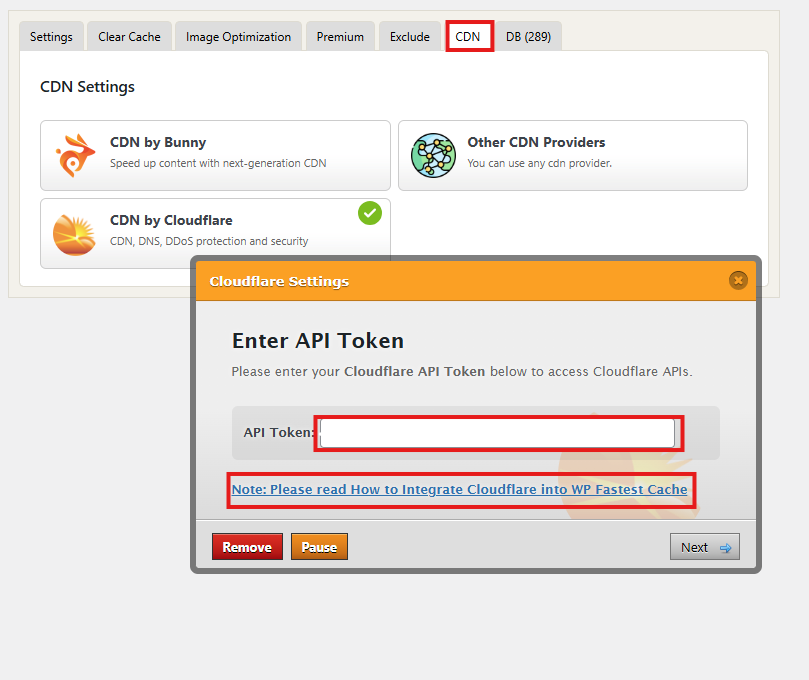
- CDN Integration: If you use a Content Delivery Network like Cloudflare or BunnyCDN, WP Fastest Cache has a built-in tab for CDN settings. Add your CDN URL to serve static files (images, CSS, JS) faster worldwide.
- Image Optimization (Premium only): If you upgrade to the Pro version, WP Fastest Cache can compress images automatically. For the free version, use an image optimization plugin or compress images before uploading.
Step 9 — Regular maintenance
Caching isn’t “set it and forget it.” Every now and then:
- Clear your cache manually after major theme/plugin updates.
- Check your speed scores again (PageSpeed, GTmetrix).
- Revisit excluded pages if you add new WooCommerce pages or forms.
- If you make style or JS changes and they don’t appear, purge the cache first.
- If you see problems after enabling an option, turn it off and purge cache — that isolates the issue quickly.
Recommended safe settings (copy-paste style)
- Cache System: ON
- GZIP Compression: ON
- Browser Caching: ON
- Preload: ON (frequency: daily or as suits your update schedule)
- Cache Timeout: 24 hours (adjust if needed)
- Minify HTML: ON
- Minify CSS / JS: ON (enable and test)
- Combine CSS / JS: Use with caution — OFF if you see layout/script issues
- Mobile Cache: ON (if responsive)
- Cache for Logged-In Users: OFF
- Exclude: /cart, /checkout, /my-account/, any dynamic pages or AJAX endpoints
Limit Plugins
It’s tempting to install every plugin that looks useful, but each one adds extra code, scripts, and database queries that can slow down your site. In simple terms: too many plugins = too many requests.
To keep your site lean and fast:
- Audit your plugins regularly. Go through your installed plugins and ask yourself if each one is truly necessary.
- Remove what you don’t use. Don’t just deactivate unused plugins — delete them completely to reduce bloat and potential security risks.
- Choose quality over quantity. Look for well-coded plugins with good reviews and regular updates instead of stacking multiple plugins that overlap in functionality.
- Avoid “all-in-one” heavy plugins. Sometimes one lightweight plugin for a single purpose is better than a bulky plugin that tries to do everything.
By limiting plugins to only the essentials, you’ll reduce server load, improve performance, and lower the chances of conflicts that can break your site.
Wrapping It Up
And there you have it — your WordPress site is now running on WP Fastest Cache, optimized for speed without complicated setup.
By combining caching, minification, and browser storage, you’ll shave valuable seconds off your load time. Paired with a solid host and optimized images, you’ll be well on your way to a site that loads in under 2 seconds.
Suggested Reading:
- How to Boost Your Website Speed for SEO and Conversions
- Unlocking Search Engine Secrets: Top SEO Tips for New Websites
- Unveiling the Secrets of Local SEO: Dominate Your Niche Market
- How to Get a Free Domain Name – Here’s How (No Tricks)
- Why Your Business Needs a Blog: Top Reasons Explained
- How to Fix WordPress 404 Not Found Error: Step-by-Step
FAQs About How to Make Your WordPress Website Load Under 2 Seconds
Why is website speed so important for my WordPress site?
A slow-loading website frustrates visitors and increases bounce rates. Studies show that if your site takes longer than 3 seconds to load, most people leave. Fast websites improve user experience, boost search engine rankings, and increase conversions.
Can I really get my WordPress site to load in under 2 seconds?
Yes! By using proper caching, image optimization, lightweight themes, and the right hosting environment, most WordPress sites can achieve load times under 2 seconds. WP Fastest Cache makes this much easier, even for beginners.
Do I need to be a developer to use WP Fastest Cache?
Not at all! WP Fastest Cache is beginner-friendly. You simply install the plugin, tick a few checkboxes, and your site will instantly start loading faster. No coding knowledge is required.
Will WP Fastest Cache work with my theme and plugins?
WP Fastest Cache works well with most WordPress themes, including Divi. If you’re using Elementor, you just need to adjust a few settings (like disabling Elementor’s CSS print and element cache options) to avoid conflicts.
How do I know if WP Fastest Cache is working?
After enabling the cache, visit your site and check the page source (right-click → “View Page Source”). At the bottom, you should see a note saying:
<!-- WP Fastest Cache file was created in (xx.xx seconds) -->
That confirms caching is active.
Can caching break my site?
Sometimes, aggressive settings like combining JS/CSS can cause layout issues. If something looks broken after enabling a setting, simply uncheck it. Always test your site after changes, and remember to exclude checkout/cart pages if you’re running WooCommerce.