

How to deploy Angular applications on cPanel through client-side rendering (CSR) or server-side rendering (SSR)
To deploy Angular app on cPanel may seem challenging at first, but once you understand the process, it becomes straightforward and easy to manage!
If you’re an Angular developer looking to deploy your application on a cPanel hosting environment, you’ve come to the right place. Many shared hosting providers like Aveshost use cPanel, making it a convenient and budget-friendly option for deploying Angular apps.
However, setting up an Angular app on cPanel requires understanding how to configure both client-side and server-side deployments properly.
Table of Contents
In this guide, we’ll walk you through everything you need to know about deploying an Angular app on cPanel. We’ll cover both client-side rendering (CSR) and server-side rendering (SSR) using Angular Universal for Angular versions 16 and earlier, and the new Angular SSR for Angular v17, v18, and v19.
📌 Prerequisites
Before we begin, make sure you have:
- A cPanel hosting account: If you don’t have cPanel hosting, follow this guide to purchase one: “How to Buy cPanel Hosting”
- A domain or subdomain set up
- Angular installed on your local machine
- FTP or cPanel File Manager access
- Basic knowledge of Angular CLI and hosting environments
Understanding the Basics: Client-Side vs. Server-Side Rendering
Before diving into the deployment process, let’s briefly touch on the difference between client-side rendering (CSR) and server-side rendering (SSR).
- Client-Side Rendering (CSR): In CSR, the browser downloads a minimal HTML file and then executes JavaScript to render the application. This is the default behavior for Angular.
- Server-Side Rendering (SSR): With SSR, the server pre-renders the application and sends the fully rendered HTML to the browser. This improves initial load times and SEO.
Crucial Node.js Version Synchronization
Before you start building and deploying, a critical step is ensuring your Node.js versions align. Discrepancies here can lead to frustrating and hard-to-debug issues.
- Checking cPanel’s Node.js Version:
- Navigate to “Setup Node.js App” within your cPanel.
- Click on “+CREATE APPLICATION” (you don’t have to fully create one).
- Locate the “Node.js version” dropdown menu.
- Note the version displayed. This is the Node.js version your cPanel environment is using.
- Matching Your Local Node.js Version:
- It’s imperative that the Node.js version on your local development machine matches the one on your cPanel server.
- If you find a mismatch, adjust your local Node.js version accordingly.
- Using Node Version Manager (nvm):
- For Windows OS, macOS, and Linux users, the Node Version Manager (nvm) is highly recommended. It allows you to easily switch between different Node.js versions.
- If you don’t have nvm, you can find installation instructions by searching for “nvm install” and your operating system.
- After installing NVM, you can install the required node version by typing
nvm install <version number>. For examplenvm install 18. - Then to use that version you can type
nvm use <version number>. For examplenvm use 18.
- Once you have the correct version installed and being used, run
node -vin your terminal to verify that the correct version is active.
- Build After Verification:
- After confirming that your local Node.js version matches cPanel’s, thoroughly test your Angular application locally to ensure it functions correctly.
- Once you have verified that your application is working correctly, then and only then should you build your angular application for deployment.
By ensuring Node.js version consistency, you’ll significantly reduce the likelihood of deployment-related errors and streamline the process.
How to deploy Angular app on cPanel: Client-side rendering (CSR)
A client-side Angular app is a static web application that doesn’t require a backend server. It’s essentially a collection of HTML, CSS, and JavaScript files served via a web server.
Step 1: Build the Angular App: Production Build
First, navigate to your Angular project folder and run:
ng build   OR
ng build --configuration=production
This command generates a new dist folder in your project root, containing the browser directory with the compiled build files of your application.
Make sure there are no errors during the build process; any issues must be resolved before proceeding.
Additionally, the default build path (dist and its subfolder) can be customized in the angular.json file under the following option:
"options": {
  "outputPath": "dist/your-app-name"
}
Step 2: Upload to cPanel
Upload the content of the browser folder from the dist folder to your cPanel.
In your dist/your-app-name folder, zip the contents of the browser folder, not the browser folder itself. This is because you want the files inside the browser folder to be directly in your public_html (or your chosen subdirectory) after unzipping.
Learn more about how to upload your website files via File Manager or FTP.
Using cPanel File Manager
- Log in to your cPanel.
- Navigate to File Manager > public_html (or your subdomain directory).
- Click Upload, then select zip file from the
dist/your-app-name/browserfolder. - Once uploaded, extract the zip file.
Ensure that all files are located in the public_html folder. If they are not, navigate to the folder where they are stored, select all files, and move them to the public_html folder or your chosen subdomain directory.
Step 3: Configure .htaccess for Angular Routing
Angular uses client-side routing, so direct URL navigation might not work without configuring .htaccess.
- To view hidden files (such as .htaccess), click on Settings in the top-right corner and enable Show Hidden Files (dotfiles).

- Create a
.htaccessfile insidepublic_htmland add:
RewriteEngine On
RewriteBase /
RewriteRule ^index.html$ - [L]
RewriteCond %{REQUEST_FILENAME} !-f
RewriteCond %{REQUEST_FILENAME} !-d
RewriteCond %{REQUEST_FILENAME} !-l
RewriteRule . /index.html [L]
This ensures that Angular’s routing works correctly without 404 errors.
Step 4: Test Your Deployment
Open your domain in a browser and ensure everything works smoothly. If you see a blank page, check the console for errors and verify that the base-href in index.html is correctly set:
<base href="/">Angular Universal Deployment (Angular v16 and below): Combining SSR and Prerendering on cPanel
Server-side rendering (SSR) improves SEO, performance, and initial load time. For Angular v16, v15, v14, v13, v12 and earlier, Angular Universal is required for Server-Side Rendering (SSR). If you haven’t installed Angular Universal yet, follow Step 1. Otherwise, proceed to Step 2.
Step 1: Add Angular Universal to Your Project
ng add @nguniversal/express-engineThis sets up an Express server to handle SSR.
Step 2: Modify the server.ts file
First, replace this code in the server.ts file:
function run(): void {
const port = process.env['PORT'] || 4000;

// Start up the Node server
const server = app();
server.listen(port, () => {
console.log(`Node Express server listening on http://localhost:${port}`);
});
}
With the new code:
function isRunningOnApachePassenger(): boolean {
return moduleFilename.includes('lsnode.js');
}

function run(): void {
// Start up the Node server
const server = app();

if (isRunningOnApachePassenger()) {
server.listen(() => {
console.log('Node Express listening to Passenger Apache');
});
return;
}

const port = process.env['PORT'] || 4000;

server.listen(port, () => {
console.log(`Node Express server listening on http://localhost:${port}`);
});
}
Second, replace:
if (
moduleFilename === __filename ||
moduleFilename.includes('iisnode')
)
With this code:
if (
moduleFilename === __filename ||
moduleFilename.includes('iisnode') ||
isRunningOnApachePassenger()
)
Step 3: Building your Angular Universal Application
You can customize the output directories for your browser and server builds (within dist) by modifying the angular.json configuration file:
"options": {
"outputPath": "dist/your-app-name",
}
Build the App
npm run build:ssrVerify that the build process completes without errors. Resolve any errors before proceeding.
This generates dist/ and your-app-name/serverdist/ folders.your-app-name/browser
Step 4: Preparing Your Project for Deployment
- On your local machine, navigate to your Angular project folder.
- Enable visibility for any hidden files (if necessary).
- To optimize your deployment package, it’s essential to exclude certain files and folders:
node_modules: This folder contains your project’s dependencies and is typically very large. We’ll install these dependencies on the server later..git: This folder contains your project’s Git repository and is not needed for deployment.README.mdand.gitignore: These are development-related files and are not required on the production server.
- Select all the remaining files and folders in your Angular project folder.
- Create a ZIP archive of the selected files.
Step 5: Upload the archive file to cPanel
- In your cPanel, go to File Manager and create a folder outside the public_html directory (e.g., app).

NOTE: You cannot directly configure a Node.js application within the public_html folder of your main domain. Node.js applications require a dedicated, separate directory outside of public_html
- Within the just created App folder, select ‘Upload‘ from the top menu.
- Click the ‘Select File‘ button to locate and select the ZIP archive you created on your local machine. The upload process will start as soon as you select the file.
- Once the upload is complete, return to the directory where you uploaded the ZIP archive.
- Right-click the uploaded ZIP file and select ‘Extract‘ to unzip it.
Ensure that all files are located in the App folder. If they are not, navigate to the extracted folder, select all files, and move them to the App folder or your chosen directory.
Learn how to upload your website files via File Manager or FTP.
Step 6: Set Up a Node.js Application in cPanel
- In the cPanel, Scroll down to the Software section.
- Click Setup Node.js App.
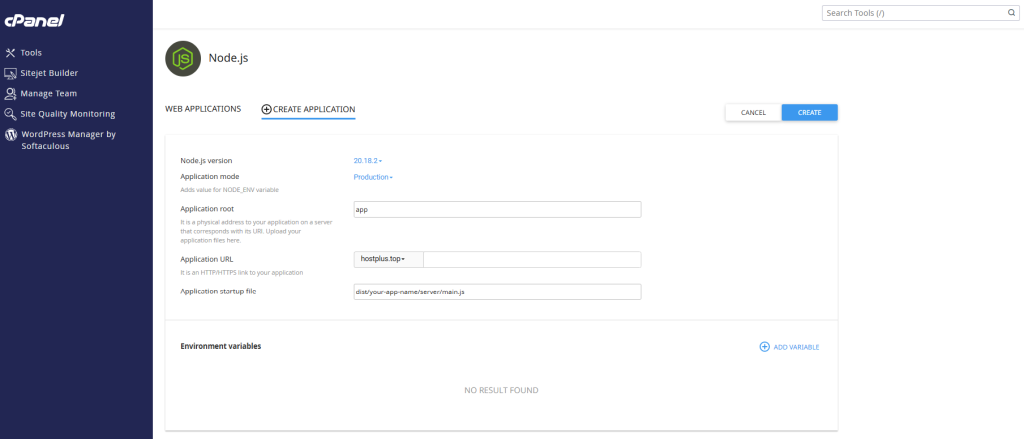
- Click + Create Application.
- Node.js version selection: It’s critical to select the Node.js version that matches the one you used for local development. This ensures compatibility and avoids potential runtime errors.
- Application mode: Select Production.
- Application root: Type app or your chosen directory
- Application URL: Choose your domain name.
- Application startup file:
dist/your-app-name/server/main.js
If you have any environment variables, you can add them from your .env or .env.local file.
- Click on CREATE to create the Node.js application.
- Stop the app. Then, go to ‘Detected Configuration Files’. If
package.jsondoesn’t appear, refresh the page. - Click “Run NPM Install” to install the dependencies specified in your
package.jsonfile.
Note: You can also use the Terminal to install dependencies. Simply return to your cPanel dashboard or search for “Terminal” in the top search bar.
Activate the Node.js environment. Click to copy the provided command at the top and execute it in the terminal.
source /home/username/nodevenv/app/20/bin/activate && cd /home/username/app
Example: source /home/username/nodevenv/app/20/bin/activate && cd /home/username/app
(Replace 20 with your selected Node.js version.)
Once the Node.js environment is activated, run the npm install command.
Note: You don’t need to run the npm install command again in the Terminal if “Run NPM Install” was successfully executed earlier.
- Restart the application by clicking the ‘START APP‘ button.
Open a new browser tab and navigate to your website’s URL. You should now see your Angular Universal application successfully running.
Congratulations! You’ve successfully deployed your Angular Universal application on cPanel.
Angular v17, v18, v19: SSR and Prerendering Deployment on cPanel
To deploy Angular on cPanel, Angular 17+ introduced a more streamlined SSR setup, removing the need for Angular Universal. Here’s how to deploy it on cPanel:
If you haven’t set up Angular’s new SSR, follow Step 1. If you’ve already added @angular/ssr, proceed to Step 2.
Step 1: Add Angular’s New SSR to Your Project
ng add @angular/ssrStep 2: Build Your SSR App
You can customize the output directories for your browser and server builds (within dist) by modifying the angular.json configuration file:
"options": {
"outputPath": "dist/your-app-name",
}
To build an Angular v17+ application:
- In your terminal, navigate to the folder containing your Angular project.
- Run the build command:
ng build- Verify that the build process completes without errors. Resolve any errors before proceeding.
This command builds your Angular application, generating output files organized into browser and server directories. The browser directory contains client-side files, and the server directory contains server-side files.
Step 3: Preparing Your Project for Deployment
- On your local machine, navigate to your Angular project folder.
- Enable visibility for any hidden files (if necessary).
- To optimize your deployment package, it’s essential to exclude certain files and folders:
node_modules: This folder contains your project’s dependencies and is typically very large. We’ll install these dependencies on the server later..git: This folder contains your project’s Git repository and is not needed for deployment.README.mdand.gitignore: These are development-related files and are not required on the production server.
- Select all the remaining files and folders in your Angular project folder.
- Create a ZIP archive of the selected files.
Step 4: Upload the archive file to cPanel
- In your cPanel, go to File Manager and create a folder outside the public_html directory (e.g., app).
NOTE: You cannot directly configure a Node.js application within the public_html folder of your main domain. Node.js applications require a dedicated, separate directory outside of public_html
- Within the just created App folder, select ‘Upload‘ from the top menu.
- Click the ‘Select File‘ button to locate and select the ZIP archive you created on your local machine. The upload process will start as soon as you select the file.
- Once the upload is complete, return to the directory where you uploaded the ZIP archive.
- Right-click the uploaded ZIP file and select ‘Extract‘ to unzip it.
Ensure that all files are located in the App folder. If they are not, navigate to the extracted folder, select all files, and move them to the App folder or your chosen directory.
Learn how to upload your website files via File Manager or FTP.
Step 5: Set Up a Node.js Application in cPanel
- In the cPanel, Scroll down to the Software section.
- Click Setup Node.js App.
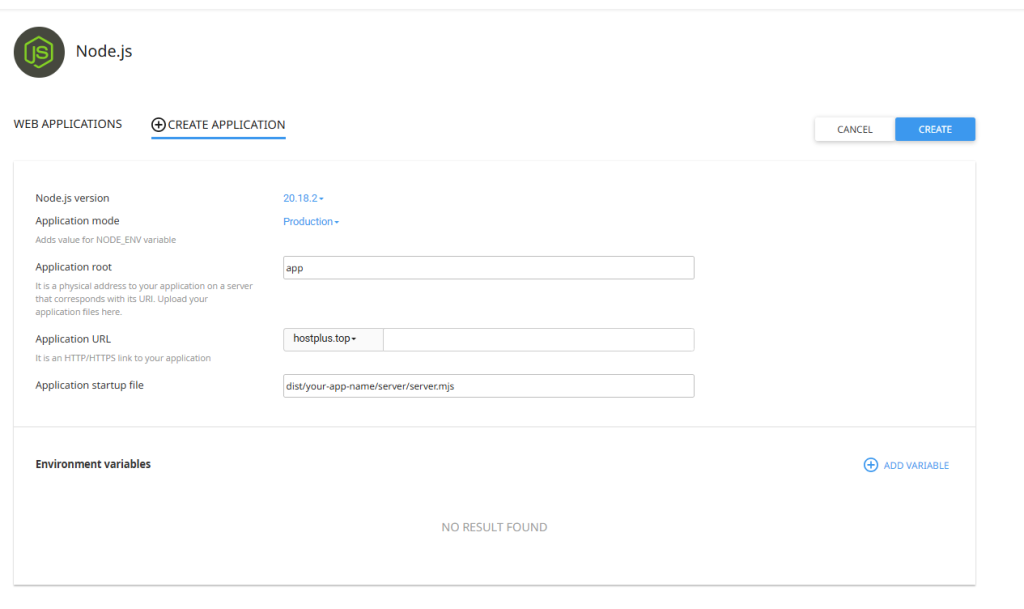
- Click + Create Application.
- Node.js version selection: It’s critical to select the Node.js version that matches the one you used for local development. This ensures compatibility and avoids potential runtime errors.
- Application mode: Select Production.
- Application root: Type app or your chosen directory
- Application URL: Choose your domain name.
- Application startup file:
dist/your-app-name/server/server.mjs
If you have any environment variables, you can add them from your .env or .env.local file.
- Click on CREATE to create the Node.js application.
- Stop the app. Then, go to ‘Detected Configuration Files’. If
package.jsondoesn’t appear, refresh the page. - Click “Run NPM Install” to install the dependencies specified in your
package.jsonfile.
Note: You can also use the Terminal to install dependencies. Simply return to your cPanel dashboard or search for “Terminal” in the top search bar.
Activate the Node.js environment. Click to copy the provided command at the top and execute it in the terminal.
source /home/username/nodevenv/app/20/bin/activate && cd /home/username/app
Example: source /home/username/nodevenv/app/20/bin/activate && cd /home/username/app
(Replace 20 with your selected Node.js version.)
Once the Node.js environment is activated, run the npm install command.
Note: You don’t need to run the npm install command again in the Terminal if “Run NPM Install” was successfully executed earlier.
- Restart the application by clicking the ‘START APP‘ button.
Open a new browser tab and navigate to your website’s URL. You should now see your New Angular SSR application successfully running.
Congratulations! You’ve successfully deployed your Angular SSR application on cPanel.
Troubleshooting Tips
1. Blank Screen After Deployment?
- Check the browser console for errors.
- Verify that
base-hrefis correctly set inindex.html. - Ensure
.htaccessis configured correctly.
2. Angular SSR Not Rendering on cPanel?
- Make sure Node.js is running.
- Verify that your Node.js version is compatible with your Angular application.
3. 500 Internal Server Error?
- Check
stderr.logorerror_login your app folder or your chosen directory. - Ensure correct permissions (use
755for directories and644for files).
Conclusion
Deploying an Angular app on cPanel may seem tricky, but following these steps makes it simple. Whether you’re hosting a client-side or server-side app, cPanel can handle it with the right configurations.
Have any questions? Drop them in the comments below! 🚀
Suggested Reading:
- How To Deploy a Node.js App on cPanel (The Ultimate Guide)
- How to Deploy Laravel Project on cPanel
- How to Buy cPanel Hosting for Your Website: Beginner’s Guide
- How to Set Up a MySQL Database & User in cPanel (2 Easy Methods)
- 50+ Essential Git Commands (With Downloadable Cheat Sheet)
- Top 90+ Essential Linux Commands Plus Cheat Sheet
Frequently Asked Questions (FAQs)
What are the prerequisites for deploying an Angular app on cPanel?
You need a cPanel hosting account, a domain or subdomain set up, Angular installed locally, FTP or cPanel File Manager access, and basic knowledge of Angular CLI and hosting environments.
Why is Node.js version synchronization important before deploying an Angular app on cPanel?
Matching the Node.js version on your local machine with the one on cPanel prevents deployment errors and ensures compatibility, as discrepancies can cause hard-to-debug issues.
How do you deploy a client-side rendered (CSR) Angular app on cPanel?
Build the Angular app using ‘ng build’, upload the contents of the ‘browser’ folder from the ‘dist’ directory to cPanel via File Manager or FTP, and configure a .htaccess file for Angular routing.
What is the difference between client-side rendering (CSR) and server-side rendering (SSR) in Angular?
CSR renders the app in the browser using JavaScript, while SSR pre-renders the app on the server, sending fully rendered HTML to improve initial load times and SEO.
How do you check the Node.js version on cPanel?
Navigate to ‘Setup Node.js App’ in cPanel, click ‘+CREATE APPLICATION’, and check the ‘Node.js version’ dropdown to see the version used in your cPanel environment.
What should you do if your local Node.js version doesn’t match cPanel’s version?
Use Node Version Manager (nvm) to install and switch to the matching Node.js version locally, then verify with ‘node -v’ and test your Angular app before building for deployment.