

How to Host Laravel Project on cPanel
To deploy Laravel project on cPanel can seem overwhelming, but it doesn’t have to be. Whether you’re launching a personal project or a client’s website, cPanel makes hosting Laravel applications straightforward.
Table of Contents
In this guide, I’ll walk you through the entire process, from setting up your hosting environment to ensuring your application runs smoothly.
Prerequisites
Before diving into the deployment, make sure you have:
- A Laravel project ready for deployment
- A cPanel hosting account. If you don’t already have cPanel hosting, you’ll need to purchase a web hosting plan. Aveshost offers several options, which you can explore here. We’ve also created a step-by-step guide to walk you through the process: “How to Buy cPanel Hosting“.
- A MySQL database created in cPanel
How to Deploy Laravel Project on cPanel
This guide outlines two methods for deploying a Laravel project within a cPanel environment: deployment via Terminal access and manual deployment (without Terminal access).
We will explore both options to accommodate users with varying cPanel configurations.
Deploy Laravel Project on cPanel: Manual Deployment (without Terminal)
This section details the process of deploying a Laravel project on cPanel for users who do not have Terminal access. It covers the necessary steps for manually uploading files, configuring directories, and setting up the application without command-line interface capabilities.
Step 1: Upload Your Laravel Project to cPanel
Option 1: Upload via File Manager
- Zip Your Project – On your local machine, compress your Laravel project into a
.zipfile. It’s crucial that your zipped file contains all of these folders and files.
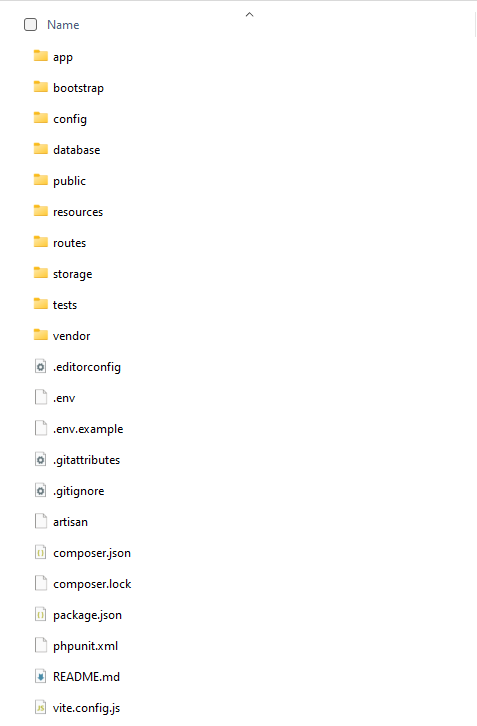
- Open cPanel – Log into your cPanel account and navigate to File Manager.
- Upload the Zip File – Go to the
public_htmldirectory (this is the root directory where your website files should go. Alternatively, you can use a subdirectory if you have created a subdomain), then upload the zipped project. - To view hidden files (such as .htaccess, .env), click on Settings in the top-right corner and enable Show Hidden Files (dotfiles).
- Extract the Zip File – Once uploaded, right-click the file and select Extract.
- Move the Extracted Files – Move extracted files into the public_html folder or the subdirectory folder in case you are using a subdomain.
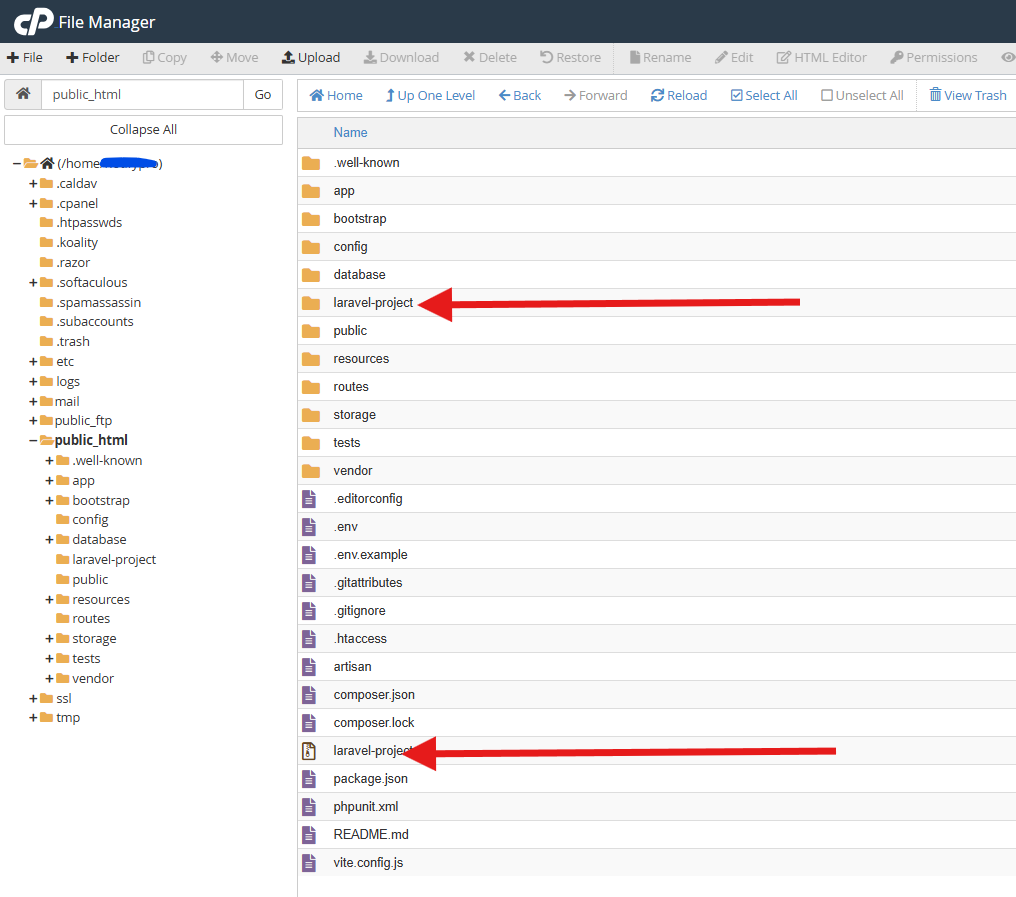
Note: After extracting the files, delete the zip file. Once the files are moved to the public_html directory, delete the laravel project folder.
Suggested Reading: For detailed instructions on how to upload your project files to cPanel, follow this step-by-step guide: “How to Upload Your Project Files.”
Option 2: Upload via FTP
- Use an FTP client like FileZilla.
- Connect to your cPanel account using your FTP credentials.
- Upload the project files to the appropriate directory (usually
public_html).
For detailed instructions on how to upload your project files to via FTP, follow this step-by-step guide: “How to Upload Your Project Files Via FTP“.
Create a MySQL Database and Import a Database File
Creating the Database
- In the cPanel dashboard, scroll down to the Databases section.
- Click MySQL Database Wizard.
Create a New Database
- Enter a name for your new database (e.g.,
my_db). - Click Next Step.
Create a Database User
- Enter a username for the database user (e.g.,
my_db_usr). - Set a strong password (use the password generator for extra security).
- Click Create User.
Assign Privileges to the User
- Check All Privileges to give full access to the user.
- Click Next Step to finalize the setup.
Import the Database
- Go back to cPanel and locate the phpMyAdmin tool in the Databases section.
- Click phpMyAdmin to open it.
- In phpMyAdmin, find the newly created database in the left sidebar and click on it.
- Click the Import tab at the top.
- Click Choose File and select the
.sqldatabase file from your PC. - Scroll down and click Go to start the import process.
Suggested Reading:
- How to Set Up a MySQL Database & User in cPanel (2 Easy Methods)
- How to Set Up a PostgreSQL Database and User in cPanel
Connecting to Your Database
- Locate the
.envFile- Navigate to your Laravel project directory.
- If the
.envfile is not visible, click on Settings in the top-right corner and enable Show Hidden Files (dotfiles). - If the
.envfile is still missing, re-upload it from your local PC. - Alternatively, if a
.env.examplefile exists, copy it and rename it to.env.
- Edit the
.envFile- Open the
.envfile in a text editor. - Update the necessary database configurations as required.
- Open the
APP_URL=https://yourdomainname.com

DB_CONNECTION=mysql
DB_HOST=localhost
DB_PORT=3306
DB_DATABASE=yourCpanelUsername_yourDbName
DB_USERNAME=yourCpanelUsername_yourDbUsername
DB_PASSWORD=yourDatabasePassword
Save the changes, and your Laravel project should now be connected to the database.
Remove ‘/public’ from the URL of a Laravel installation
To remove /public from the URL, edit your .htaccess file or create a new one in the root folder and add:
<IfModule mod_rewrite.c>
    RewriteEngine On
    RewriteRule ^(.*)$ public/$1 [L]
</IfModule>
Save your changes to the .htaccess file. Your site should now just be loading as domain.com instead of domain.com/public.
Set File Permissions
For Laravel to work properly, you need to set the correct permissions for the storage and bootstrap/cache directories:
- Right-click on the storage folder and select Change Permissions.
- Set the permissions to 775 (or 777 if necessary).
- Repeat the same for the bootstrap/cache folder.
Alternatively, if you have SSH access, you can run the following command in the terminal:
chmod -R 775 storage bootstrap/cacheIf you run into issues, try setting them to 777 temporarily:
chmod -R 777 storage bootstrap/cache(However, setting 777 is not recommended for security reasons.)
Deploy Laravel Project on cPanel Via Terminal
Deploying a Laravel project on cPanel using the terminal (SSH) ensures better performance and flexibility compared to manual uploads. Follow these steps to deploy your Laravel application successfully.
Step 1: Log in to cPanel and Access Terminal (SSH)
- Log into your cPanel by visiting
domain.com/cpaneland entering your credentials. - Open the Terminal (if enabled) by navigating to Advanced > Terminal.
Step 2: Navigate to the Correct Directory
- By default, cPanel’s public_html is the web root directory.
- Move to the
public_htmldirectory using:
cd public_htmlStep 3: Clone Your Laravel Project
If your Laravel project is hosted on GitHub, GitLab, or Bitbucket, use the following command to clone it:
git clone https://github.com/yourusername/your-laravel-project.gitOR if you’re uploading manually, use FTP/File Manager to upload your Laravel files into public_html.
Step 4: Move Laravel Files to the Root Directory
If your project is inside a folder (e.g., your-laravel-project), move all files to public_html:
mv your-laravel-project/* your-laravel-project/.* .Remove the empty directory:
rmdir your-laravel-projectStep 5: Install Dependencies (Composer)
- Run the following command to install Laravel dependencies:
composer install --no-dev --optimize-autoloaderIf Composer is not available, install it using:
curl -sS https://getcomposer.org/installer | php
mv composer.phar /usr/local/bin/composer
Step 6: Set Permissions
Run the following commands to set correct file permissions:
chmod -R 755 storage bootstrap/cache
chmod -R 775 storage bootstrap/cache
Step 7: Configure the .env File
- If
.envdoesn’t exist, rename the.env.examplefile to.env:
cp .env.example .env- Open the
.envfile and update the database credentials:
nano .envModify these values to match your cPanel MySQL details:
APP_URL=https://yourdomainname.com

DB_CONNECTION=mysql
DB_HOST=localhost
DB_PORT=3306
DB_DATABASE=yourCpanelUsername_yourDbName
DB_USERNAME=yourCpanelUsername_yourDbUsername
DB_PASSWORD=yourDatabasePassword
Step 8: Generate Application Key
Run the command:
php artisan key:generateStep 9: Run Database Migrations
If your Laravel project has database migrations, execute:
php artisan migrate --forceStep 10: Remove ‘/public’ from the URL of a Laravel installation
To remove /public from the URL, edit your .htaccess file or create a new one in the root folder and add:
<IfModule mod_rewrite.c>
    RewriteEngine On
    RewriteRule ^(.*)$ public/$1 [L]
</IfModule>
Save your changes to the .htaccess file. Your site should now just be loading as domain.com instead of domain.com/public.
Step 11: Set Up File Permissions
Run the following commands:
chmod -R 755 public
chmod -R 775 storage bootstrap/cache
Optimize Laravel for Production
Run the following optimization commands:
php artisan config:clear
php artisan route:clear
php artisan view:clear
This will speed up your application by caching configurations and routes.
Set Up Cron Jobs (Optional)
Laravel uses scheduled tasks that should run automatically. In cPanel:
- Go to Cron Jobs under the Advanced section.
- Add a new cron job with the command:
php /home/your-cpanel-username/public_html/artisan schedule:run >> /dev/null 2>&1Set it to run every minute (*/5 * * * *).
Final Checks
Now that everything is set up, visit your website and check if it loads correctly. If you encounter errors:
- Check file permissions.
- Review the
.envfile for database connection issues. - Run
php artisan cache:clearandphp artisan config:clear.
If all goes well, congratulations! Your Laravel project is now successfully deployed on cPanel.
Conclusion
Deploying a Laravel project on cPanel might seem complex at first, but by following these step-by-step instructions, you can get your application up and running smoothly. Whether you’re manually uploading files or using Git, optimizing for production is key to ensuring speed and security.
If you found this guide helpful, feel free to share it or drop a comment below if you have any questions!
Happy coding!
Suggested Reading:
- How to Remove .html, .php, or Both from URLs
- How to Upload Your Website (in 3 Simple Steps)
- How To Transfer Your Domain: A Step-by-Step Guide
- How to Buy cPanel Hosting for Your Website: Beginner’s Guide
- How to Flush DNS Cache on Windows, Mac, Linux & Browsers
- How to Start an Online Store in Ghana: Comprehensive Guide
FAQs About Deploying Laravel on cPanel
What are the prerequisites for deploying a Laravel project on cPanel?
You need a Laravel project ready for deployment, a cPanel hosting account, and a MySQL database created in cPanel.
What are the two methods for deploying a Laravel project on cPanel?
The two methods are manual deployment without Terminal access and deployment via Terminal (SSH) access.
How do I upload my Laravel project to cPanel manually?
Zip your Laravel project, upload it via cPanel’s File Manager to the public_html directory, extract it, move the files, and delete the zip and original folder.
How do I create and import a MySQL database for Laravel in cPanel?
Use the MySQL Database Wizard in cPanel to create a database and user, assign privileges, then import a .sql file via phpMyAdmin.
How do I connect my Laravel project to the database in cPanel?
Edit the .env file in your Laravel project directory to update database configurations like DB_DATABASE, DB_USERNAME, and DB_PASSWORD with your cPanel details.
How can I remove ‘/public’ from the Laravel URL in cPanel?
Edit or create an .htaccess file in the root folder with rewrite rules to redirect requests to the public directory, so the site loads as domain.com instead of domain.com/public.
What file permissions are needed for Laravel to work on cPanel?
Set permissions to 775 (or 777 if necessary) for the storage and bootstrap/cache directories to ensure Laravel functions properly.