Running Ollama on a VPS gives you a straightforward way to use a local language model on your own cloud server. Add Open WebUI and you get a browser-based workspace for prompts, conversations and model selection—without needing a hosted model-provider API key for the local setup.
In this tutorial, we will deploy both applications on our self-managed cloud VPS using Docker Compose. We will keep the model API internal and access the chat interface through an encrypted SSH tunnel. This is a practical starting point for developers, personal assistants and a controlled business pilot.
You will use a small CPU-friendly model first, then measure the workload before expanding. The setup uses Ubuntu 24.04 LTS, persistent data volumes and pinned software versions, so it is easy to understand and maintain.
- Start with an 8 GB RAM cloud VPS and a small local model.
- Keep Ollama off the public internet and Open WebUI on localhost.
- Preserve the chat-data volume and the application secret.
- Review integrations before letting them access confidential information.
Table of Contents
What you will build with Ollama and Open WebUI
| Component | Its role | Where it runs |
|---|---|---|
| Ollama | Downloads and serves your selected local model | A container on your cloud VPS |
| Open WebUI | Provides the browser chat interface and user accounts | A second container on the same VPS |
| Docker Compose | Defines networking, storage and startup settings | On the VPS |
| SSH tunnel | Carries your browser connection securely to the private interface | Between your computer and the VPS |
Open WebUI is the interface; Ollama performs inference with the model you select. Keeping them separate makes updates and troubleshooting clearer. The Docker network lets WebUI reach Ollama using its service name, while the API has no published host port.
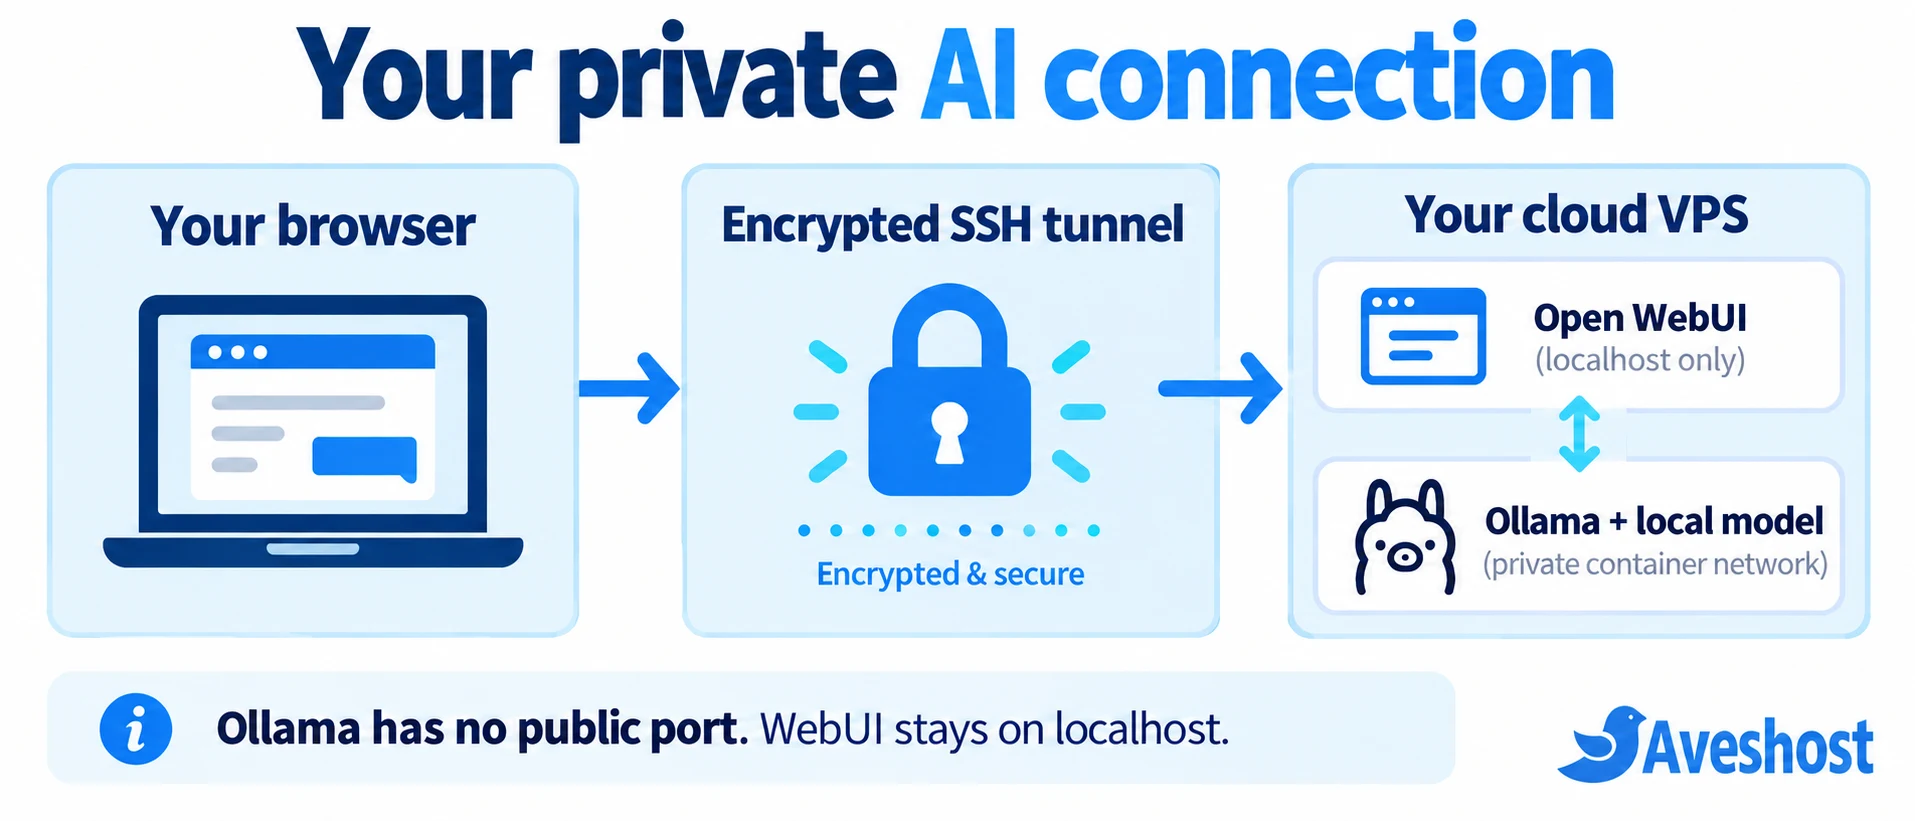
Our VPS is a cloud VPS, so you can host the workspace remotely and access it from your own computer. “Local model” here means inference runs on your server rather than a hosted AI API. Your VPS provider, account security, backups and application settings remain part of the data-handling design.
Choose a budget cloud VPS for local AI
For this tutorial, choose our self-managed Cloud VPS 2: the published package includes 4 vCores, 8 GB RAM, 100 GB SSD storage and a 32 TB traffic allowance. It gives you room for Ubuntu, Docker, the interface and a small starter model.
| Starting point | Use case | What to measure |
|---|---|---|
| 8 GB RAM, small 1B model | Personal workspace or a limited pilot | Available memory and response time |
| More RAM and CPU capacity | Larger models or longer conversations | Model working memory and CPU throughput |
| Additional capacity or GPU-backed infrastructure | Higher concurrent demand or faster generation targets | Peak load, latency and acceleration requirements |
Model download size is different from runtime memory. The model weights, context cache, application and operating system all need RAM. Longer context and parallel inference can raise memory use substantially. Begin with one active request and a 2,048-token context, then adjust from measurements.
You do not need cPanel or DirectAdmin for this Docker-based workflow. Our self-managed cloud VPS does not include those panels. If you want a bundled hosting control panel and server-management support, compare our fully managed cloud VPS packages and discuss your AI application requirements with us.
How to run Ollama and Open WebUI on a VPS: 8 steps
Step 1: connect to a fresh Ubuntu VPS
Use an Ubuntu 24.04 LTS server with SSH access and a user who can run sudo. On your own computer, connect using your server address and SSH user:
ssh YOUR_SSH_USER@YOUR_VPS_IPReplace the uppercase placeholders with your actual details. Use SSH keys, keep your recovery access available and restrict public administration access to the sources you need. The deployment below does not require public ports 3000 or 11434.
free -h
df -h
Check available RAM and disk space before downloading models. Use a separate environment from a busy production website so you can measure the AI workload independently.
Step 2: install Docker Engine and Compose
The following commands use Docker’s official Ubuntu repository. Run them on the VPS, not your local computer. If Docker is already installed, first check its version and existing workloads rather than replacing a working installation.
sudo apt update
sudo apt install -y ca-certificates curl openssl
sudo install -m 0755 -d /etc/apt/keyrings
sudo curl -fsSL https://download.docker.com/linux/ubuntu/gpg -o /etc/apt/keyrings/docker.asc
sudo chmod a+r /etc/apt/keyrings/docker.asc

sudo tee /etc/apt/sources.list.d/docker.sources > /dev/null <<EOF
Types: deb
URIs: https://download.docker.com/linux/ubuntu
Suites: $(. /etc/os-release && echo "${UBUNTU_CODENAME:-$VERSION_CODENAME}")
Components: stable
Architectures: $(dpkg --print-architecture)
Signed-By: /etc/apt/keyrings/docker.asc
EOF

sudo apt update
sudo apt install -y docker-ce docker-ce-cli containerd.io docker-buildx-plugin docker-compose-plugin
sudo systemctl enable --now docker
sudo docker run --rm hello-world
sudo docker compose version
The hello-world output and Compose version confirm installation. See Docker’s official Ubuntu instructions for supported releases and existing-package conflicts. We use sudo rather than adding an account to the Docker group.
Step 3: create your workspace and persistent secret
mkdir -p ~/private-ai
cd ~/private-ai
umask 077
printf "WEBUI_SECRET_KEY=%s\n" "$(openssl rand -hex 32)" > .env
chmod 600 .env
Run the secret-generation command once for a new deployment. Keep the same .env file through restarts and upgrades, and store it in your protected backup. Open WebUI uses this persistent secret for application security; regenerating it during routine recreation can invalidate sessions and affect encrypted settings.
Step 4: define the two services
Create compose.yaml in the same directory:
nano compose.yamlPaste this configuration, save the file and exit the editor:
name: private-ai

services:
  ollama:
    image: ollama/ollama:0.40.3
    restart: unless-stopped
    environment:
      OLLAMA_HOST: "0.0.0.0:11434"
      OLLAMA_NO_CLOUD: "1"
      OLLAMA_CONTEXT_LENGTH: "2048"
      OLLAMA_NUM_PARALLEL: "1"
      OLLAMA_MAX_LOADED_MODELS: "1"
    volumes:
      - ollama:/root/.ollama

  open-webui:
    image: ghcr.io/open-webui/open-webui:v0.12.0
    restart: unless-stopped
    depends_on:
      - ollama
    ports:
      - "127.0.0.1:3000:8080"
    environment:
      OLLAMA_BASE_URL: "http://ollama:11434"
      WEBUI_SECRET_KEY: "${WEBUI_SECRET_KEY}"
      WEBUI_AUTH: "True"
      ENABLE_OPENAI_API: "False"
      ENABLE_VERSION_UPDATE_CHECK: "False"
      RAG_EMBEDDING_MODEL_AUTO_UPDATE: "False"
      OFFLINE_MODE: "True"
    volumes:
      - open-webui:/app/backend/data

volumes:
  ollama:
    name: private-ai-ollama
  open-webui:
    name: private-ai-webui
The versions are pinned to Ollama 0.40.3 and Open WebUI v0.12.0, the releases checked on 12 October 2026. Review Ollama releases and Open WebUI releases before deploying, and use the current reviewed stable versions when updating.
Ollama listens on the container network but has no ports entry, so its API is not published on the VPS. Open WebUI publishes port 3000 only on the host’s loopback address. The two named volumes preserve models and chat data when containers are recreated.
OLLAMA_NO_CLOUD disables Ollama’s cloud features. ENABLE_OPENAI_API disables the hosted OpenAI connection, while the other settings reduce background update requests. Keep WEBUI_AUTH enabled. This setup is for local text chat; document extraction, embeddings, voice and third-party tools should be configured separately when you need them.
Step 5: start the services and download a small model
sudo docker compose config --quiet
sudo docker compose pull
sudo docker compose up -d
sudo docker compose ps
sudo docker compose logs --tail=50 open-webui
Wait for the interface to finish starting, then download and test Llama 3.2 1B:
sudo docker compose exec ollama ollama pull llama3.2:1b
sudo docker compose exec ollama ollama run llama3.2:1b "Write a three-sentence welcome message for a new team member."
The official model listing documents this small text model and its licence. Review the licence and acceptable-use terms for your intended use. A small model is a useful first check for installation, short rewriting tasks and basic chat; evaluate its answers on your own examples.
Step 6: open a private browser connection
On your local computer, open a new terminal and run:
ssh -N -L 127.0.0.1:3000:127.0.0.1:3000 YOUR_SSH_USER@YOUR_VPS_IPKeep that terminal running. Open http://127.0.0.1:3000 in your local browser. The browser talks to your computer’s loopback port, and SSH carries that connection to the VPS. The interface does not need a public HTTP endpoint for this personal setup.
If local port 3000 is occupied, use 3001 on the left side of the mapping and visit http://127.0.0.1:3001. Press Ctrl+C in the tunnel terminal when you want to close the connection.
Step 7: create the administrator and select Ollama
- Create the first administrator account while using the private connection. Use a strong, unique password.
- Open your avatar → Settings → Admin → Connections. Confirm the Ollama connection is http://ollama:11434.
- Check that the locally downloaded llama3.2:1b model appears in the model selector.
- Keep new signups disabled for the personal workspace. For a team, approve only the accounts you intend to admit.
- Start a new chat and select llama3.2:1b.
The first account controls instance-wide settings, so complete that bootstrap before arranging wider access. The Open WebUI quick-start guide explains the current account and connection workflow. Some admin settings persist in the database; inspect the saved settings after changing environment variables.
Step 8: verify operation and private access
sudo docker compose exec ollama ollama ps
sudo docker stats --no-stream
sudo ss -ltnp
Confirm the interface listens on 127.0.0.1:3000 and that Docker has not published Ollama on host port 11434. Send a test prompt and watch CPU and memory. Start with ordinary test content, check that the reply is saved, and restart the containers to confirm the workspace persists:
sudo docker compose restartReconnect through the tunnel and confirm your account, conversations and model remain available. Record the selected model, context setting and response time so later changes have a useful baseline.
Get better performance from a CPU-based VPS
On a CPU-based cloud VPS, model size and context length matter more than the number of models you download. Start with short prompts, one active user and one loaded model. Increase one setting at a time and monitor the result.
- Keep the first model small; test a larger model only after checking available RAM.
- Use shorter context for concise tasks and avoid unnecessary full-document prompts.
- Keep parallel processing at one until you have measured spare capacity.
- Unload an idle model when you want to free its working memory.
- Review background jobs and optional features that compete for CPU and RAM.
sudo docker compose exec ollama ollama stop llama3.2:1b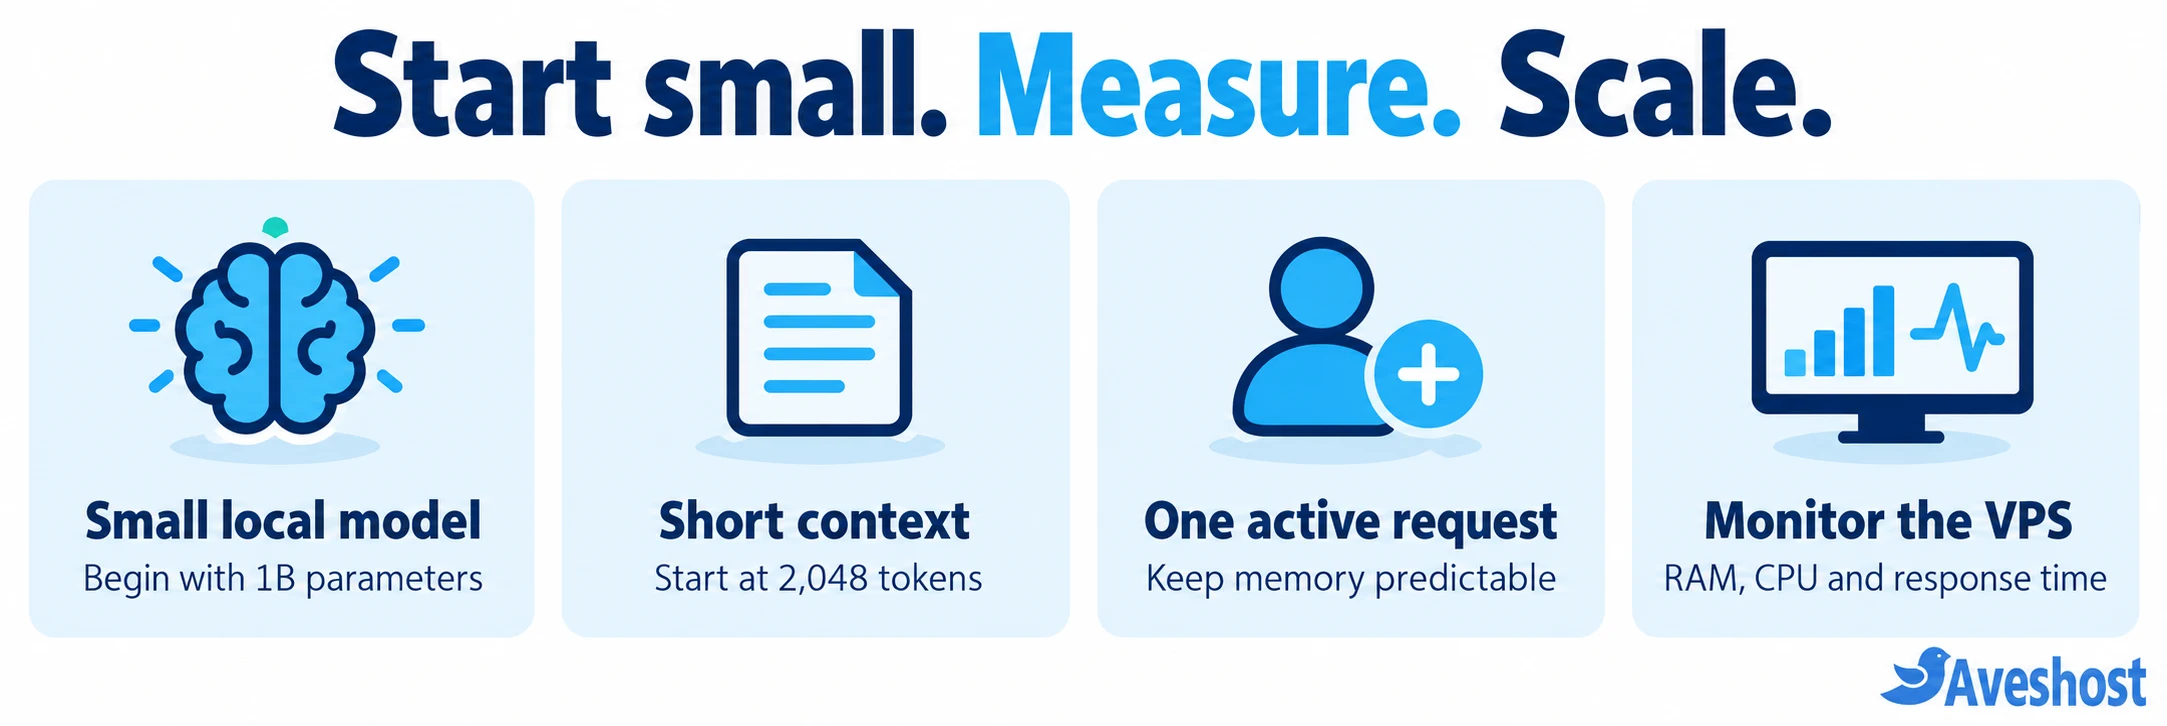
The Ollama FAQ explains context and concurrency settings. Application-level model options may override a server default, so check Open WebUI’s model parameters as well. For faster generation or greater concurrency, bring your test results to our support team so we can help plan the next resource configuration.
Keep your private AI setup private
Privacy comes from the complete deployment. Use local models, keep Ollama internal, preserve authentication and protect SSH access. Review who can administer the VPS and the WebUI instance, where backups are stored and how long conversations are retained.
External model connections, web search, document-processing services and plugins can send data beyond your VPS. Enable them deliberately and understand their destinations. Community tools and functions may execute code or access information, so review them before installation and limit their permissions.
The local inference setup does not require an OpenAI API key or a paid model-provider subscription. Your cloud VPS, backups and any additional services still have operating costs. Self-hosting gives you control over data handling; business compliance also requires the appropriate processing arrangements, access controls and retention procedures.
For team access through a domain, use an authenticated HTTPS reverse proxy or a private access gateway. Preserve WebSocket and streaming support, keep the model API internal and apply account controls before sharing the interface. Follow our Cloudflare protection guide for the web-security foundations. Do not replace the loopback binding with public exposure just to make the page easier to reach.
Back up and update your AI workspace
Your important application state lives in private-ai-webui and your configuration directory. Back up the WebUI volume and .env together, protect the archive and store a separate copy away from the VPS. Stop the application during a simple file-level backup so its database is copied consistently.
cd ~/private-ai
mkdir -p backups
chmod 700 backups
sudo docker compose stop
sudo docker run --rm \
  -v private-ai-webui:/data:ro \
  -v "$PWD/backups":/backup \
  alpine:3.22 tar czf /backup/webui-data.tgz -C /data .
sudo cp .env compose.yaml backups/
sudo chmod 600 backups/*
sudo docker compose start
This example replaces the same archive on each run; use dated backup filenames for retention. Model weights can be downloaded again, but back up custom models and configuration if you need them. Test restoration into a separate environment before relying on the backup.
For updates, read the release notes, back up first and edit the image versions in compose.yaml. Then pull and recreate the services:
sudo docker compose pull
sudo docker compose up -d
sudo docker compose logs --tail=50 open-webui
Keep the persistent volumes and the same secret. Do not use docker compose down -v for a routine update: that removes named data volumes. A version rollback may also need the matching database backup if the newer release performed a schema migration.
Troubleshooting common setup problems
| Problem | Likely check | Practical next step |
|---|---|---|
| Browser cannot open the interface | Tunnel terminal, local port and service status | Reopen the tunnel and inspect compose ps and logs |
| No model in the selector | Model pull and Ollama connection URL | Confirm http://ollama:11434 and run ollama list |
| Reply is slow | Model size, context, CPU load and parallel requests | Use smaller tasks and measure capacity |
| Container exits or memory is exhausted | Available RAM and service logs | Reduce model/context demand or increase RAM |
| Workspace appears empty after an update | Wrong volume, directory or Compose configuration | Restore the intended volumes and configuration |
| Document or external feature fails | Offline mode and optional feature dependencies | Configure that feature deliberately without changing the local chat baseline |
sudo docker compose exec ollama ollama list
sudo docker compose logs --tail=100 ollama
sudo docker compose logs --tail=100 open-webui
Share relevant errors and resource observations with our support team through a private ticket. Remove passwords, application secrets and sensitive conversation content from logs before sharing them.
Grow your private AI workspace with us
Our self-managed cloud VPS gives you the environment to build a private AI workspace with root access, SSD storage and a predictable package. Begin with the small-model setup, validate your tasks and expand the resources as your usage grows.
Explore our self-managed cloud VPS packages, or contact our team with the model and workload you want to run. If you are moving an existing application from AWS, read our cloud migration playbook and ask us about arranging your free website migration.
Frequently asked questions
Can I run Ollama on a VPS without a GPU?
Yes. Ollama supports CPU-only operation. Start with a small model and modest context, then measure response time and memory usage. A GPU is an optional acceleration choice for more demanding workloads, not a requirement for this tutorial.
Which cloud VPS should I start with?
Our self-managed Cloud VPS 2 is a useful starting configuration for this small-model tutorial: 4 vCores, 8 GB RAM and 100 GB SSD storage. Select more memory and capacity when your model, context or simultaneous users require it.
Do I need cPanel or DirectAdmin for Ollama?
No. This tutorial uses SSH and Docker Compose on our self-managed cloud VPS. If you also want a bundled hosting control panel, our fully managed cloud VPS includes cPanel or DirectAdmin.
Do I need an OpenAI API key or paid model subscription?
No API key or paid model-provider subscription is needed for the local model used here. You pay for the cloud VPS and any additional infrastructure you choose. Review the licence and acceptable-use terms of each model you download.
Are prompts sent to a hosted AI provider?
With the local Ollama model and the settings in this guide, model inference runs on your VPS. Cloud features and hosted OpenAI connections are disabled. External tools, web search, plugins and other integrations can change where data goes, so review them before enabling them.
Why is Open WebUI not available at my server IP?
The tutorial intentionally binds the interface to 127.0.0.1. Open the SSH tunnel on your computer and visit http://127.0.0.1:3000. Keep Ollama’s API off the public internet.
Can I give my team access through a domain?
Yes. Use a properly configured HTTPS reverse proxy or private access gateway, keep authentication enabled and keep Ollama internal. Add approved user accounts and test streaming and WebSocket connections before rolling out team access.
Does self-hosting make the assistant compliant with every privacy requirement?
Self-hosting gives you control over the deployment and data handling. Compliance also requires appropriate access, retention, processing arrangements and organisational procedures for your use case. Plan those controls before using sensitive business information.