How to Deploy Django Application and connect a Database in cPanel
Django is one of the most popular web frameworks for building scalable and secure applications. While deploying Django on cloud servers is common, many developers and website owners prefer using cPanel for hosting due to its user-friendly interface and affordability.
If you’re looking for a detailed, step-by-step guide on how to deploy a Django application on cPanel, you’re in the right place.
Table of Contents
Deploying a Django application on cPanel might seem challenging, but with the right steps, you can get your project up and running smoothly. This guide will walk you through the process in a friendly, easy-to-follow manner.
In this comprehensive guide, we’ll walk you through every step, from setting up your Django project to configuring your database, handling static files, and securing your application.
Whether you’re a beginner or an experienced developer, you’ll find all the necessary details here to successfully deploy your Django app on cPanel.
Why Deploy Django on cPanel?
cPanel is one of the most popular web hosting control panels, widely used for managing websites, databases, and emails. Many shared hosting providers offer cPanel, making it an affordable and accessible option for hosting Django applications.
While cPanel is traditionally optimized for PHP applications, you can still run Django by using its Setup Python App feature.
Prerequisites
Before you begin, ensure you have:
- A Django project ready for deployment
- A cPanel hosting account
- SSH Access (Optional)
- A registered domain or subdomain pointed to your cPanel server
- Python 3.x support (provided by your hosting provider)
- Basic familiarity with the command line
Watch the Video Tutorial
For an easier way to deploy a Django application on cPanel, watch the YouTube video below. If you prefer a detailed, step-by-step written guide, continue reading.
Step 1: Create a Python Application in cPanel
- Log in to your cPanel account.
- Scroll down to the Software section and click on Setup Python App.

- Click Create Application and select:
- Python version (Choose the latest available 3.x version).
- Application root:
/home/yourusername/yourprojectname(or any preferred directory). For instance, if your application’s root folder is named Django-project and you are using your primary domain, the application root directory will be public_html/Django-project. In this guide, we are using a subdomain, so our application root becomes py.hostplus.top. - Application URL: Select the domain or subdomain you want to use.
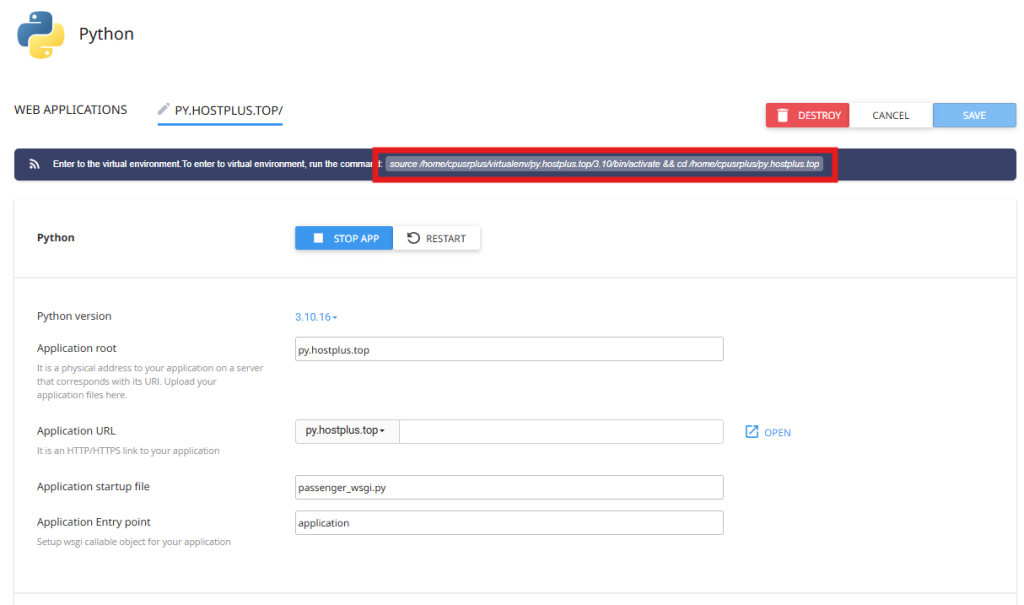
- Application startup file: Leave it blank for now (we’ll configure this later).
- Application Entry point: Leave it blank for now (we’ll configure this later).

- Click Create and note the Virtual Environment Path displayed.
Step 2: Upload Your Django Project to cPanel
You can upload your Django project in two ways:
Option 1: Upload via File Manager
- Go to Files section in the cPanel and click File Manager.
- Navigate to the application root directory you set in Step 1.
- Click Upload and select your Django project’s
.zipfile.
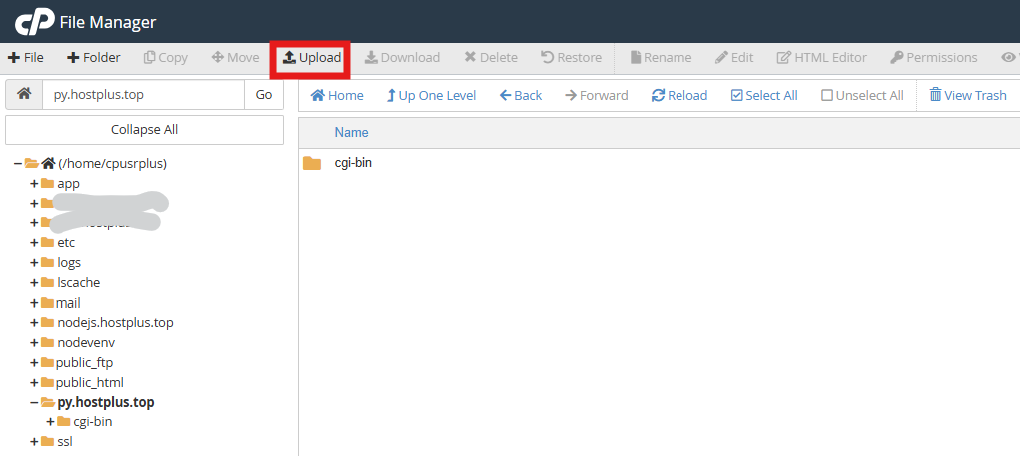
- Extract the
.zipfile after uploading. Right-click the uploaded ZIP file and select ‘Extract‘ to unzip it.
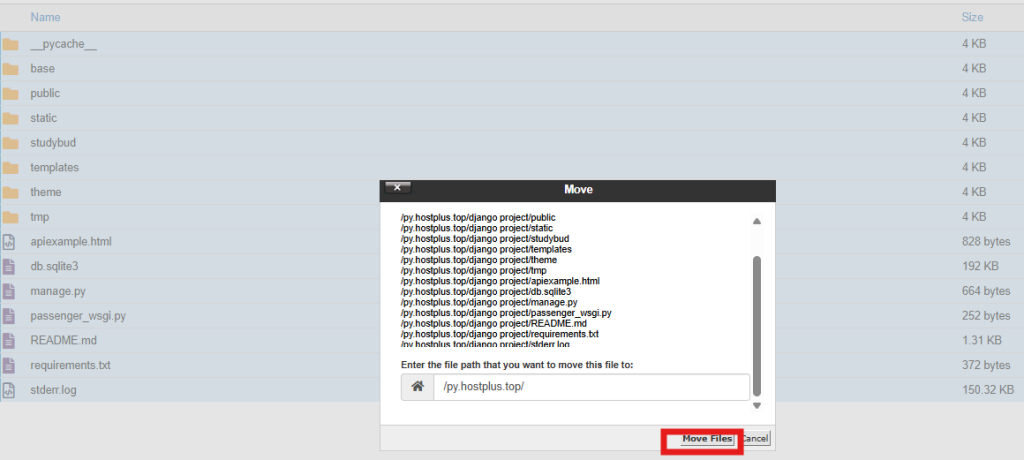
Ensure that all files are located in the py.hostplus.top folder (or any preferred directory). If they are not, navigate to the extracted folder, select all files, and move them to the py.hostplus.top folder or your chosen directory.
Suggested Reading: How to Upload Your Website (in 3 Simple Steps)
Option 2: Clone from GitHub
- Open Terminal from cPanel or connect via SSH.
- Navigate to the application directory:
cd /home/yourusername/yourprojectname- Clone your project from GitHub:
git clone https://github.com/yourusername/your-repository.gitStep 3: Install Dependencies
Your Django project has dependencies listed in requirements.txt. You can install them in two ways:
Method 1: Using Setup Python App Page
- Go back to Setup Python App.
- Click the Edit button for your application.
- Find the Configuration files section and enter:
requirements.txtthen click Add button
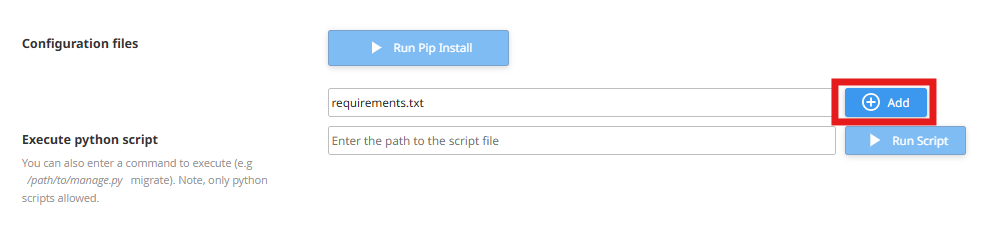
- Click “Run Pip Install”, then select the requirements.txt file to install the dependencies.
Method 2: Using the Terminal
- Activate the virtual environment: copy and paste the Virtual Environment Path from Step 1 or manually activate the virtual environment.
Virtual Environment Path from Step 1
source /home/cpusrplus/virtualenv/py.hostplus.top/3.10/bin/activate && cd /home/cpusrplus/py.hostplus.topManually activate the virtual environment
source /home/yourusername/virtualenv/yourprojectname/3.x/bin/activate- Install dependencies: In the Terminal, navigate in your project directory and run the command to install the dependencies;
pip install -r requirements.txtStep 4: Configure Application Startup File
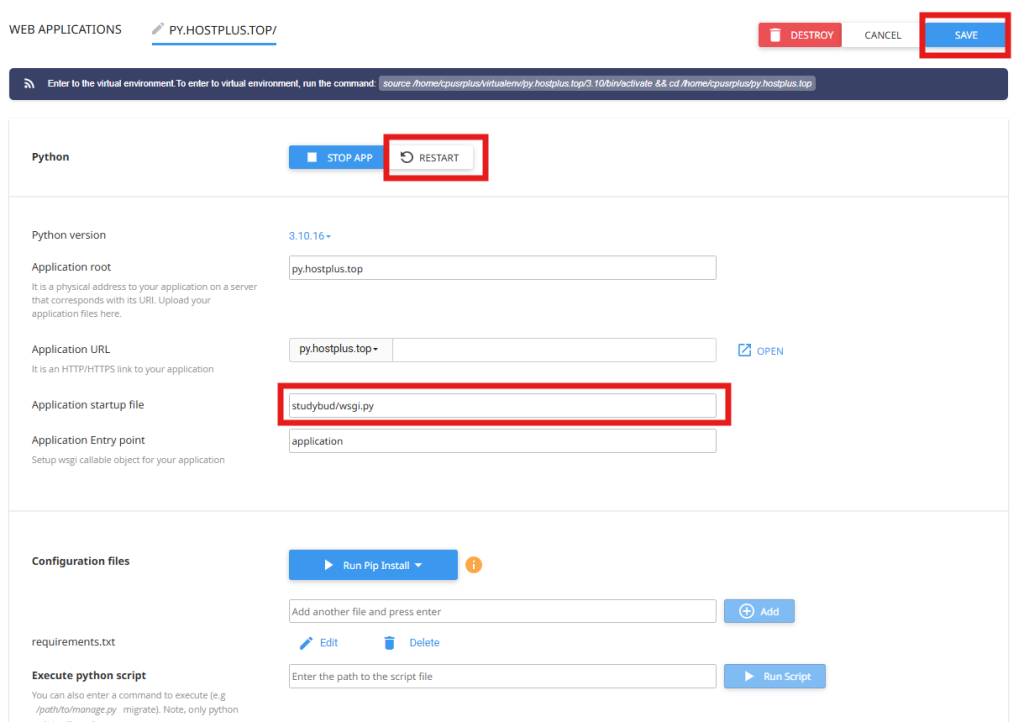
- Open Setup Python App and locate your application.
- Find the Application Startup File section: Enter the location of your
wsgi.pyfile. In my case, it isstudybud/wsgi.py, then save and restart the application.
- Alternatively, you can keep the
passenger_wsgi.pyfile and follow the rest of the process to modify it accordingly. - Inside your project folder, edit the
passenger_wsgi.pyfile and add the following code snippet:
import os
import sys

# Adjust this path
sys.path.insert(0, "/home/yourusername/yourprojectname")

os.environ['DJANGO_SETTINGS_MODULE'] = 'yourprojectname.settings'

from django.core.wsgi import get_wsgi_application
application = get_wsgi_application()
Remember to update the following with your Django project directory:
sys.path.insert(0, "/home/yourusername/yourprojectname")For example, in my case, since I’m using a subdomain, it would be:
sys.path.insert(0, "/home/cpusrplus/py.hostplus.top/studybud")Additionally, update your Django settings module:
os.environ['DJANGO_SETTINGS_MODULE'] = 'yourprojectname.settings'For example:
os.environ['DJANGO_SETTINGS_MODULE'] = 'studybud.settings'- Restart the application in Setup Python App.
Suggested Reading:
- How to Set Up a MySQL Database & User in cPanel (2 Easy Methods)
- How to Set Up a PostgreSQL Database and User in cPanel
Step 5: Configure Allowed Hosts
Edit the settings.py file inside your Django project:
ALLOWED_HOSTS = ['yourdomainname.com', 'www.yourdomainname.com']If your site is on a subdomain:
ALLOWED_HOSTS = ['sub.yourdomainname.com']Save the file and restart your application.
How to Use MySQL Instead of SQLite3 in Django on cPanel
Step 1: Create a MySQL Database in cPanel
- Navigate to MySQL® Databases under the Databases section.
- Under Create New Database, enter a name (e.g.,
mydjango_db) and click Create Database. - Scroll down to MySQL Users and create a new database user (e.g.,
mydjango_user). - Assign a strong password and click Create User.
- Scroll to Add User to Database, select your database and user, then click Add.
- Grant All Privileges and click Make Changes.
For a step-by-step guide on creating a MySQL database in cPanel, follow this illustrated tutorial: How to Set Up a MySQL Database & User in cPanel (2 Easy Methods).
Step 2: Install MySQL Connector for Python
If you haven’t installed mysqlclient, do so via:
- Execute Python Script. Go back to Setup Python App and click to edit your application. Scroll to the Configuration files section.

- Terminal. Activate the virtual environment.
source /home/yourusername/virtualenv/yourprojectname/3.x/bin/activate && cd /home/yourusername/yourprojectname
pip install mysqlclientIf that fails, try:
pip install pymysqlThen, add this to your Django project’s __init__.py file (same directory as settings.py):
import pymysql
pymysql.install_as_MySQLdb()
Step 3: Configure MySQL in Django settings.py
Open your settings.py and replace the SQLite3 settings with the MySQL configuration:
DATABASES = {_
'default': {
'ENGINE': 'django.db.backends.mysql',
'NAME': 'yourusernamemydjango_db', # Replace with your cPanel database name_
'USER': 'yourusernamemydjango_user', # Replace with your cPanel MySQL username
'PASSWORD': 'your_password', # Replace with your MySQL password
'HOST': 'localhost', # cPanel MySQL host
'PORT': '3306', # Default MySQL port
}
}
Step 4: Apply Migrations
Run the following commands to apply database changes:
python manage.py migrateIf you need a superuser, create one:
python manage.py createsuperuserStep 5: Restart the Application
- Go to cPanel > Setup Python App.
- Restart your Django application.
- Visit your site and check if everything is working.
Step 6: Common Errors and Fixes
Error 1: Module Not Found
Solution:
- Make sure dependencies are installed correctly using:
pip install -r requirements.txt - Restart the application in Setup Python App.
Error 2: Internal Server Error (500 Error)
Solution:
- Check your
passenger_wsgi.pyfile for any incorrect paths. - Review
stderr.login the Django application project folder. - Verify that
ALLOWED_HOSTSincludes your domain.
Error 3: Static Files Not Loading
Solution:
- Add the following to
settings.py:
STATIC_URL = '/static/' STATIC_ROOT = os.path.join(BASE_DIR, 'static')- Run:
python manage.py collectstatic- Ensure the static files directory is accessible.
Error 4: Database Connection Issues
Solution:
- If using SQLite, check that the database file is in the correct location.
- If using MySQL/PostgreSQL, ensure the credentials in
settings.pymatch your cPanel database. - If migrations fail, ensure MySQL user privileges are set correctly.
- If you see
mysqlclienterrors, try installingpymysqlinstead. - Verify that the database host is set to
localhost.
Conclusion
Deploying a Django application on cPanel is straightforward when you follow the correct steps. From setting up your Python environment to configuring the startup file, this guide provides everything you need to launch your app successfully.
Still facing issues? Drop a comment or reach out to Aveshost support for additional assistance!
Happy coding! 🚀
Suggested Reading:
- How to Deploy Angular App on cPanel: CSR & SSR Guide
- How To Deploy a Node.js App on cPanel (The Ultimate Guide)
- How to Deploy Laravel Project on cPanel
- How to Set Up a PostgreSQL Database and User in cPanel
- How to Set Up a MySQL Database & User in cPanel (2 Easy Methods)
Frequently Asked Questions (FAQs)
What are the prerequisites for deploying a Django app on cPanel?
You need a Django project ready for deployment, a cPanel hosting account, a registered domain or subdomain pointed to your server, Python 3.x support from your hosting provider, and basic familiarity with the command line. SSH access is optional but helpful.
How do I create a Python application in cPanel for my Django project?
Log into cPanel, go to the Software section, and click ‘Setup Python App’. Click ‘Create Application’, select your Python version, set the application root directory (e.g., /home/yourusername/yourprojectname), choose your domain or subdomain for the Application URL, and click ‘Create’. Note the Virtual Environment Path provided.
What are the methods to upload my Django project to cPanel?
You can upload via File Manager by navigating to your application root directory, uploading a .zip file of your project, and extracting it. Alternatively, you can clone from GitHub using the cPanel Terminal or SSH by navigating to your application directory and running ‘git clone [repository-url]’.
How do I install dependencies for my Django project on cPanel?
You can install dependencies via the ‘Setup Python App’ page by editing your application, adding ‘requirements.txt’ in the Configuration files section, and clicking ‘Run Pip Install’. Alternatively, activate the virtual environment in the Terminal using the path from Step 1 and run ‘pip install -r requirements.txt’.
How do I configure the application startup file for Django on cPanel?
In ‘Setup Python App’, edit your application and enter the path to your wsgi.py file (e.g., studybud/wsgi.py) in the Application Startup File section, then save and restart. Alternatively, edit the passenger_wsgi.py file in your project folder to include code that sets the correct path and Django settings module, then restart the application.